Repository Scan Reports
Repository scan reports provide insights on the compliance of different Git repositories containing configuration files.
Onboarding Repositories
Add Git repositories to the Nirmata Control Hub to view scan reports containing misconfiguration information. Git providers like GitHub, GitLab, and BitBucket are supported.
To onboard a repository with Nirmata:
- Go to Menu>Repositories. The repositories page with the listed scanned repositories is displayed. The page shows the repository names, their last scanned status, the branches available within them, the type, and the number of files present within the repositories.
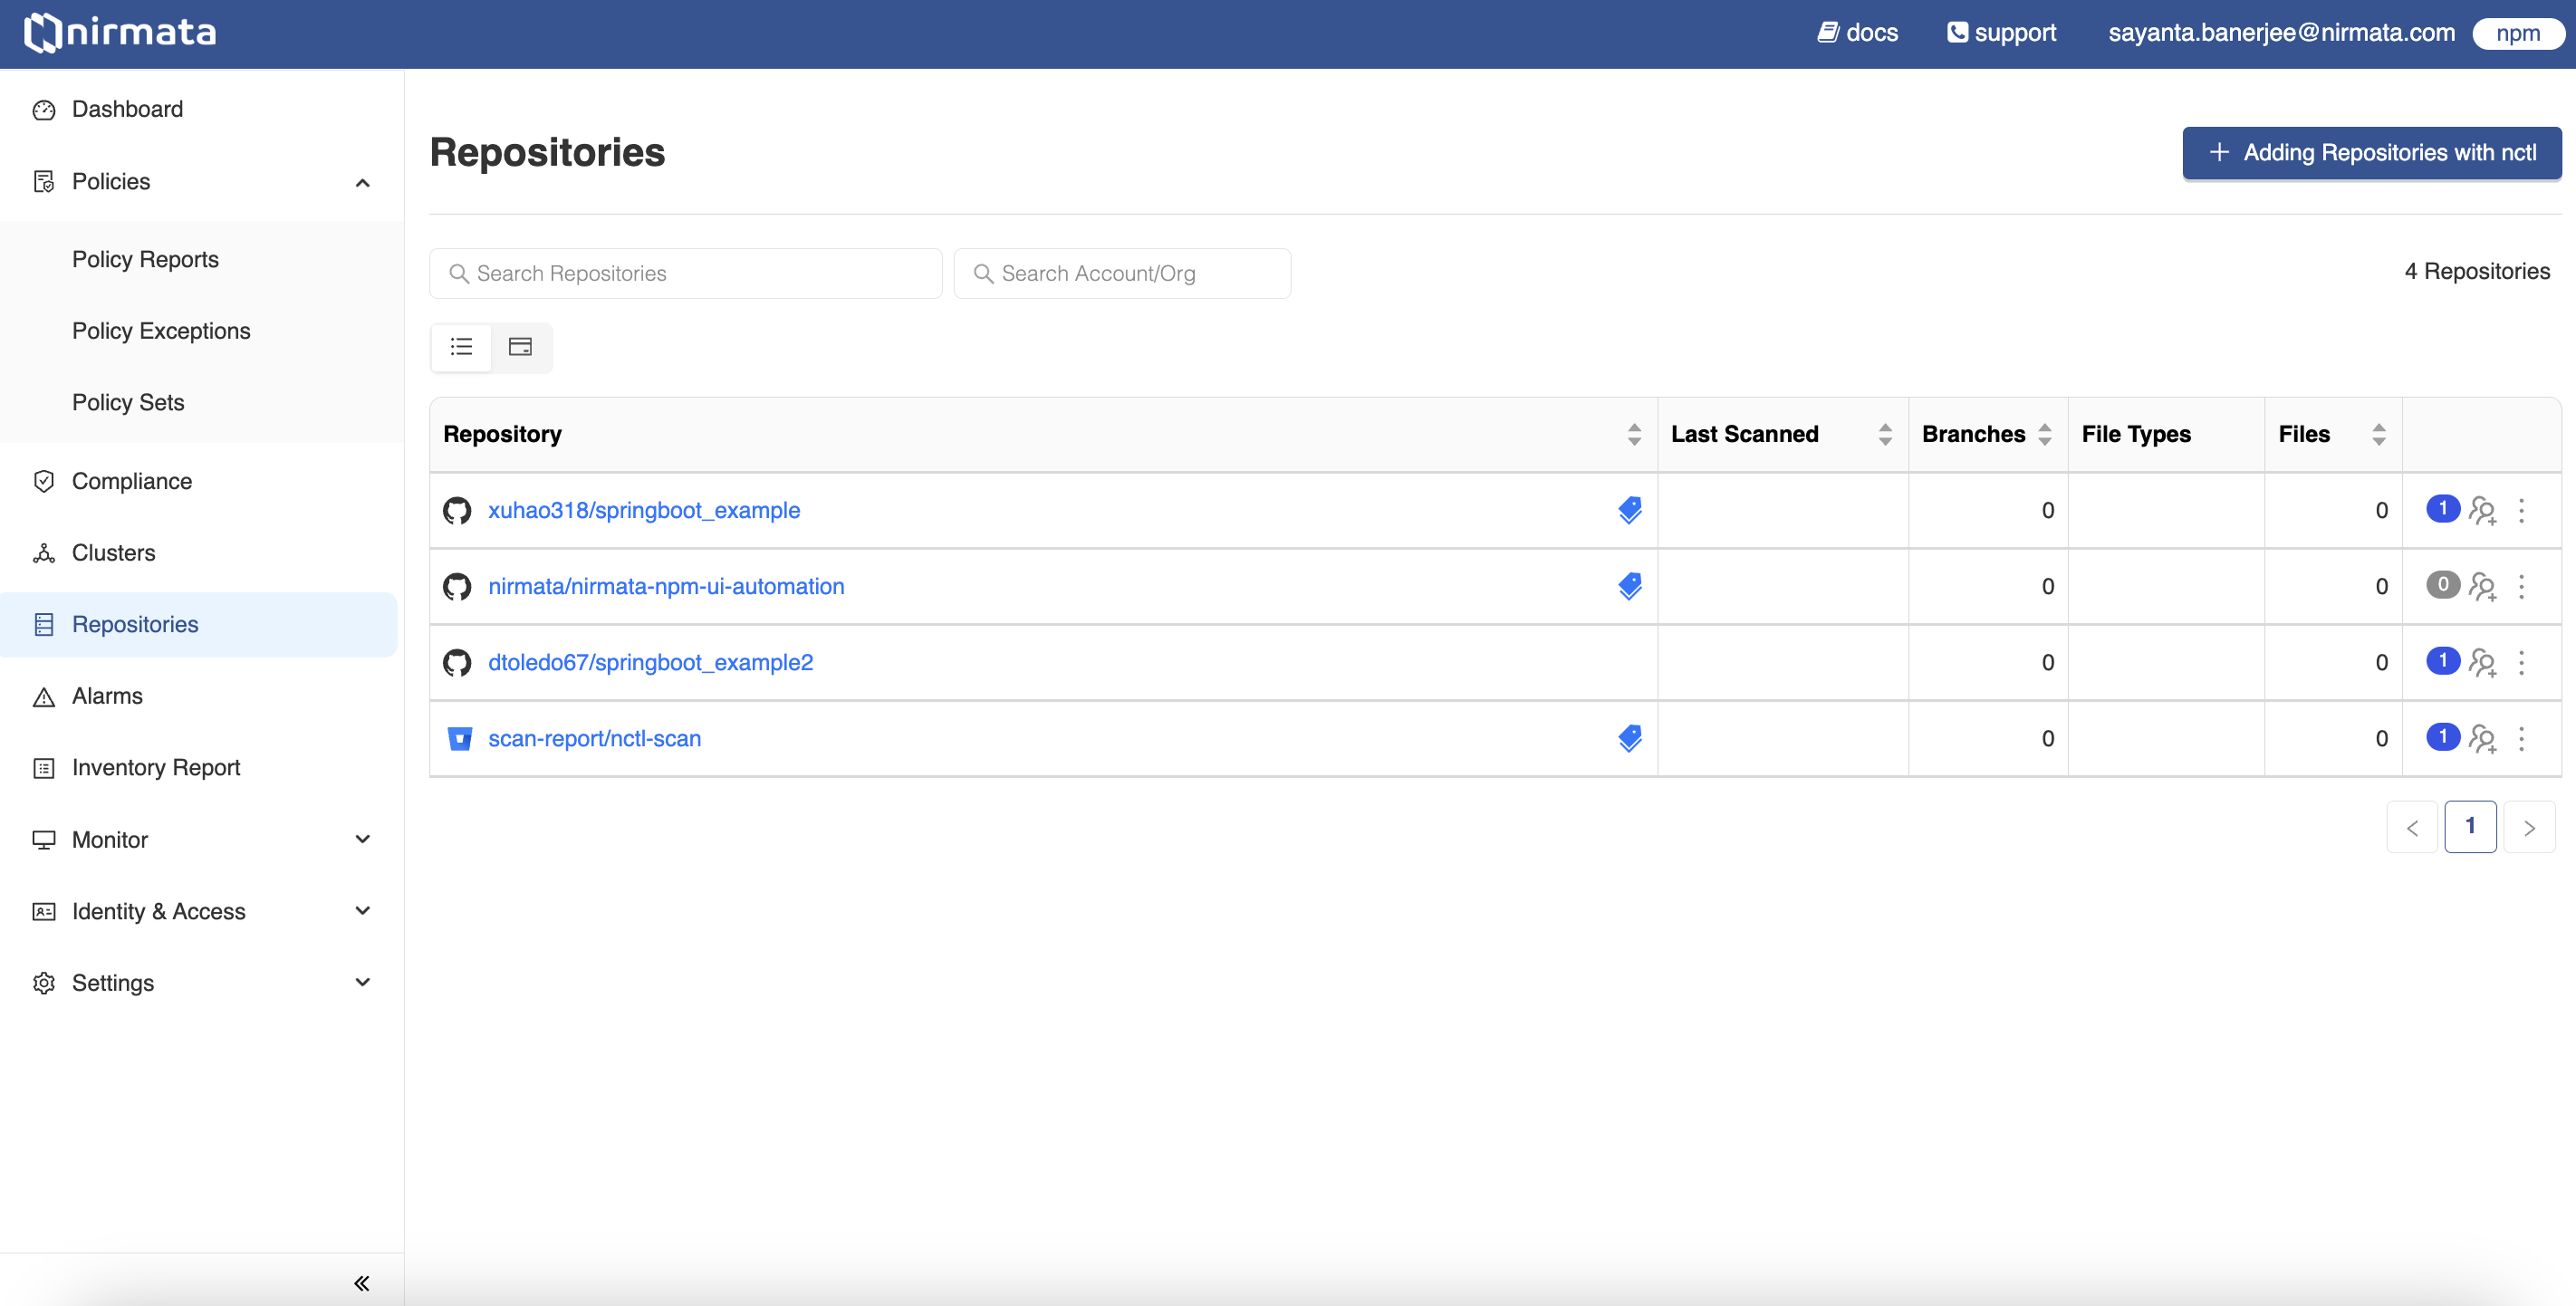
- Click on the
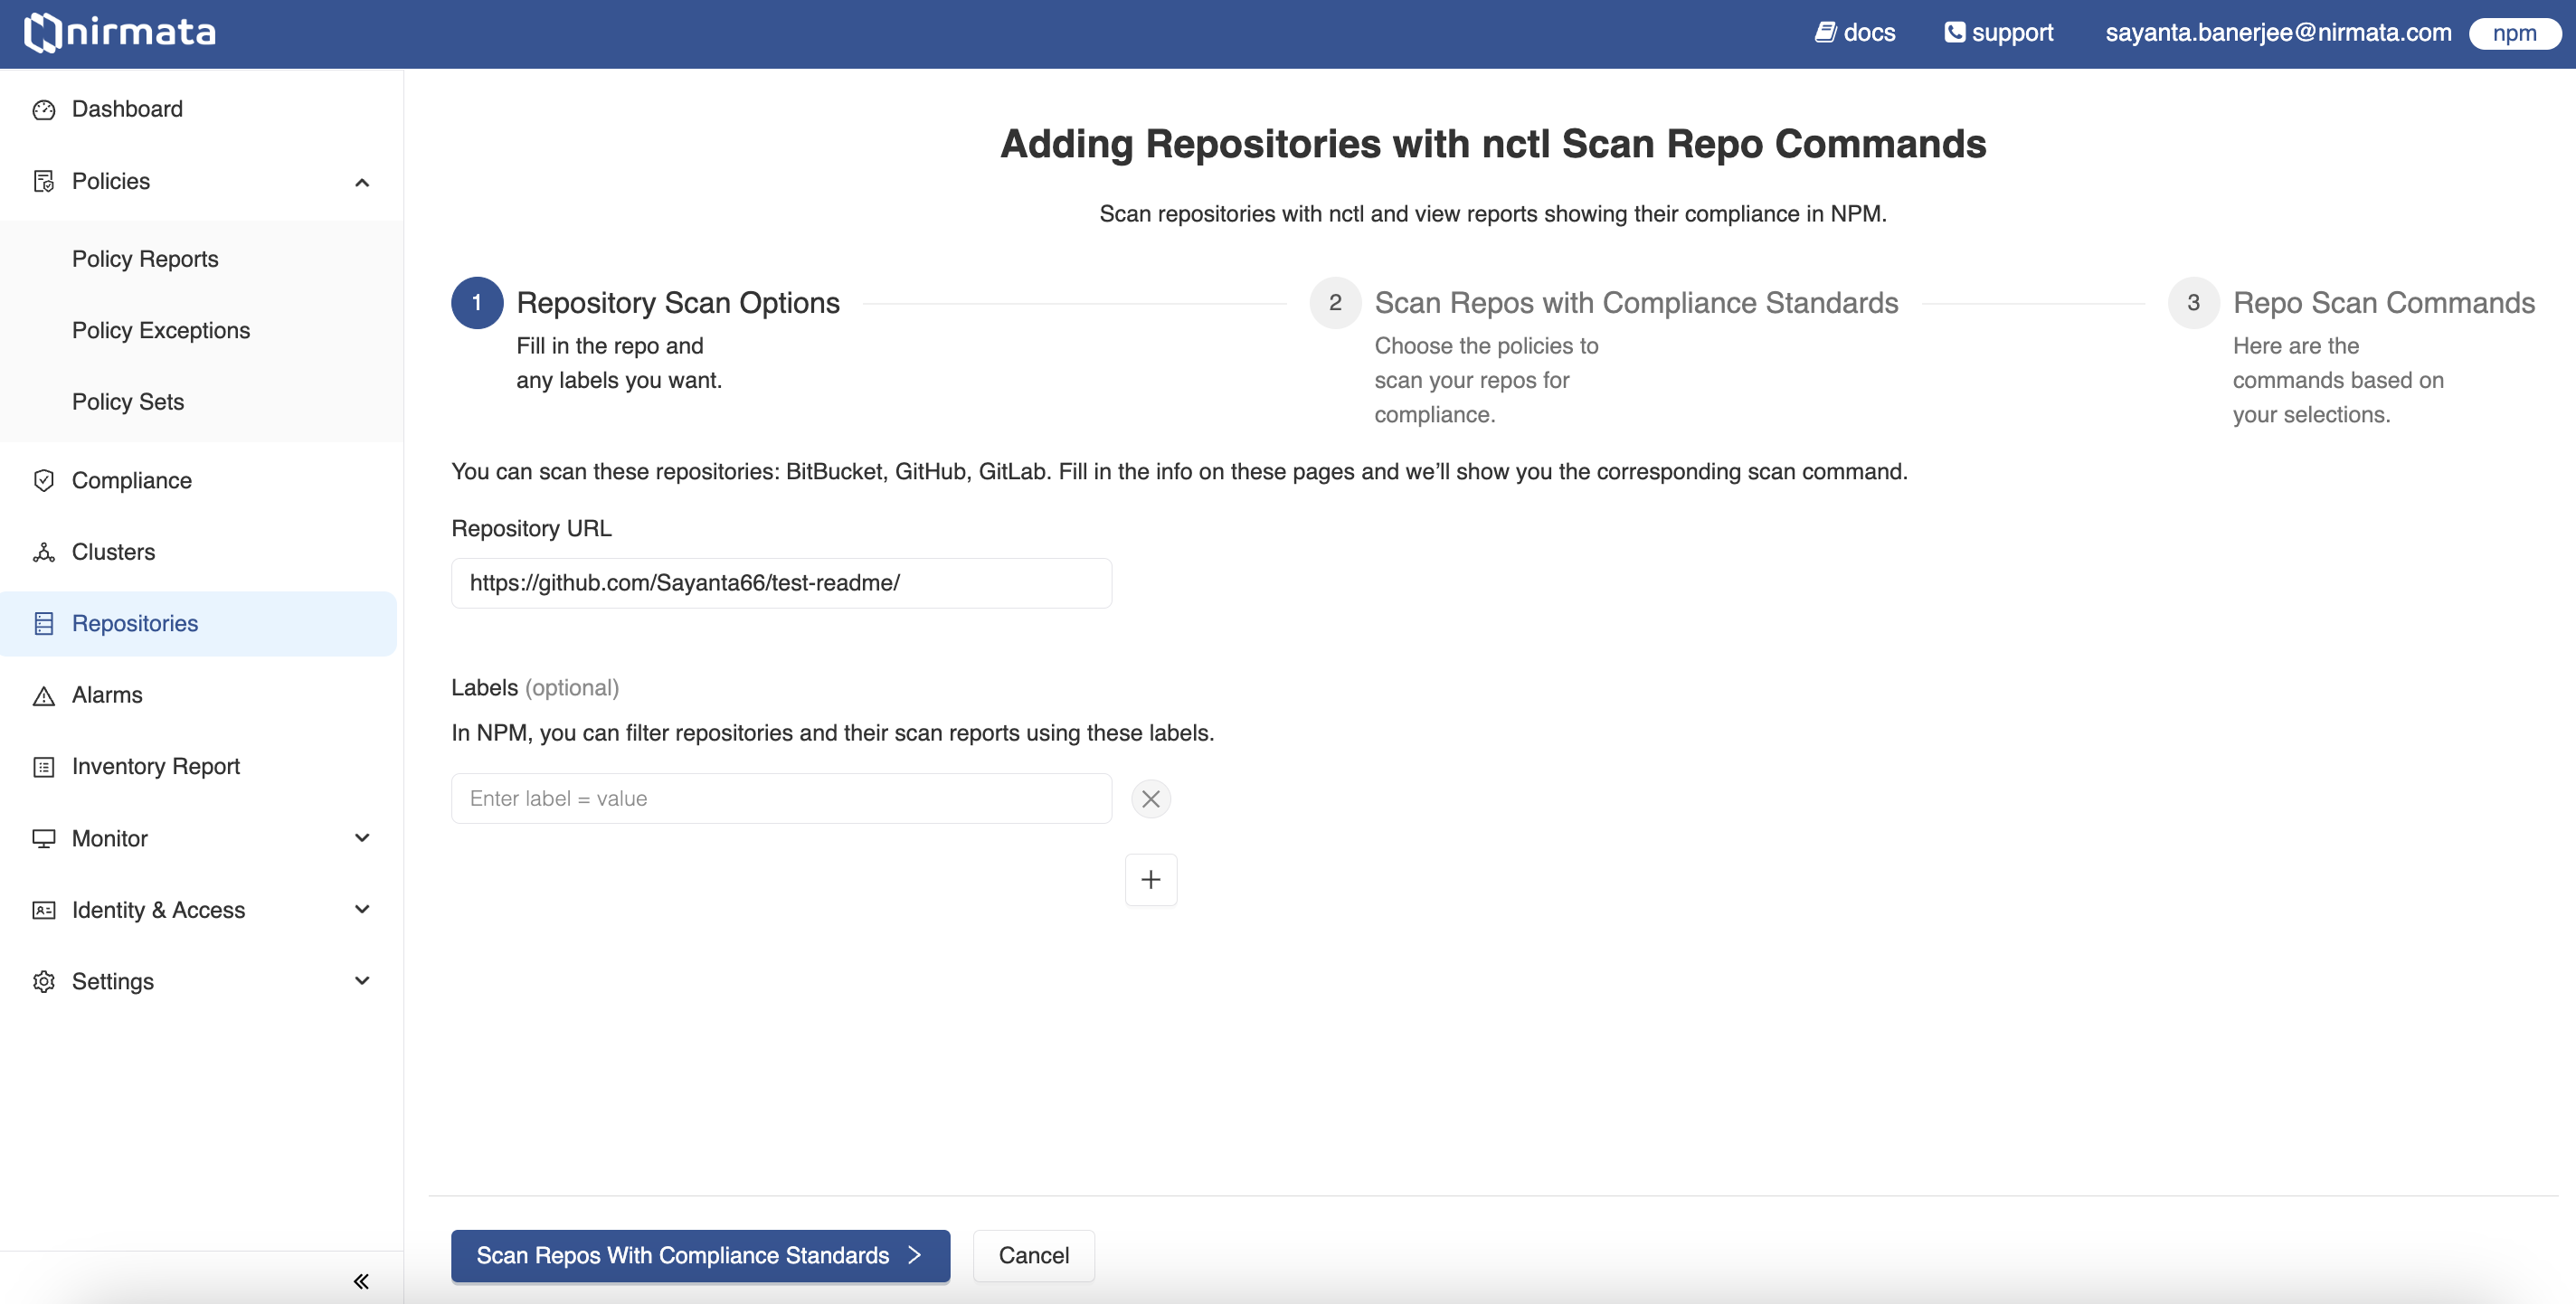
Adding Repositories with nctlbutton located on the right hand top corner of the screen. It will display the repositories onboarding page. This workflow requiresnctl. Refer to the documentation for installation. - The repositories onboarding page requires the repository details. Enter the URL of the repository to be scanned under
Repository URLand labels underLabels. Labels are optional but it should be entered as a key-value pair. Click on the+button to add multiple labels. - After entering the repository details, scroll down to click on the
Scan Repos with Compliance Standardsbutton to proceed to the next step.
- Select the Nirmata curated policies with which the repository needs to be scanned by clicking on the toggle switch beside them. The set of policies are grouped under
Kubernetes,Dockerfile, andTerraform. Click on each of them to see further profiling of policies and select the ones based on the needs. - The repository can be scanned with custom policies as well. In that case, enter the policy repository URL beside
Policy file or directory.
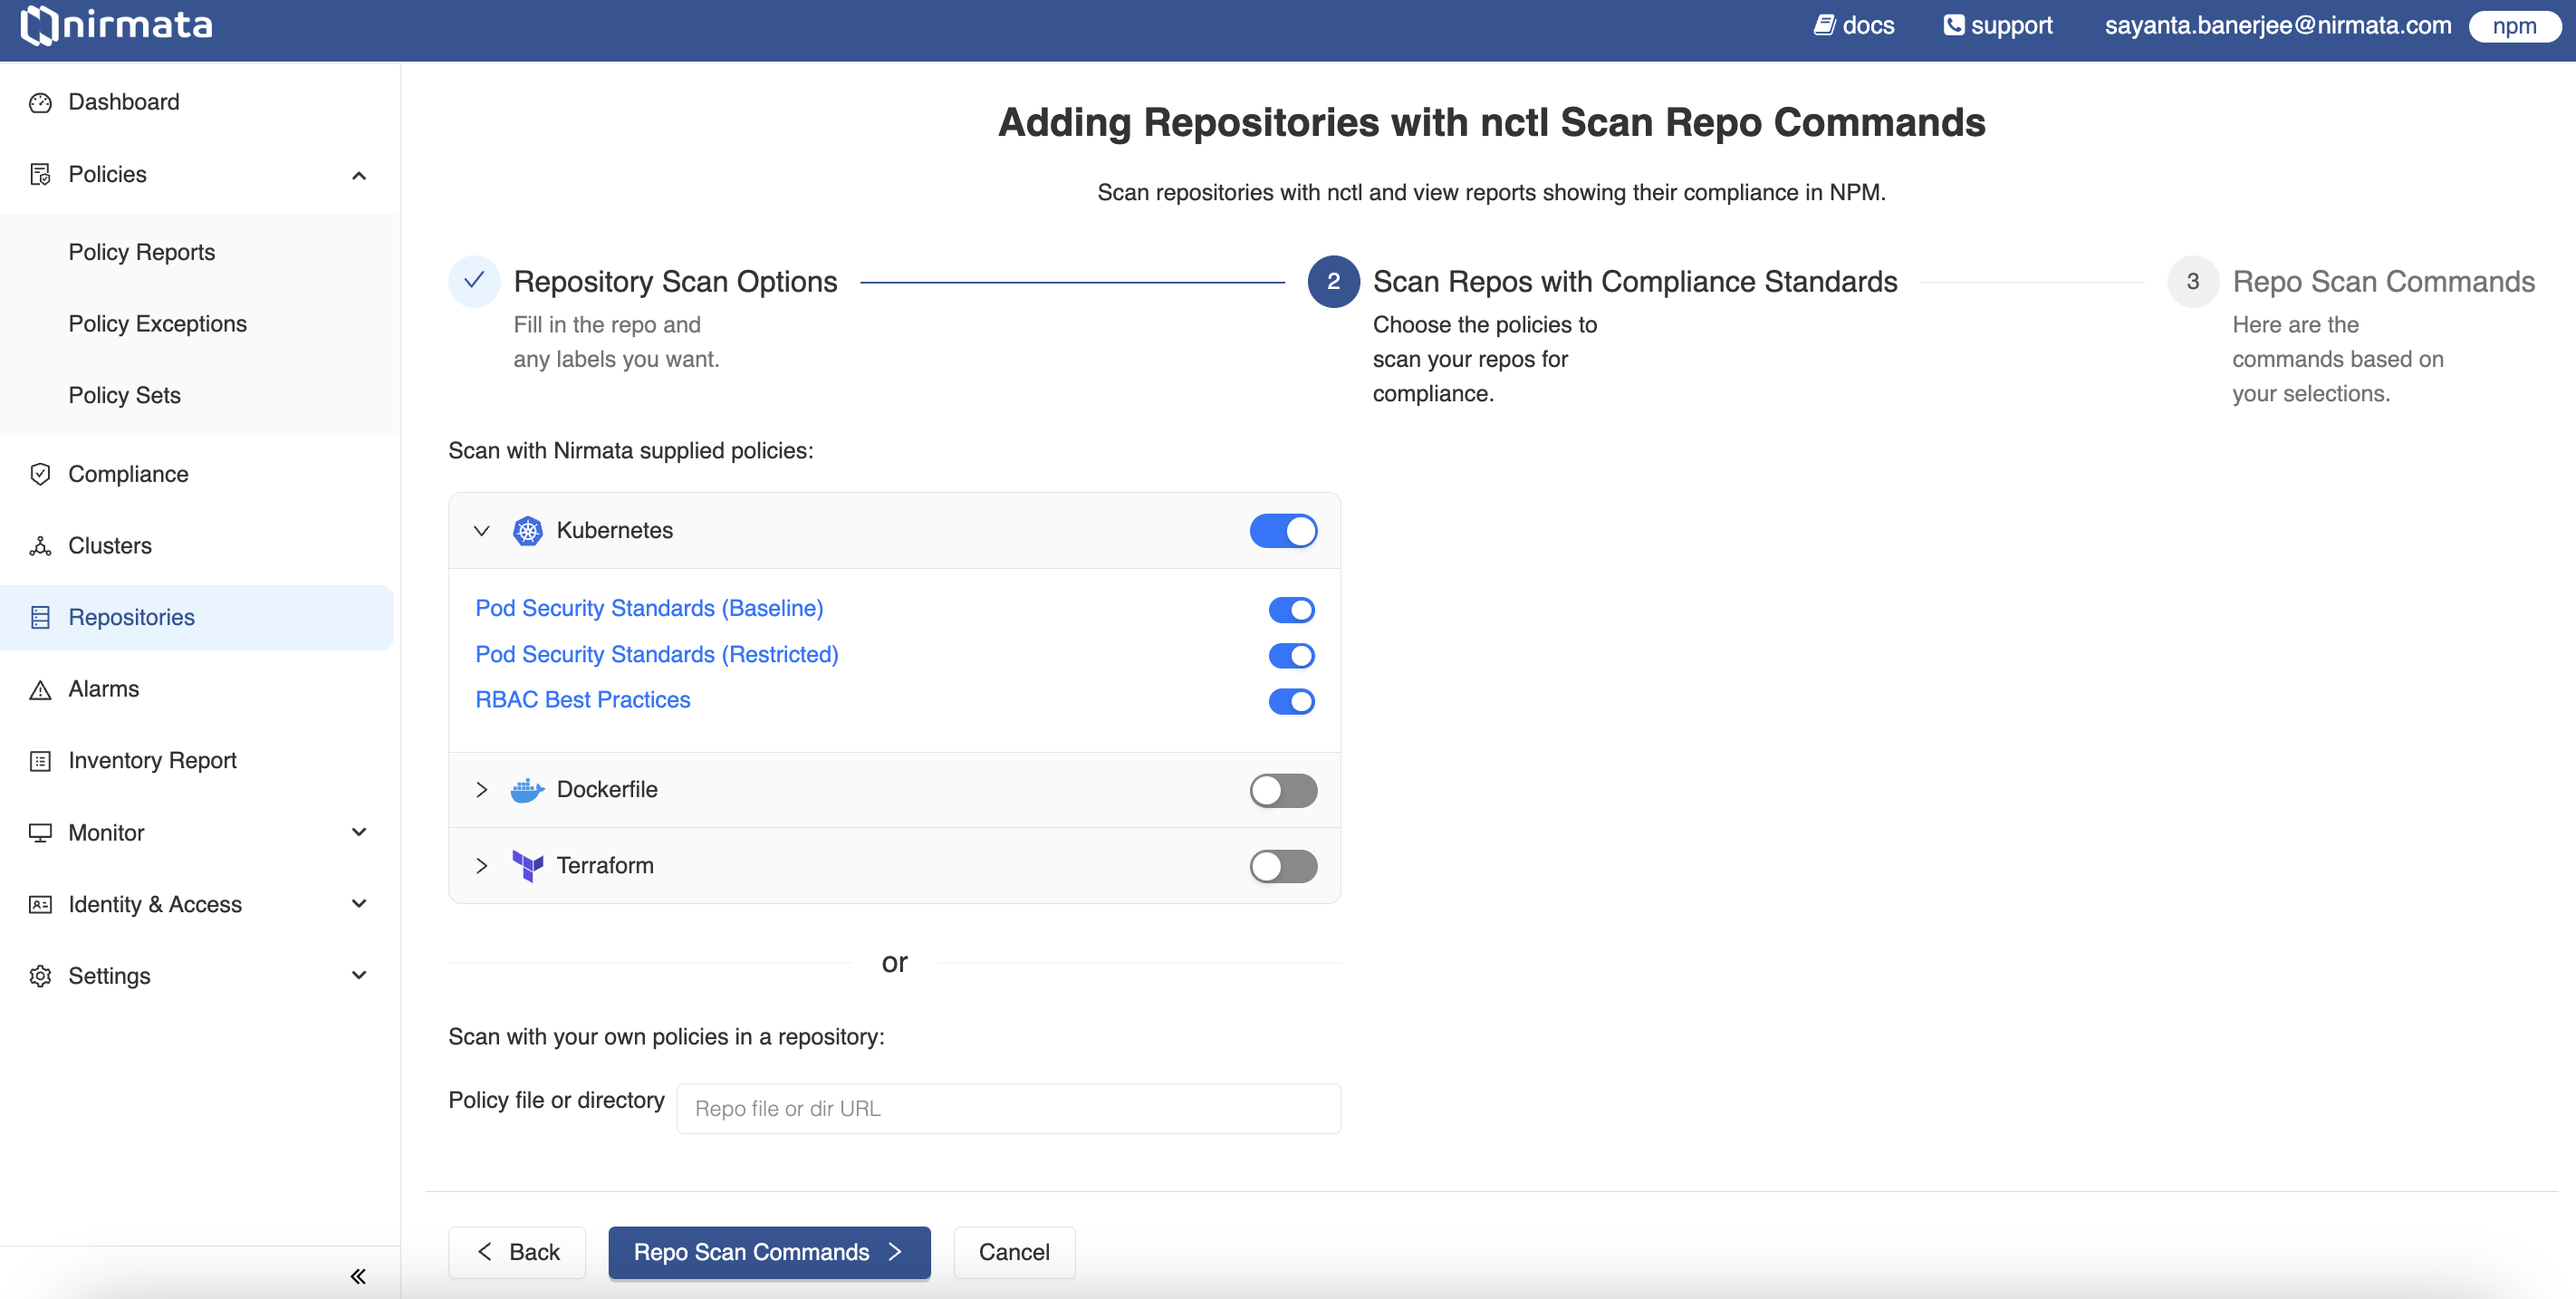
- After selecting the polices for scanning, click on the
Repo Scan Commandsbutton to proceed to the final step. - The
nctlcommands required to scan the repository are shown in the final step based on the selection. Copy and run the commands in the shell/terminal to perform the repository scan and publish the reports to NCH.
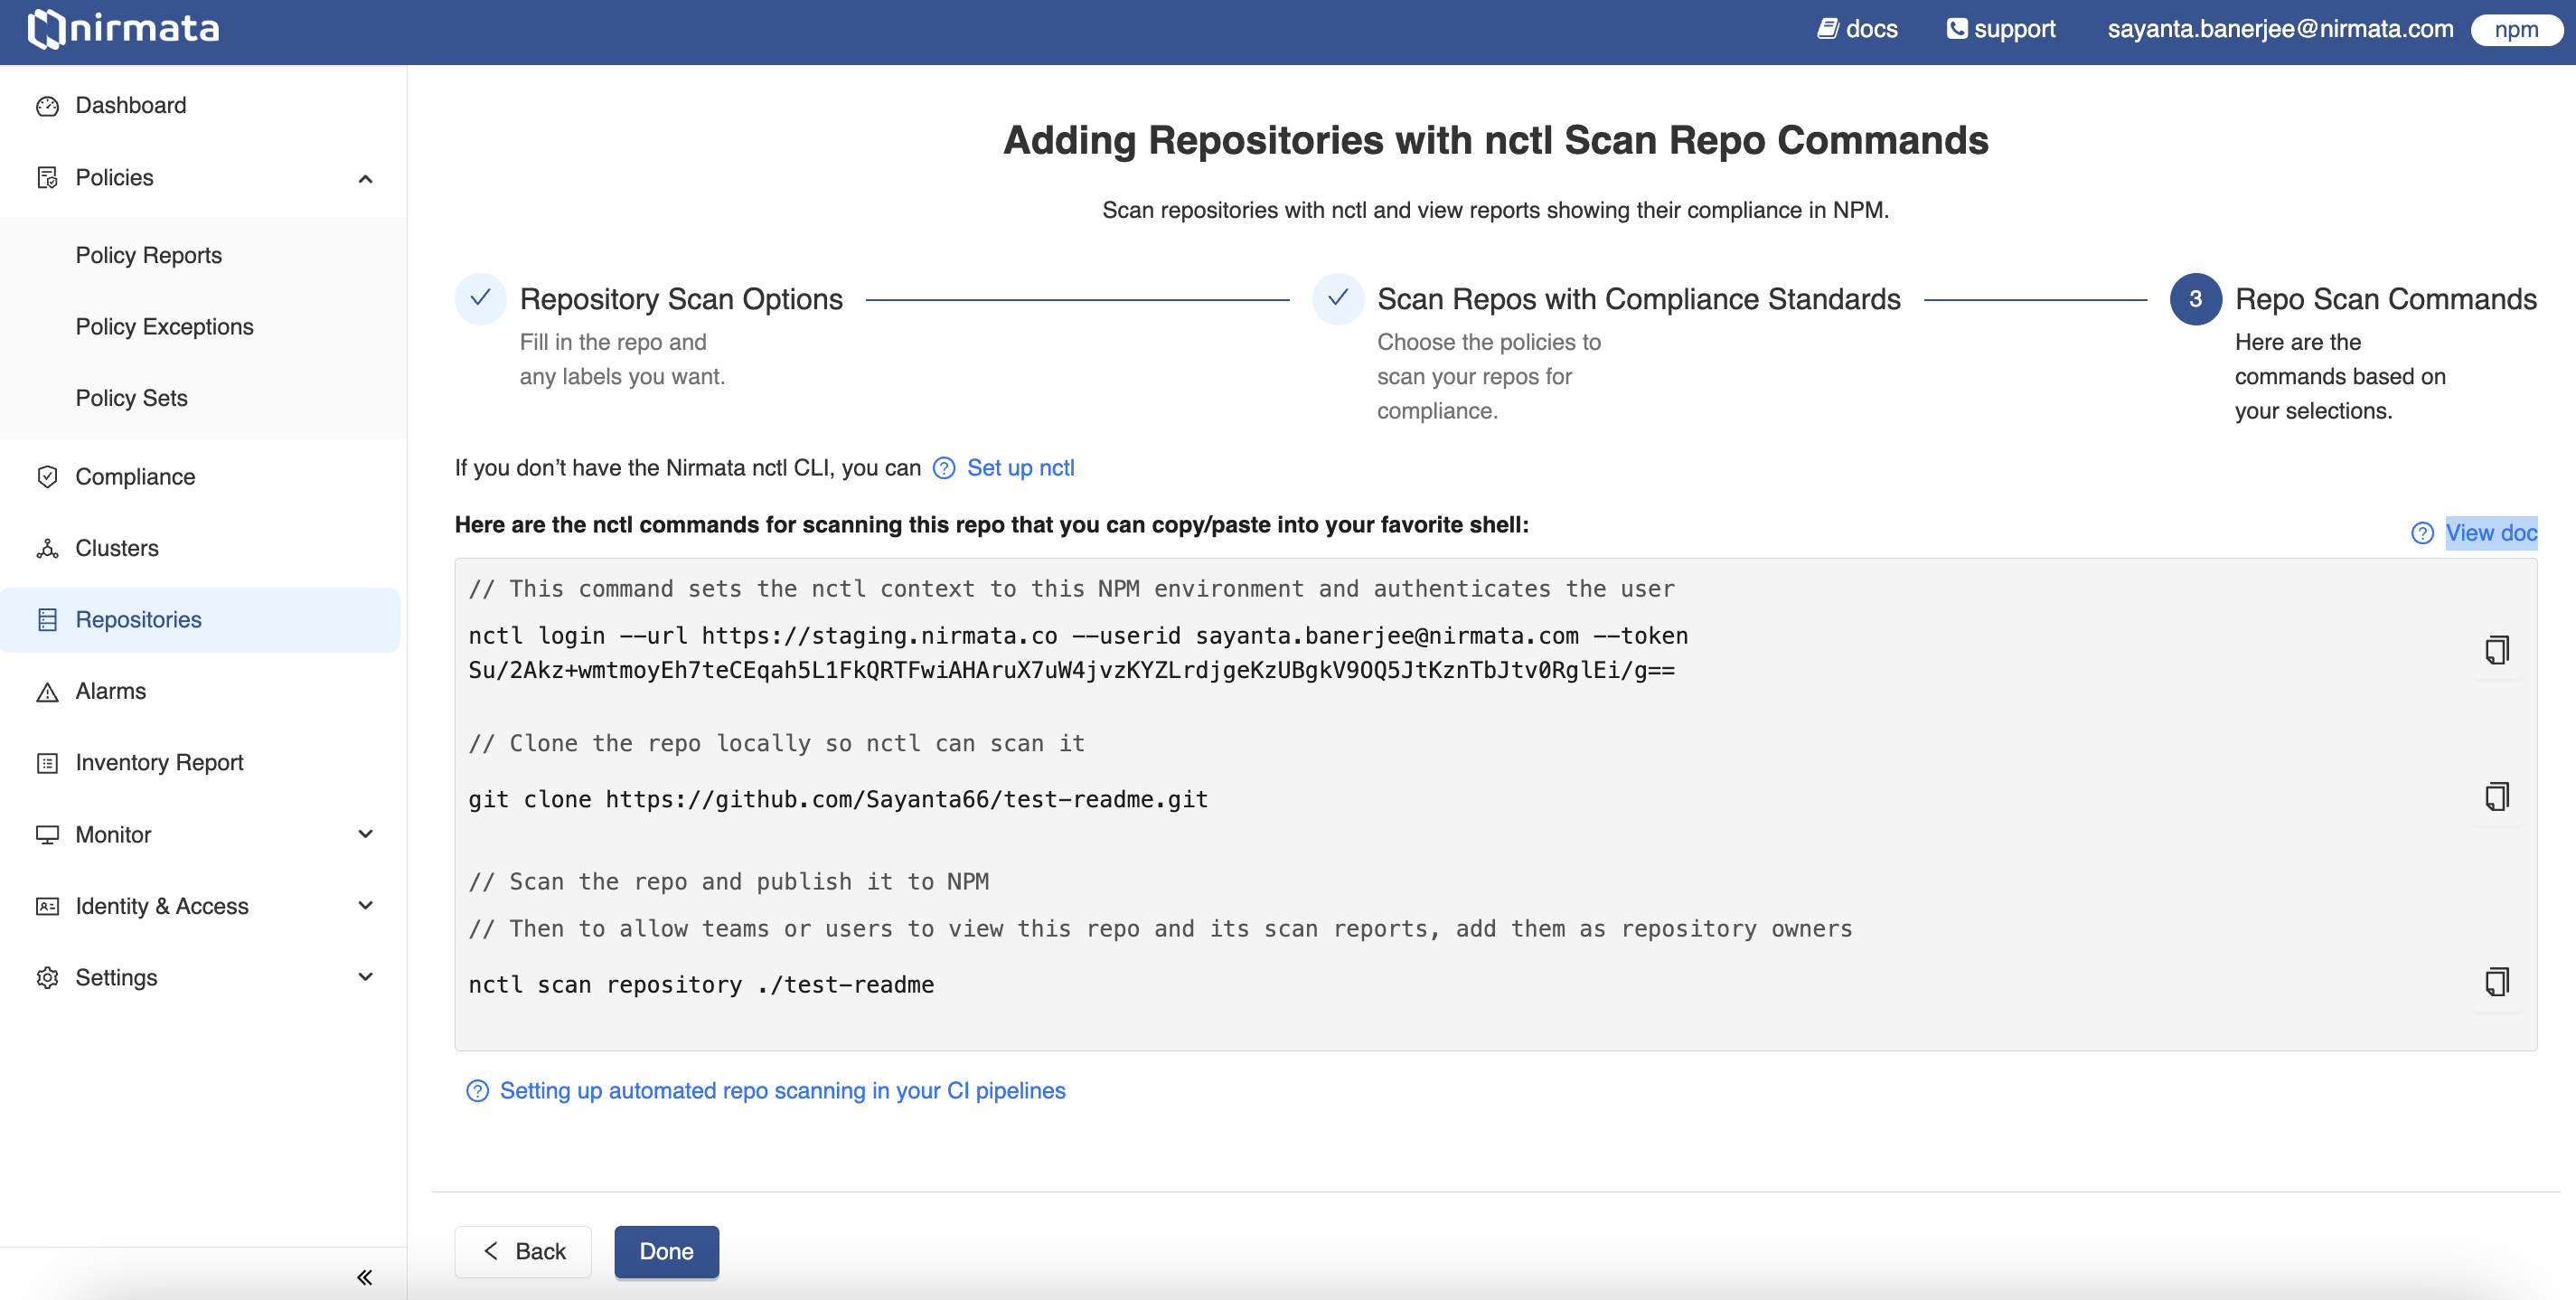
Note: While using the
nctl logincommand, if the token is not auto generated, visit the Profile page and click onGenerate API Keybutton to generate the token.
- After successfully running the commands, click on the
Donebutton to complete the onboarding process. The onboarded repository will now be listed on the Repositories page.
Publishing Repository Scan Results to NCH via the CLI
Admin User
Login to the NCH tenant with the user’s API Key.
nctl login --url https://nirmata.io --userid admin@acme.corp --token <admin-api-key>
Clone the repository locally.
git clone https://github.com/nirmata/nctl-shift-left
Run the repo scan command
nctl scan repository ./nctl-shift-left --policy-sets pss-baseline
DevOps User
Login to the NCH tenant with the user’s API Key.
nctl login --url https://nirmata.io --userid user@acme.corp --token <user-api-key>
Clone the repository locally.
git clone https://github.com/nirmata/nctl-shift-left
NOTE: A DevOps user can publish scan reports to NCH only if they belong to a team that has permission to publish scan results. Please contact an Admin user for granting permission.
Run the repo scan command
nctl scan repository ./nctl-shift-left --policy-sets pss-baseline --publish-token <team-repo-publish-key>
NOTE: All users belonging to the team will be able to view the repository scan results.
Publishing Repository Scan Results to NCH via CI Pipelines
To scan repositories and publish report to NCH via CI pipelines, refer to the Workflows section.
Viewing Repository Scan Reports in NCH
To view the scan reports:
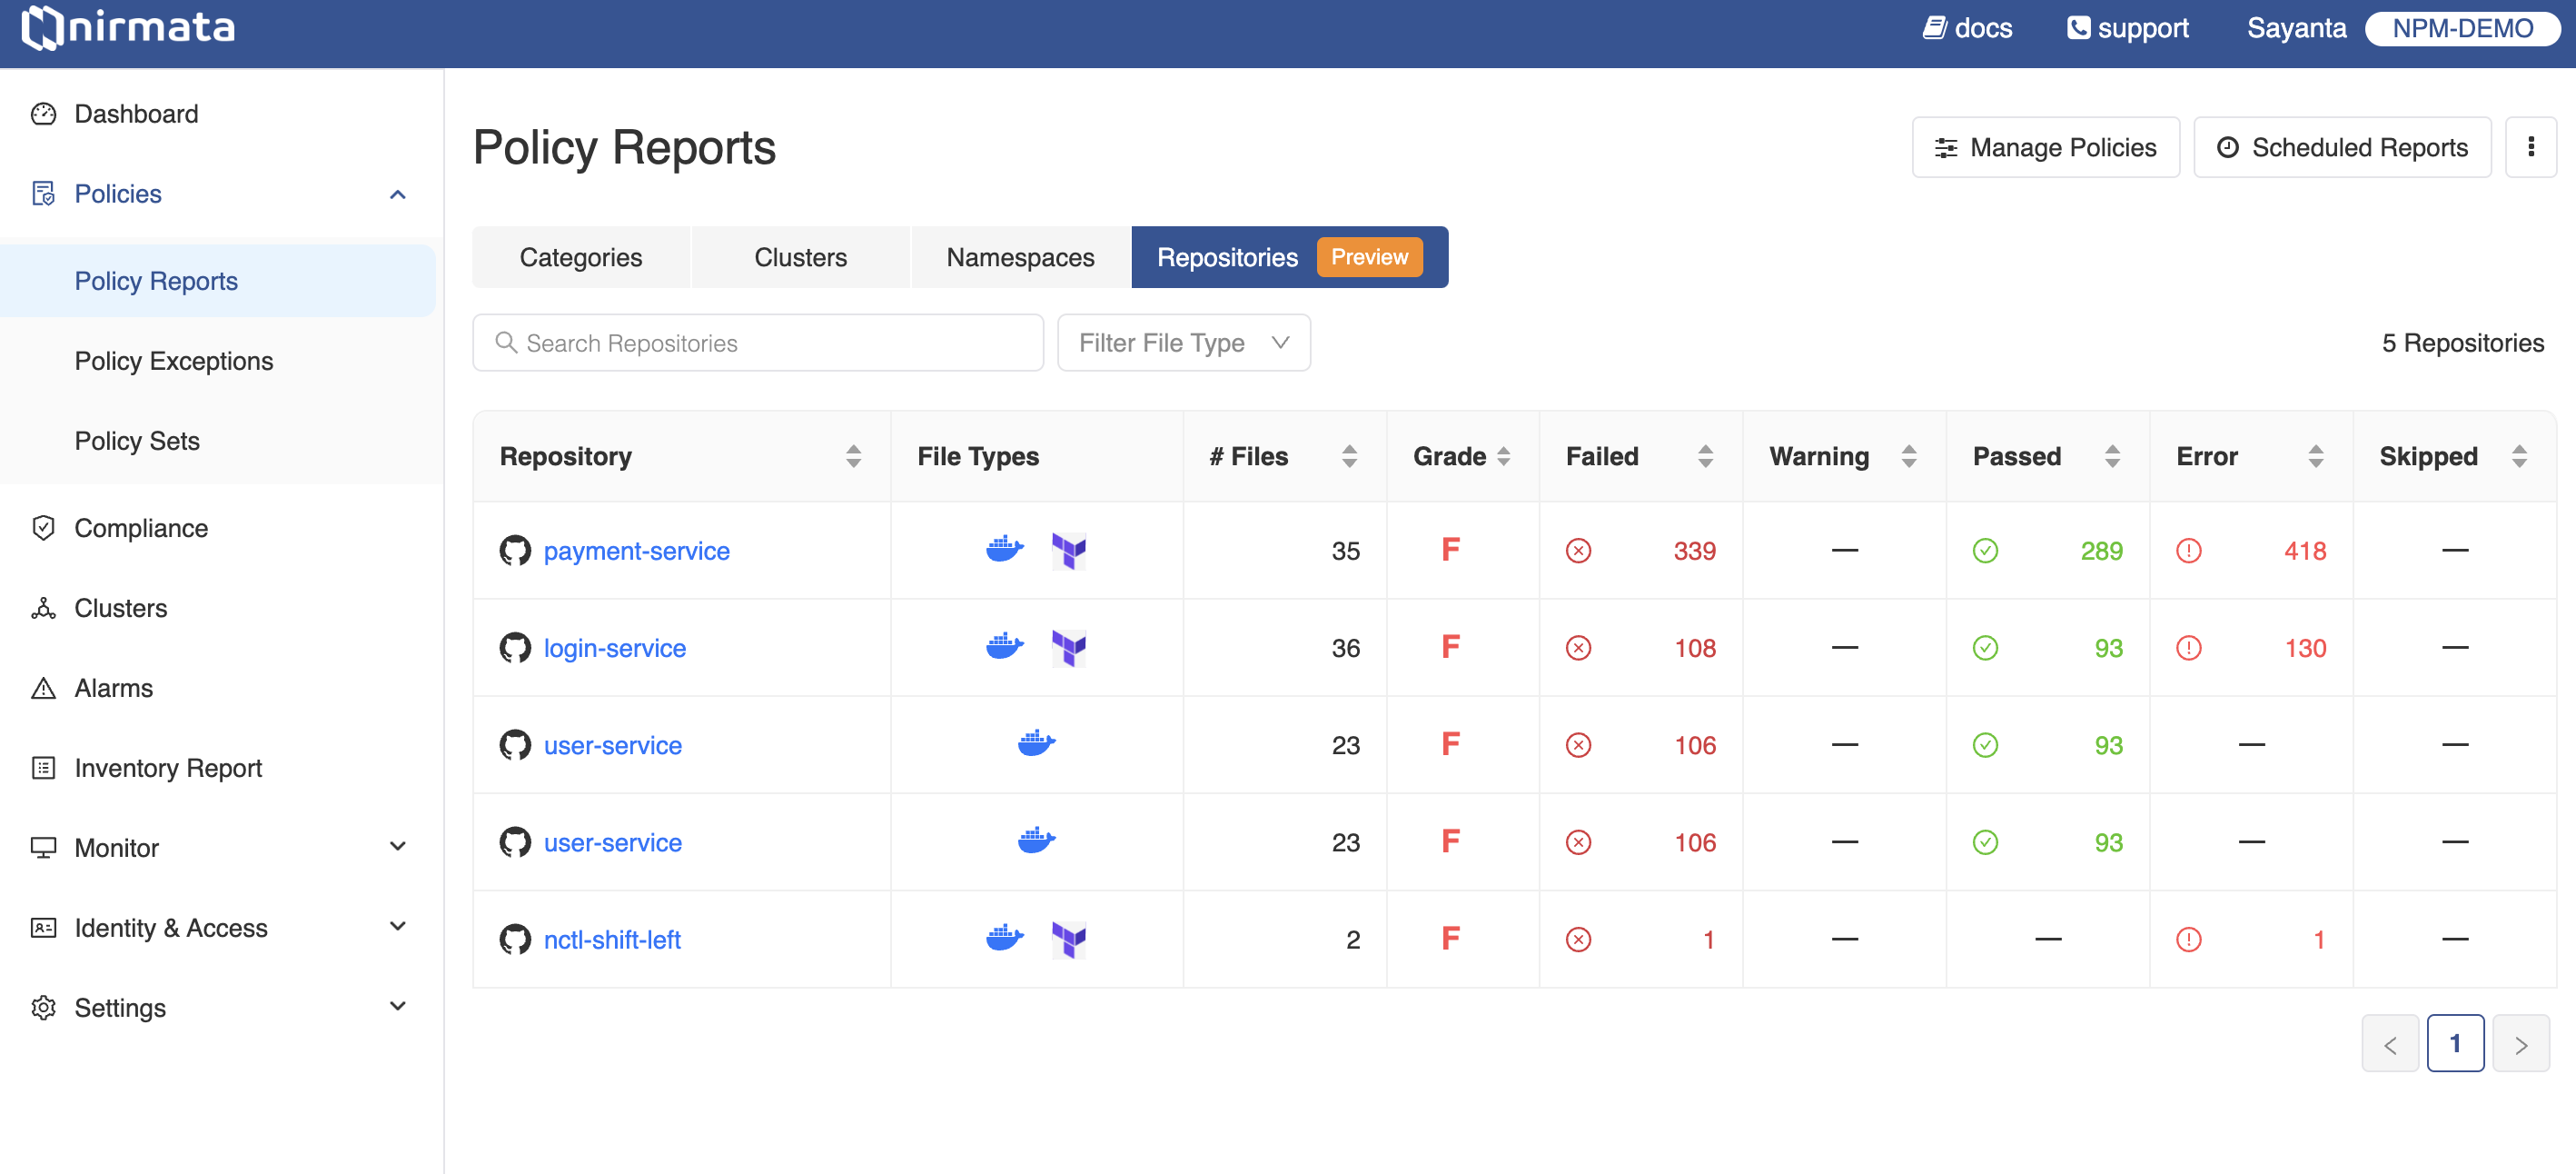
- Go to Policies>Policy Reports. The Policy Reports can be viewed based on Categories, Clusters, Namespaces, and Repositories.
- Click on the Repositories tab to get a list of the available repositories. The information related to the repositories are displayed with the type and number of files present within, the grade obtained, and the status of the repository with the number of Failed, Warning, Passed, Error, and Skipped.
- Click on any of the repositories to view the list of findings under the Findings tab. The findings are displayed with information related to Impact (File Types and # of Files), and Status (% Pass or Fail). The page also shows the repository status with the overall grade, % Pass, and % Fail.
- To view the findings on different available branches of the repository, change the branch by clicking on the
All Branchestab at the top of the screen. Filter the violations by severity by clicking on theSeveritytab located beside the search bar. Click on theFilter File Typetab to filter by the type of file with which the violation is associated.
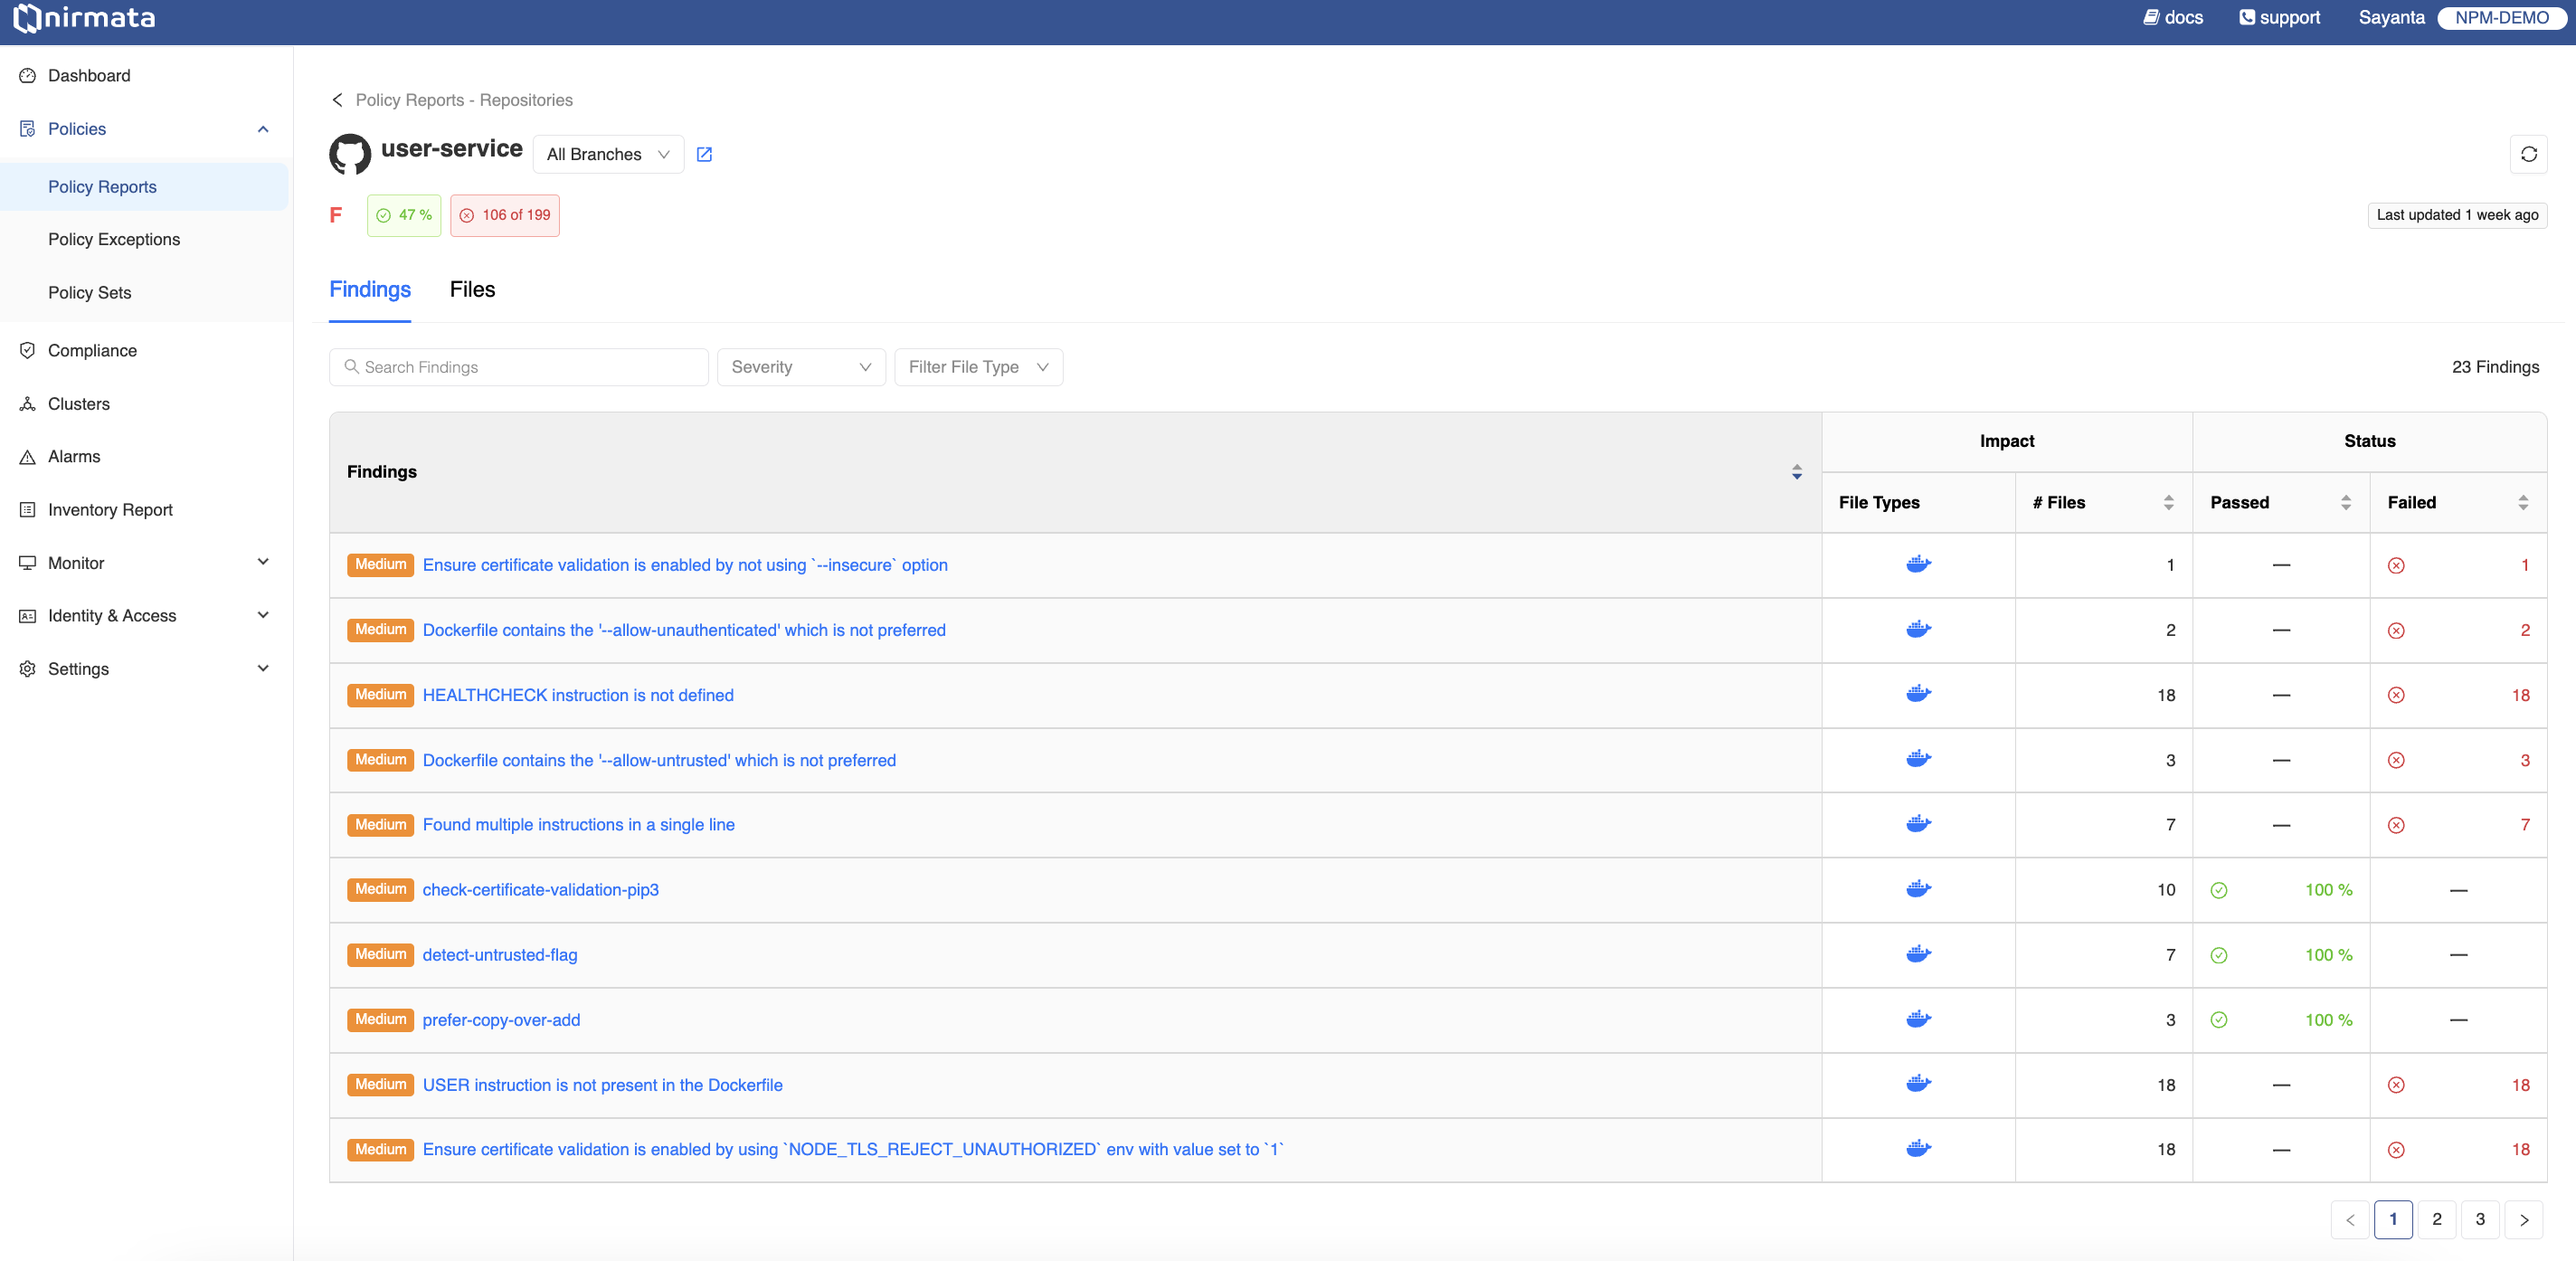
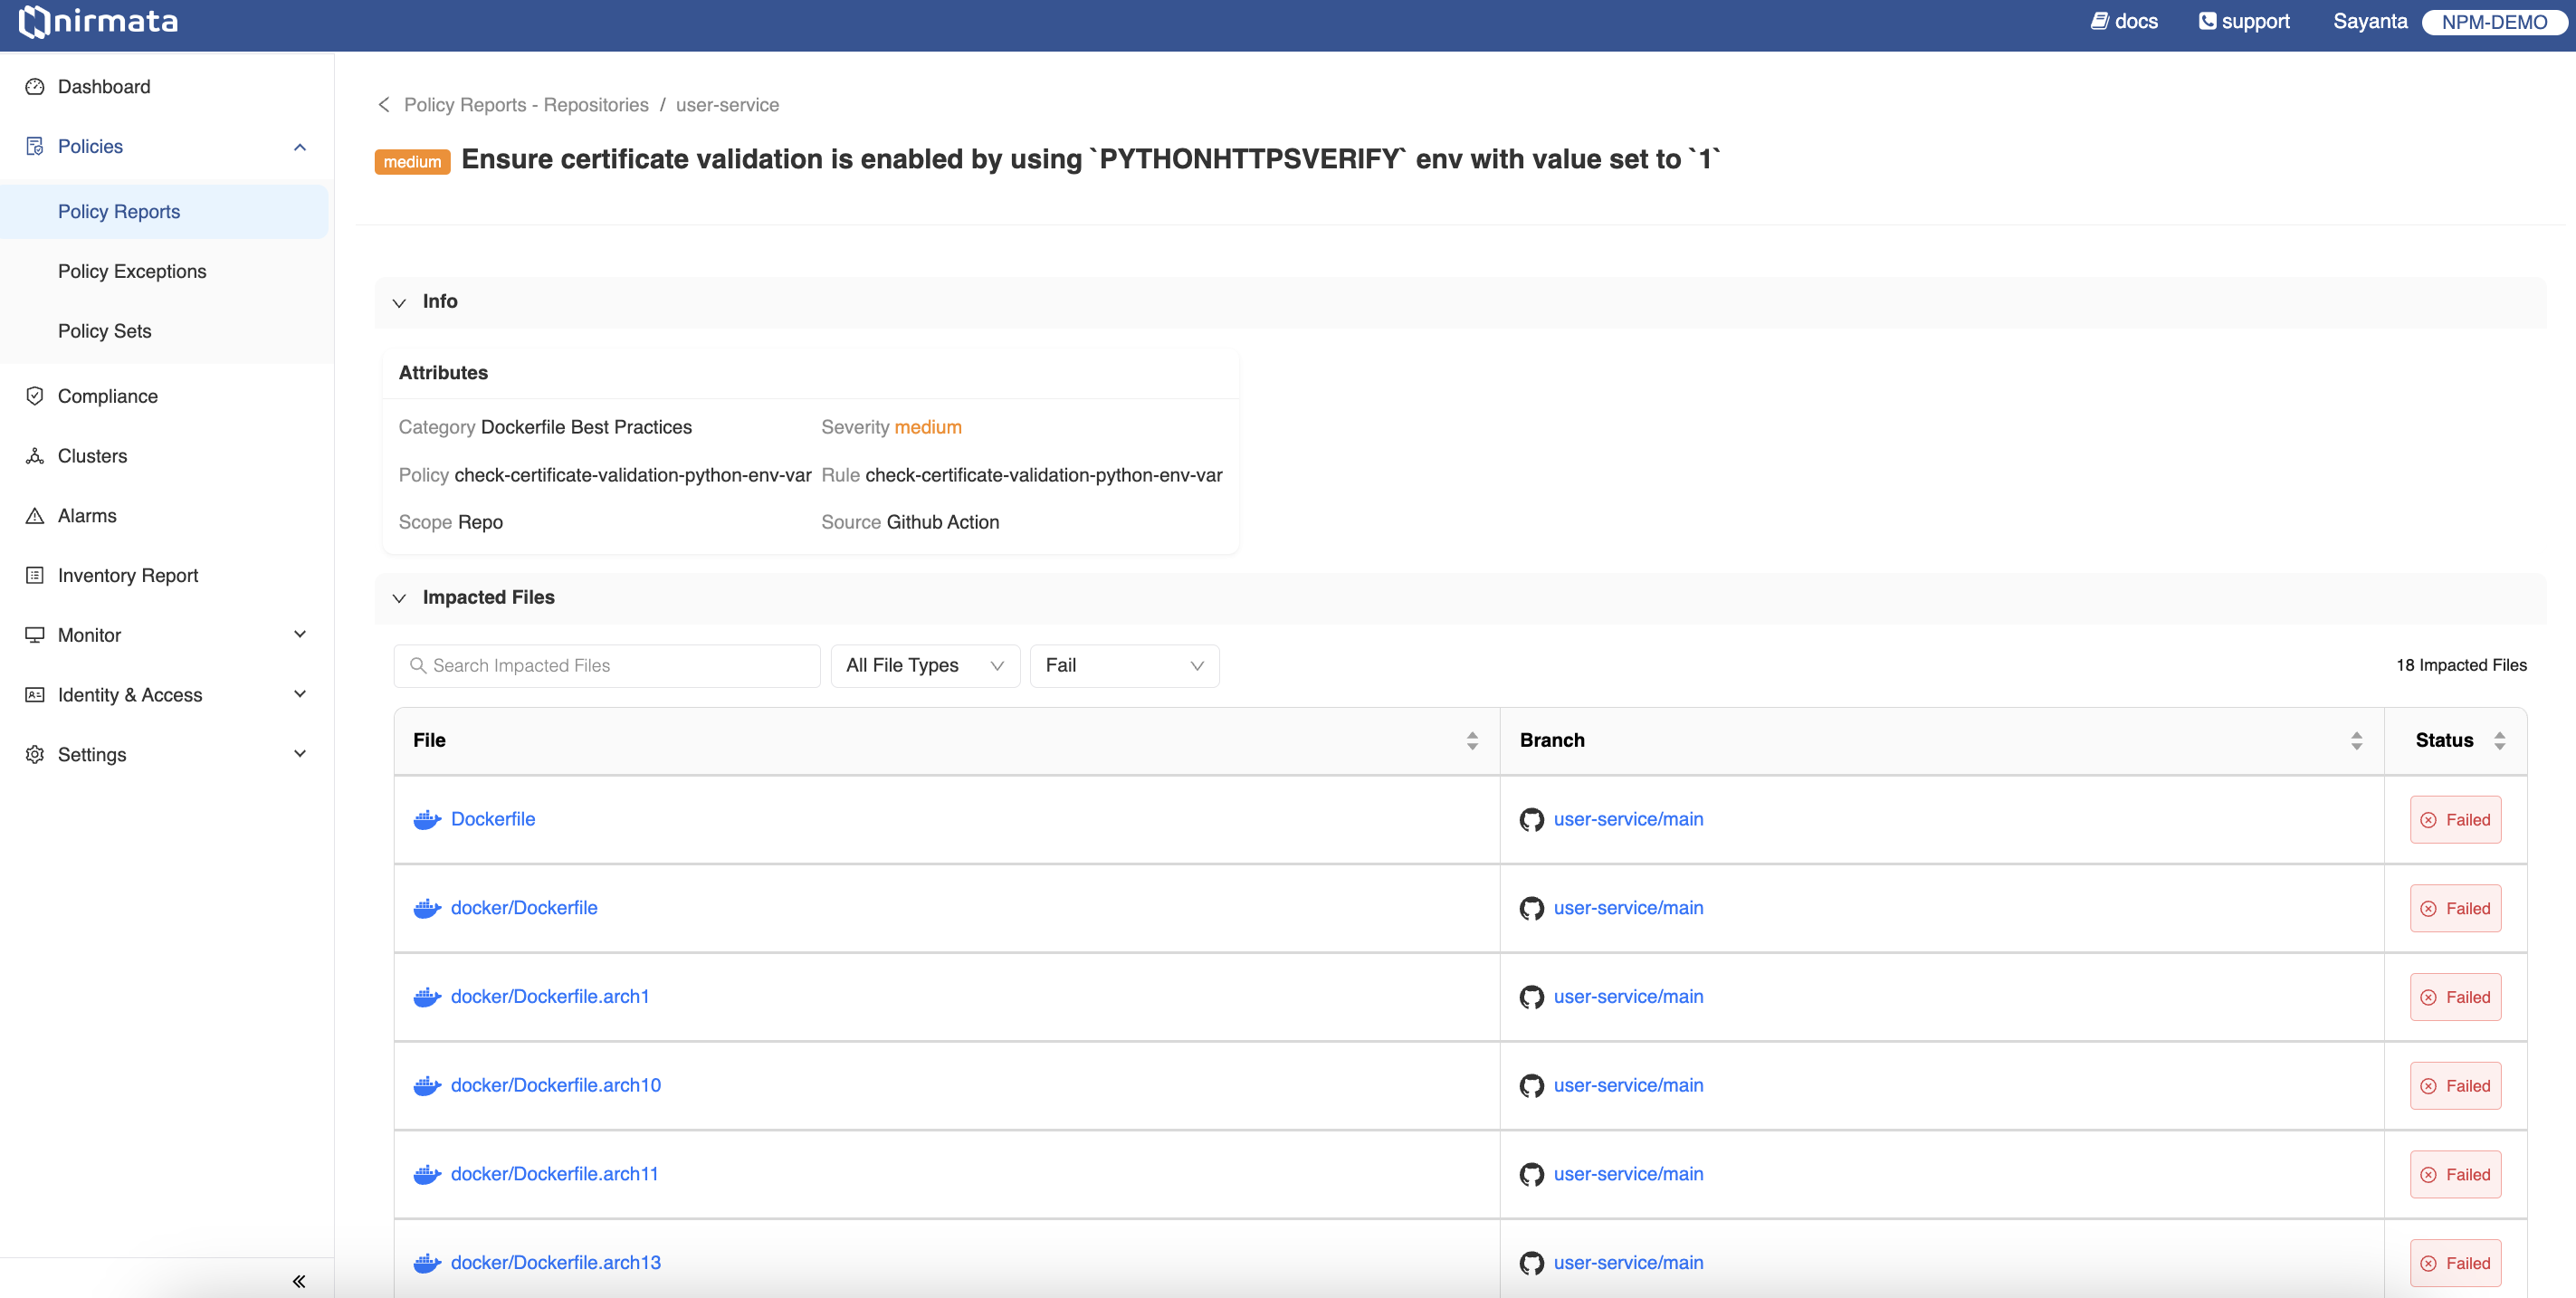
- Now, click on any of the findings to view the details of the finding. The details contain violation and policy information as the policy name, rule name, severity of the violation, and other metadata. The page also lists the impacted files associated with the violation, their branch name, and status.
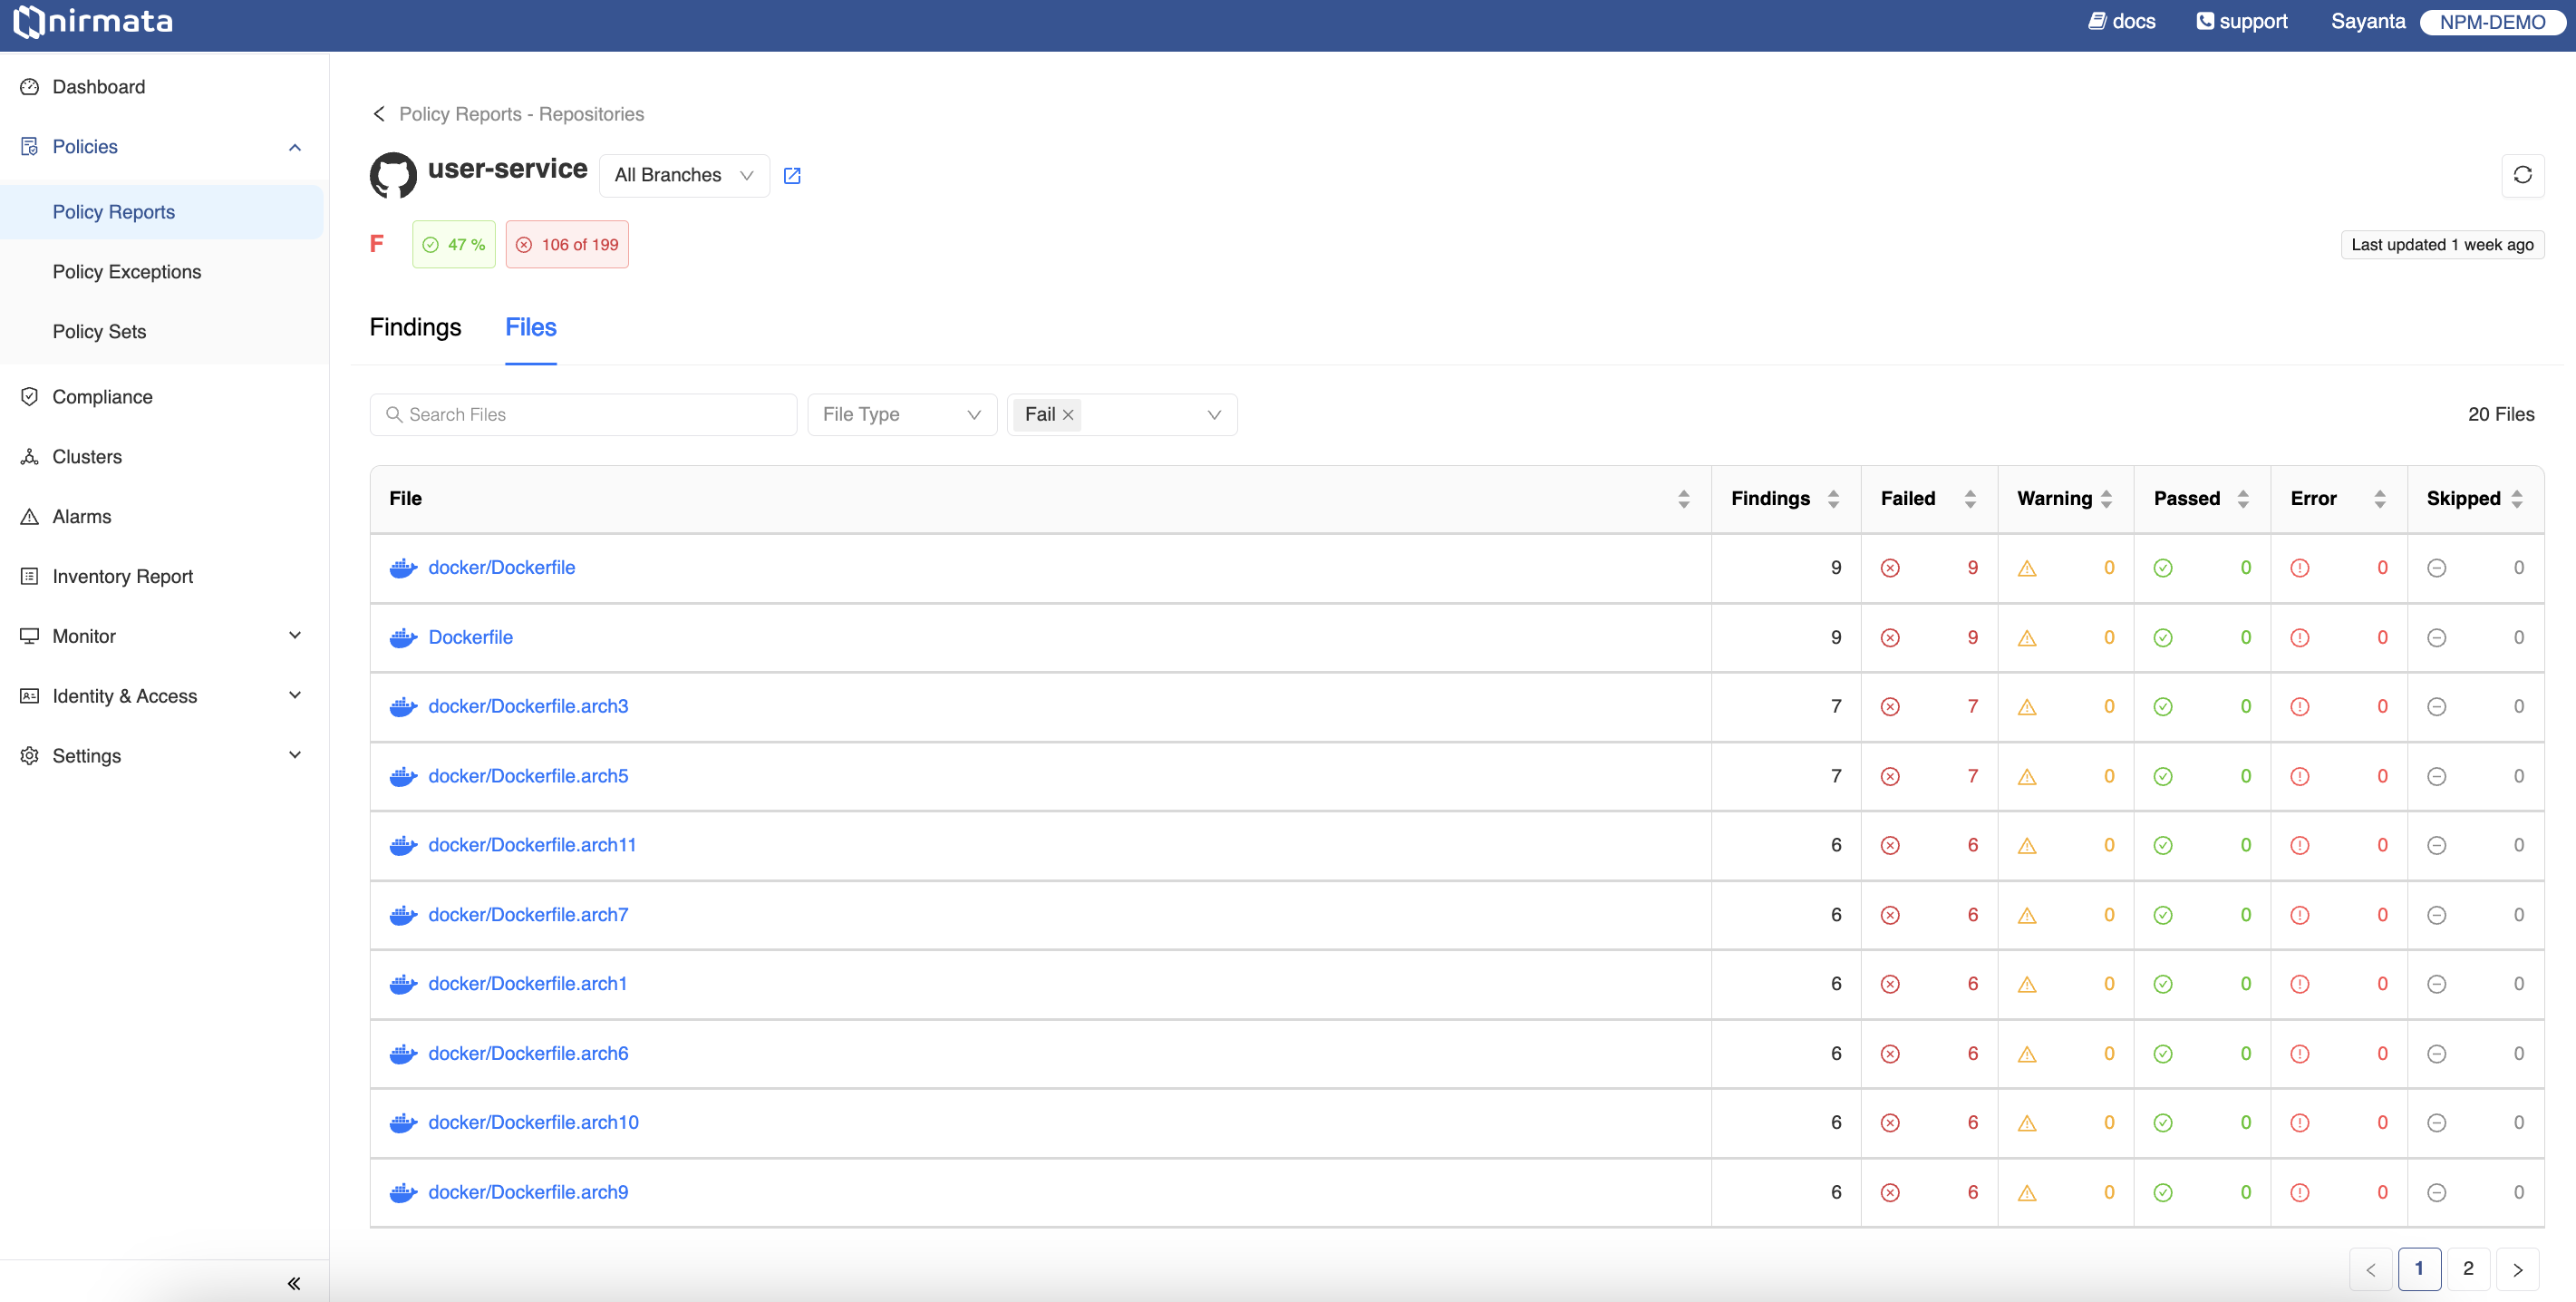
- Go back to the previous page and click on the Files tab to view the list of impacted files. The files are listed with information detailing the Status of the file with Failed, Warning, Passed, Error, and Skip and the number of violations that has impacted the file. The files can be viewed in different branches of the repository and can be filtered according to the type and status of the file.
Adding Ownership to Repositories
A team or a user can be added to a repository as an owner to get access to the repository scan reports.
To add a user or a Team as an owner to a repository:
- Go to Menu>Repositories. The page lists the scanned repositories and the information related to them. At the end of each row displaying information about a scanned repository, the button for editing owners to the repository is present.
- Click on the button with the
+sign on the far right hand side of the row to open the dialog box for adding and editing Users/Teams to a particular repository. - Select
Add UsersorAdd Teamsfrom the dropdown depending on the preference. - Next, select the User or Team to be selected as owner from the list of Users or Teams available in the dropdown.
- Then, click on the
+button to add that User or Team as the owner of that repository. - Finally, click Save.

Note: By default, an Admin user has access to all repositories. Only an Admin user can add other users/teams as repository owners.
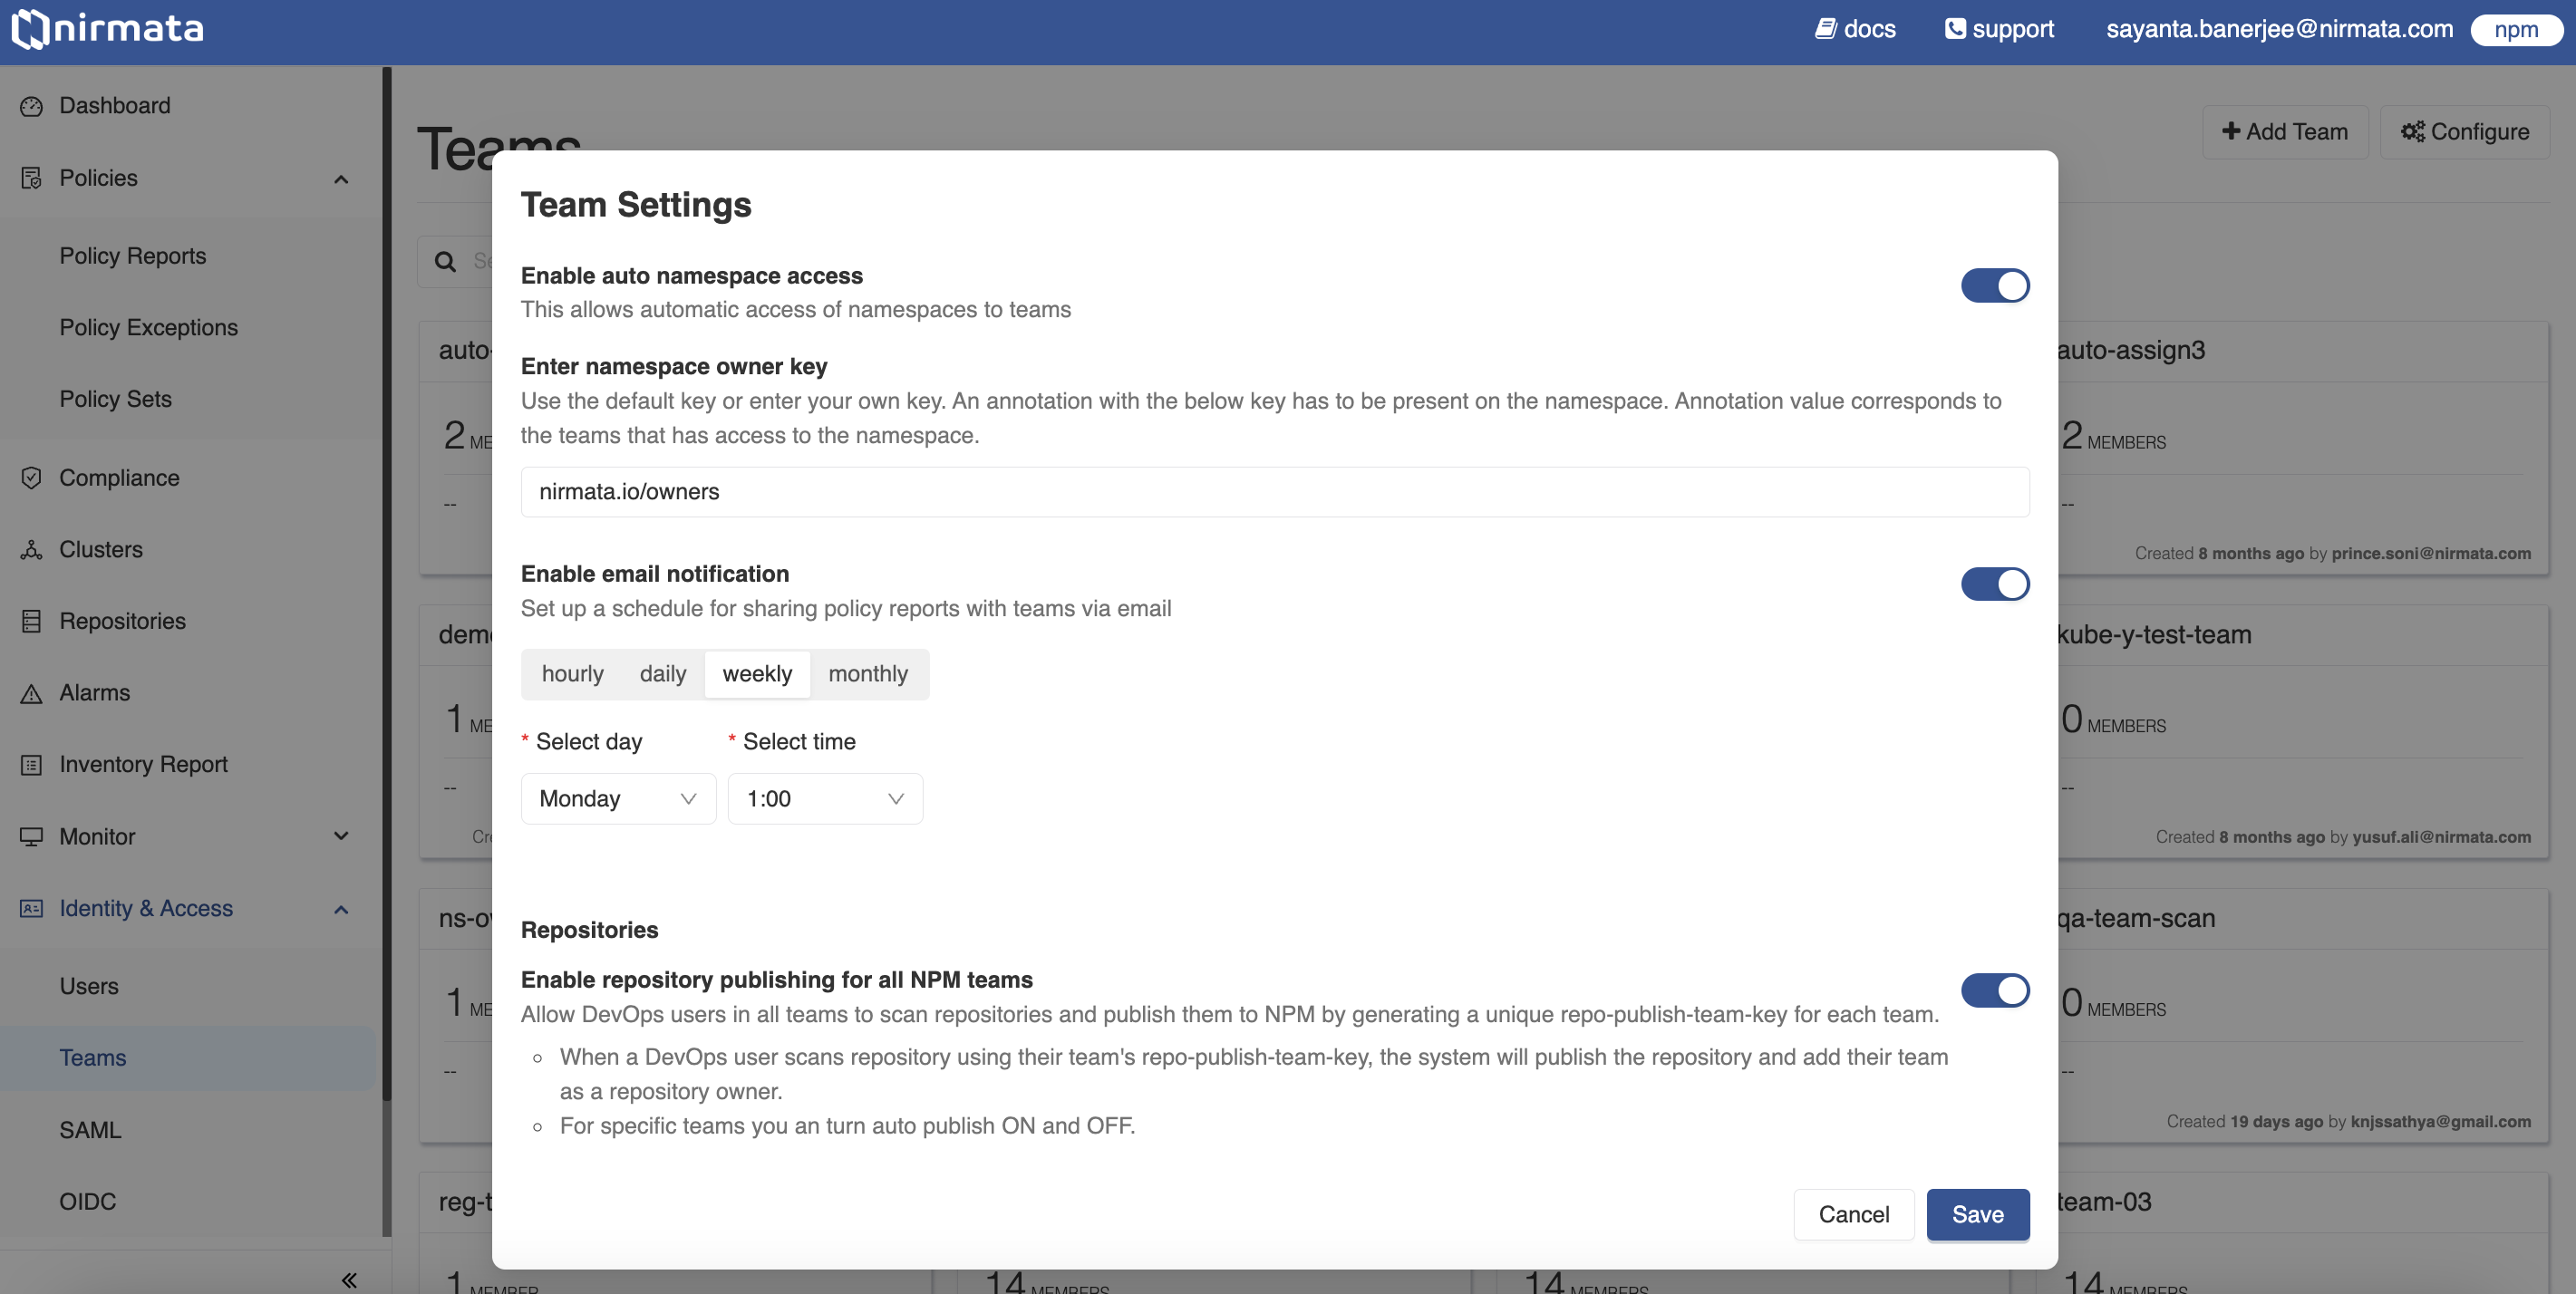
Similarly, repository publishing for DevOps users in a Team can be configured by an Admin user.
To configure repository publishing for DevOps users in all teams:
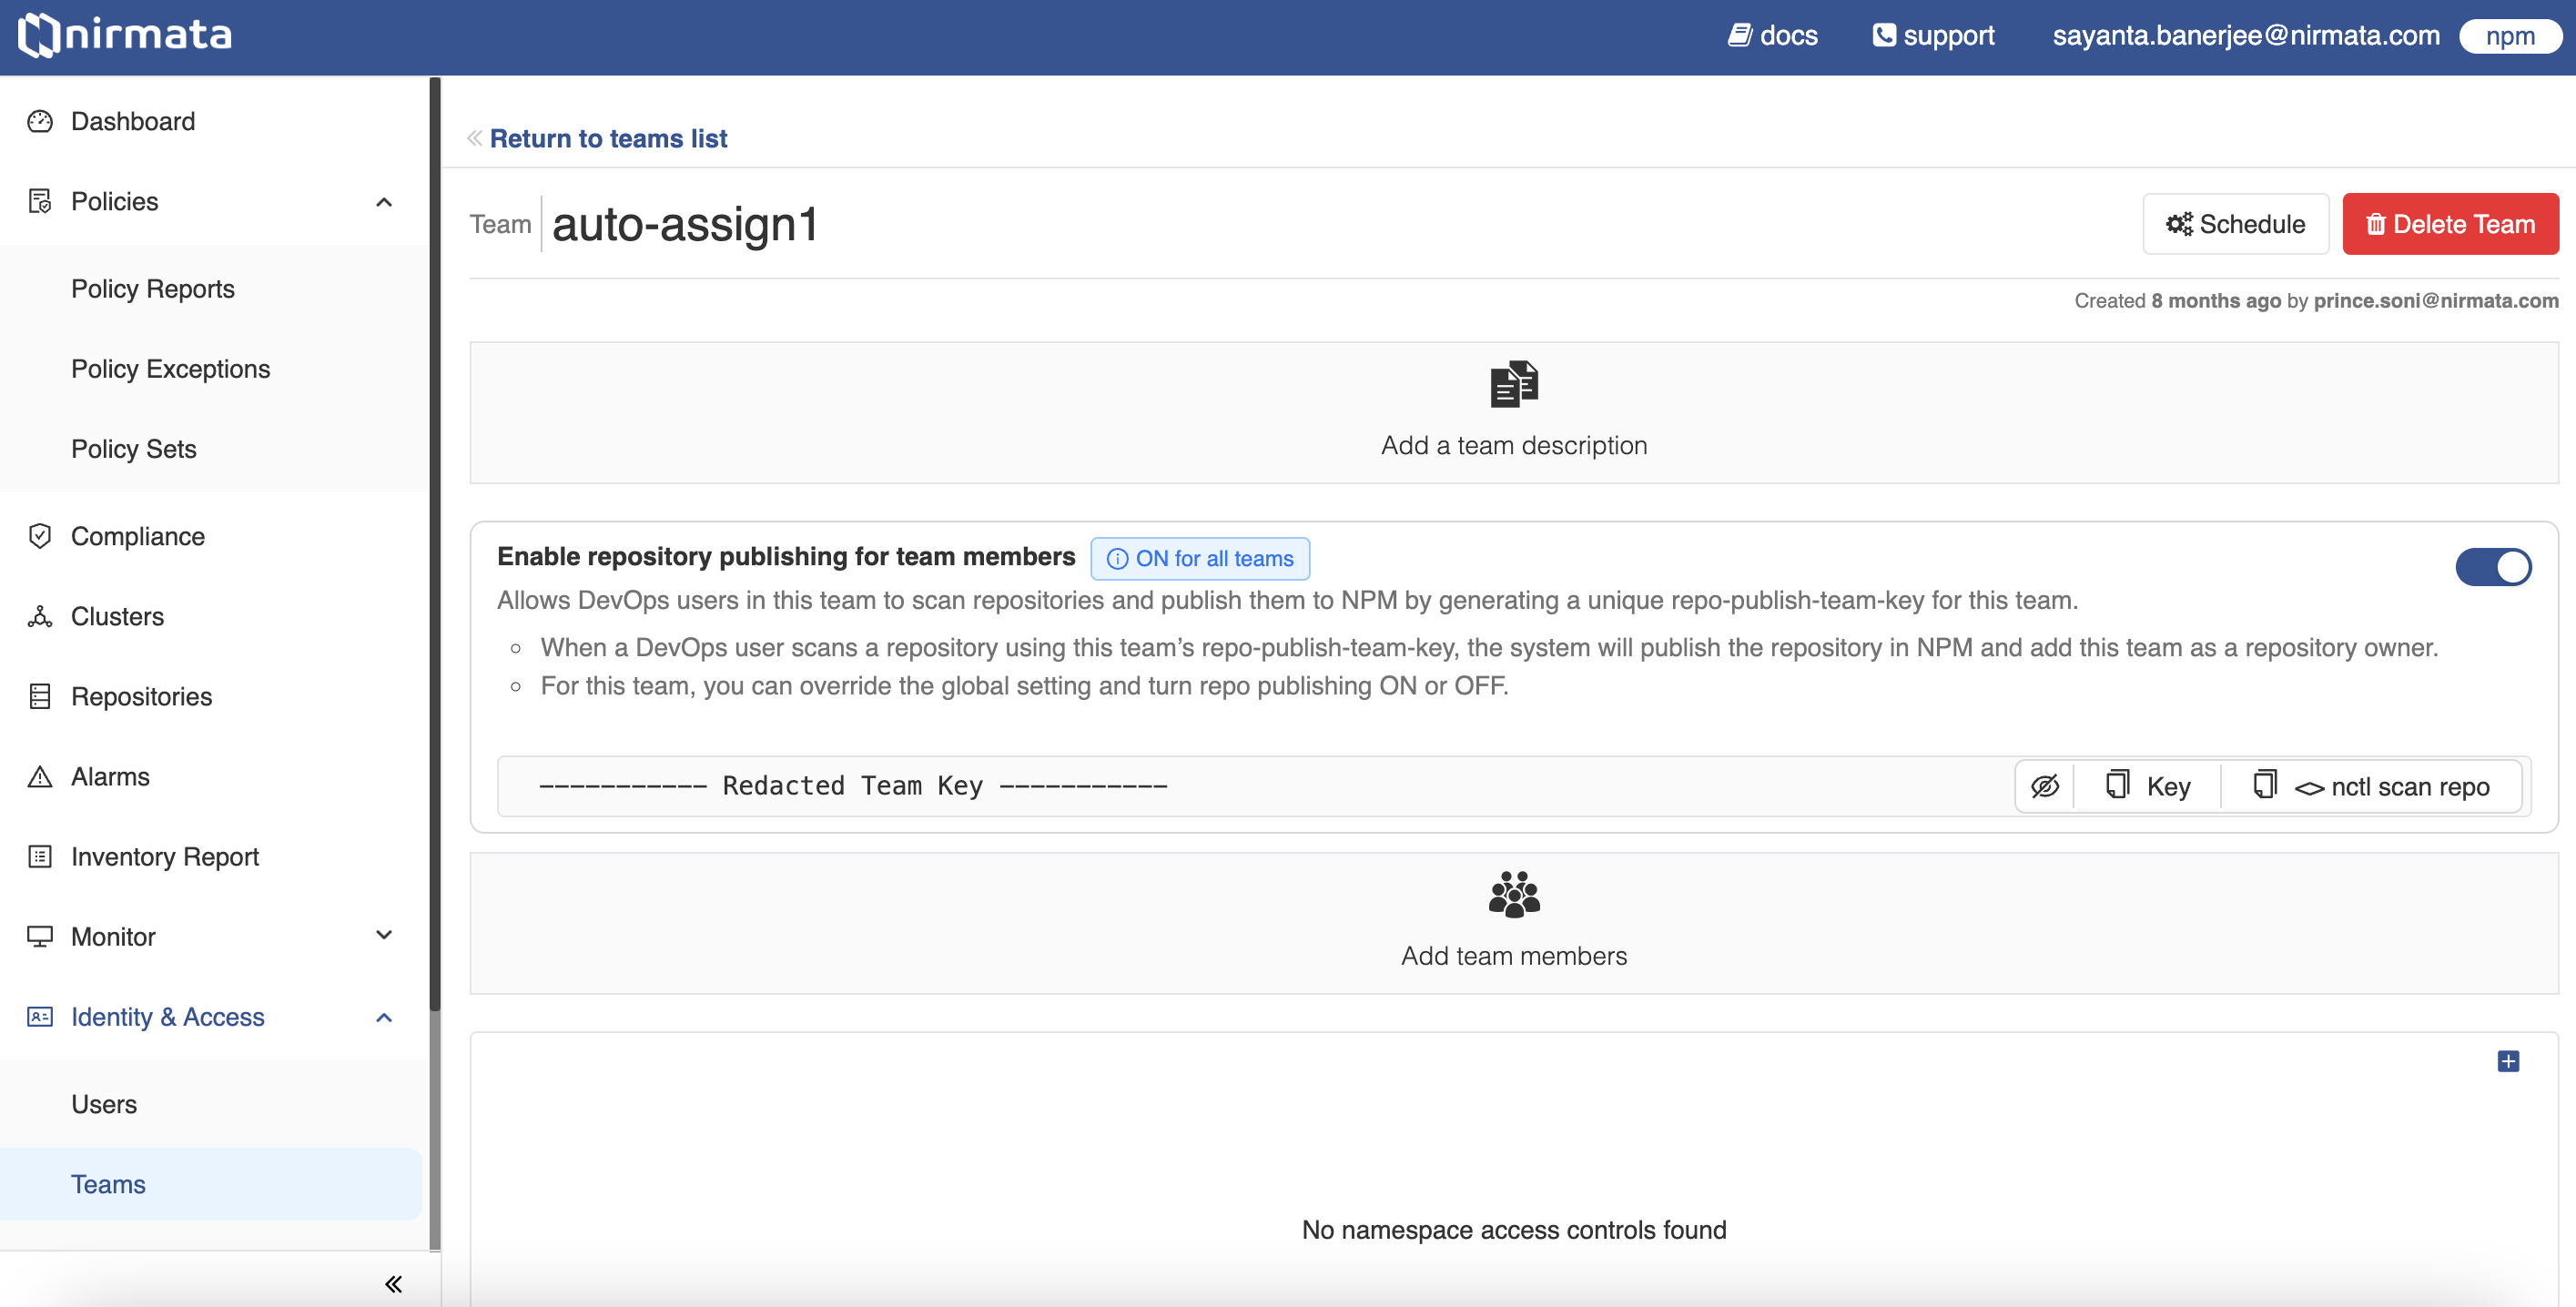
- Go to Identity & Access>Teams. All Teams available are displayed on this page.
- Click on the
Configurebutton located on the right hand top corner of the screen. The Team Settings dialog box opens. - Next, scroll down to Repositories and click on the
toggle buttonbeside Enable repository publishing for all NCH teams. - Finally, click Save.
To configure repository publishing for DevOps users of a particular team:
- Go to Identity & Access>Teams and click on the team card that needs permission to publish scan reports.
- Now, click on the
toggle buttonbeside Enable repository publishing for team members. - The DevOps users in the team can now publish scan reports to NCH.