---
title: "Compliance"
diataxis: how-to
applies_to:
product: "nirmata-control-hub"
audience: ["platform-engineer","devsecops"]
last_updated: 2026-04-16
url: https://docs.nirmata.io/docs/control-hub/policy-hub/compliance/
---
Kyverno policies map to one or more compliance controls and compliance standards. Policy violations are generated when a resource fails a policy rule. A compliance standard contains various controls or rules that policies need to comply with.
To view the Compliance report:
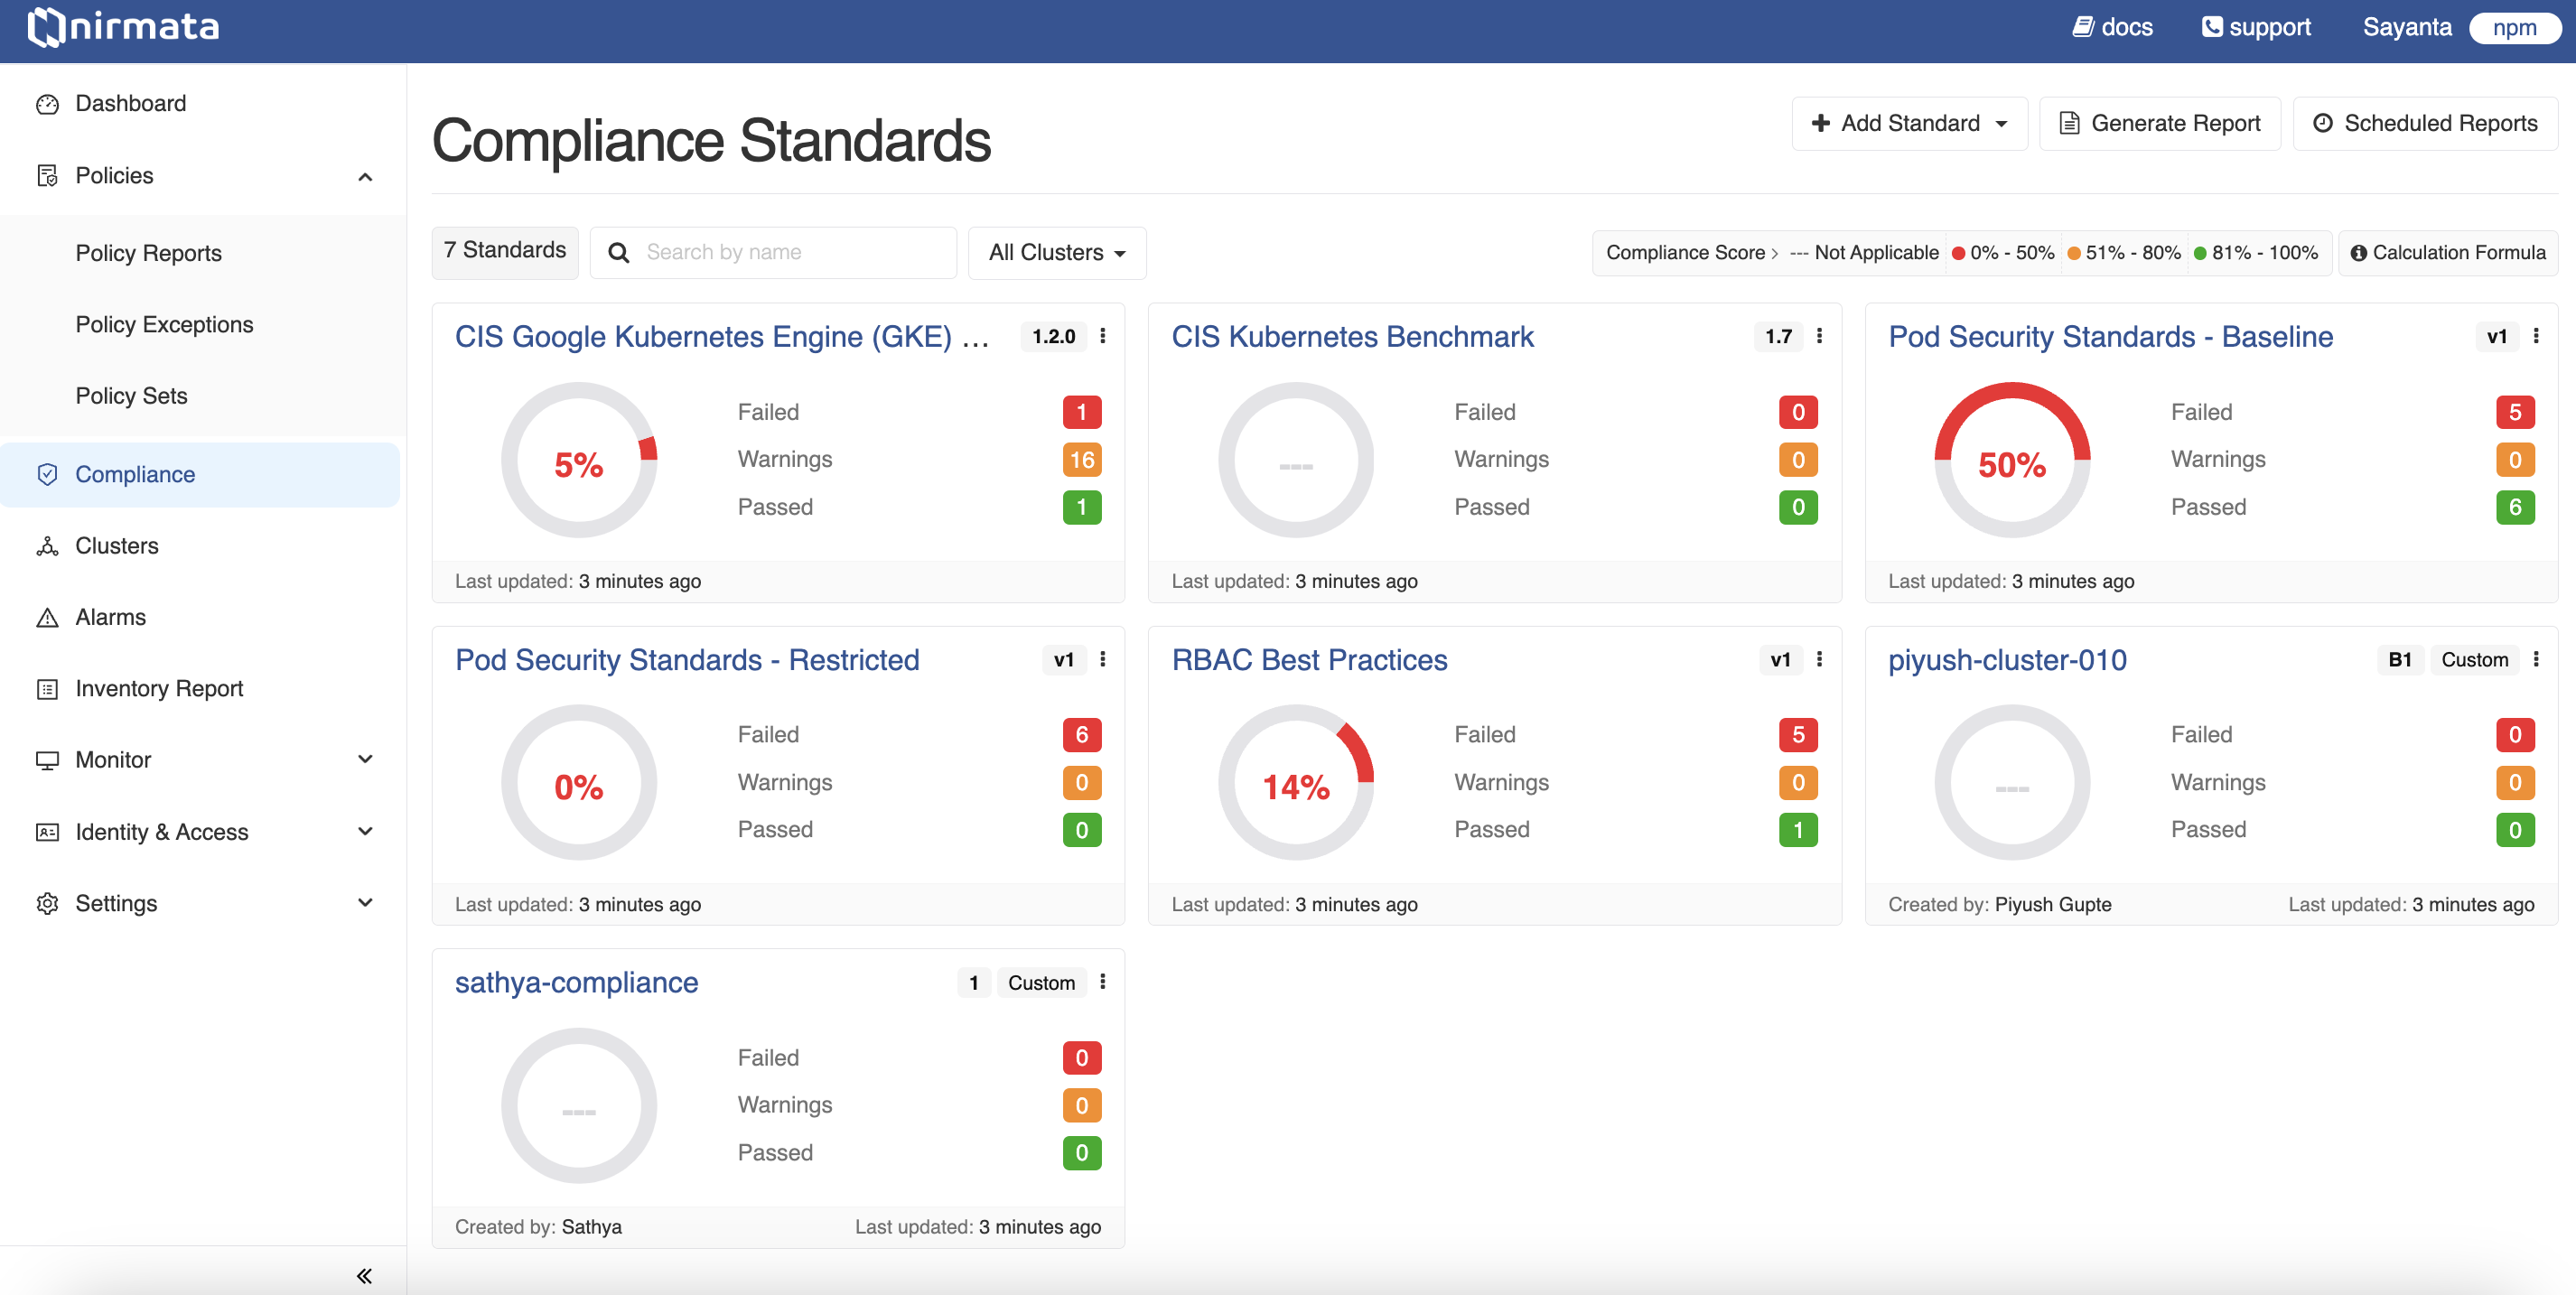
1. Go to **Menu**>**Compliance**. The Compliance Standards page with the default standards is displayed. In the top right corner of each standard, click the Kebab Menu to view the options: **Details**, **Generate Report**, **Clone**, **Disable**, and **Delete**. Additionally, the **Edit** option is displayed for User Managed Standards. Select any option for the respective action.
2. Click any default standard, for example, CIS Benchmarks v8. The CIS Benchmarks v8 report will be displayed.
By default, the report shows Controls. Click the **Clusters** button to view the report for clusters. You can view the report for All Clusters or search for a particular cluster in the Search field. Additionally, you can filter by status and view the report for a particular status such as *pass*.
3. Click on the control name to see the details of the control, its status, policy mappings, and findings. Similarly by clicking on the Clusters button, you can view the cluster list and clicking on the cluster name, you can view the controls associated with it. You can also click on the control name to see the details of the control.
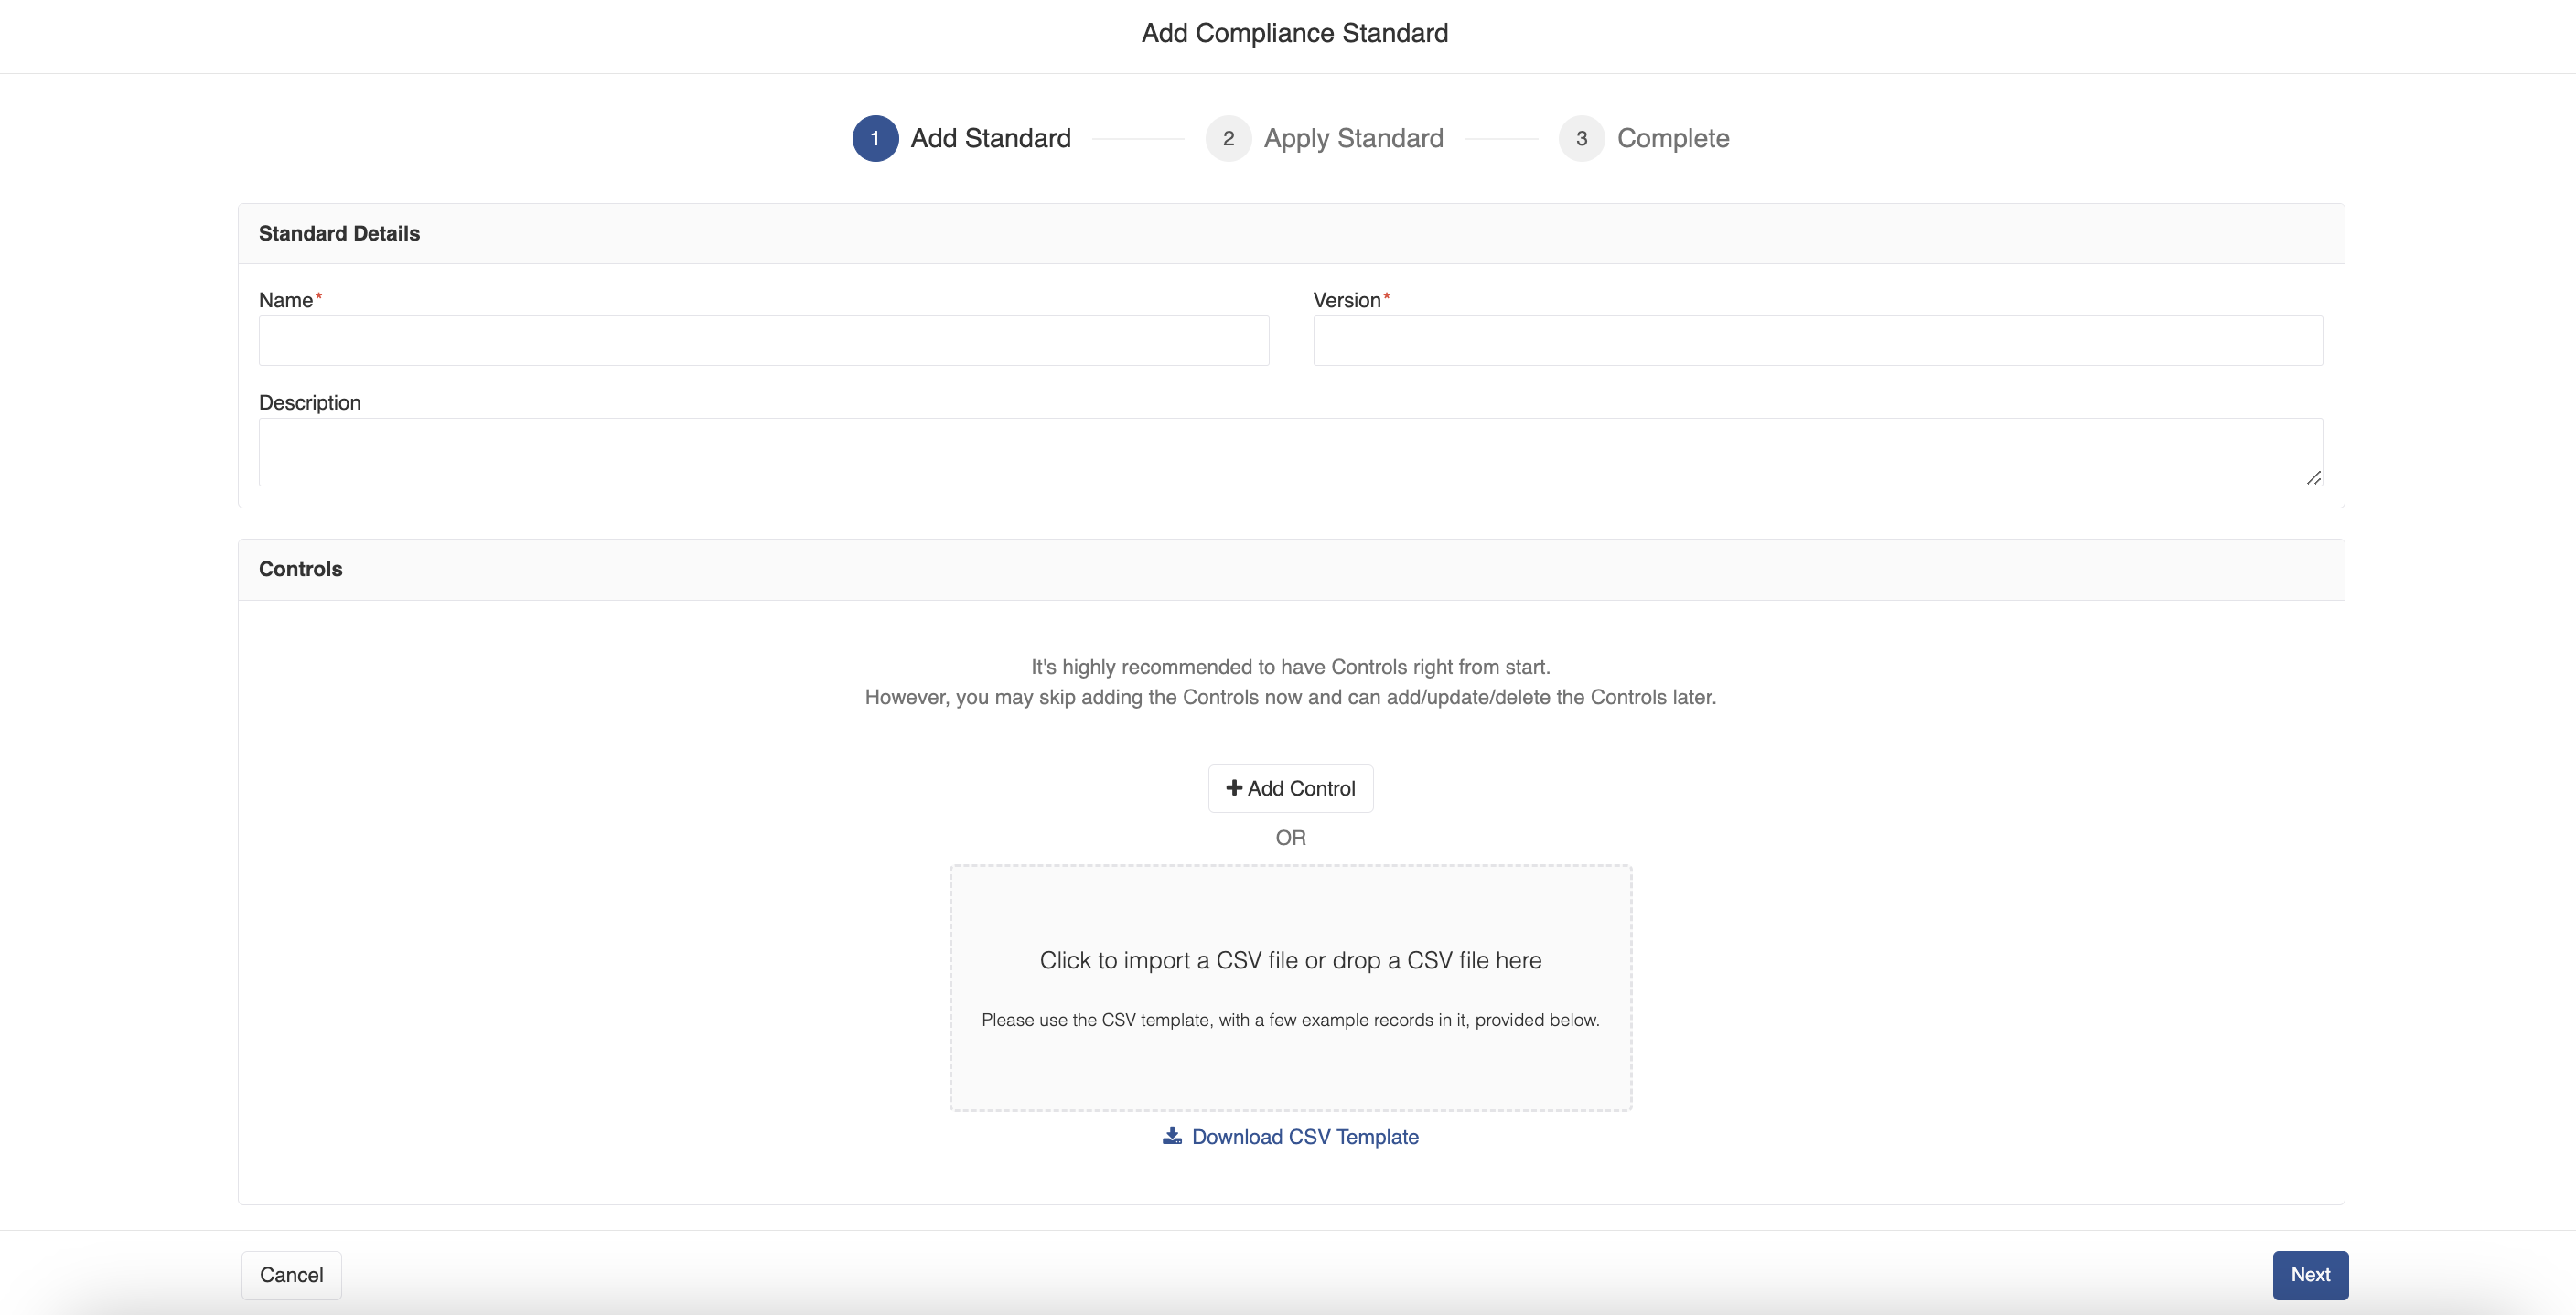
4. In the Compliance Standards page, click the **Add Standard** button to add a standard. A drop-down list of Nirmata Managed Standards and an option to add User Managed Standard are displayed. When you click the Nirmata Managed option, it is directly added. When you click the User Managed option, the Add Compliance Standard window opens.
a. Enter **Name, Version and Description** and click **Save**.
b. In the Controls block, you can either add a control by clicking on the **Add Control** button or import a CSV file by clicking the block, **Click to import a CSV file or drop a CSV file here**.
>NOTE: Nirmata recommends you to add controls while adding the standard. However, you can skip this step and can add/update/delete controls later.
c. Click on the **Download CSV Template** link to download the example template.
d. When you click on the Add Control button, the Add Compliance Control window opens. On this window, add **Control Details** such as Name, ID, SubID, Description, select **Cloud Providers** such as EKS, AKS, GKE, or Self Managed, and add **Policy Mappings** such as Policy Name, Rule, UUID, and click **Save**.
5. Click on the **Generate Report** button to generate a report on the standard. The Generate Report page opens.
a. In the Mail block, enter **Sender**, **Recipients**, **Subject**, **Message** details.
b. Select the **Schedule** checkbox to schedule the email. The options available are hourly, daily, weekly, and monthly.
c. Click on the **Save** button.
6. Click on the **Scheduled Reports** and click on the **+** symbol to schedule a periodic email to notify any policy violations. The Schedule Email window opens.
a. Select a cluster from the list or search the cluster and click **Next**. The Schedule Email page is displayed.
b. In the Scope block, select the radio button, either **Cluster or Namespaces** to choose the scope of the report.
c. In the Mail block, enter **Sender**, **Recipients**, **Subject**, **Message** details.
d. Select the **Schedule** checkbox to schedule the email. The options available are hourly, daily, weekly, and monthly.
e. Click on the **Save** button.
7. Go to **Policies**>**Policy Reports**. Click on the Kebab Menu at the right corner of the screen. The *Enable CIS Benchmarks* option is displayed.
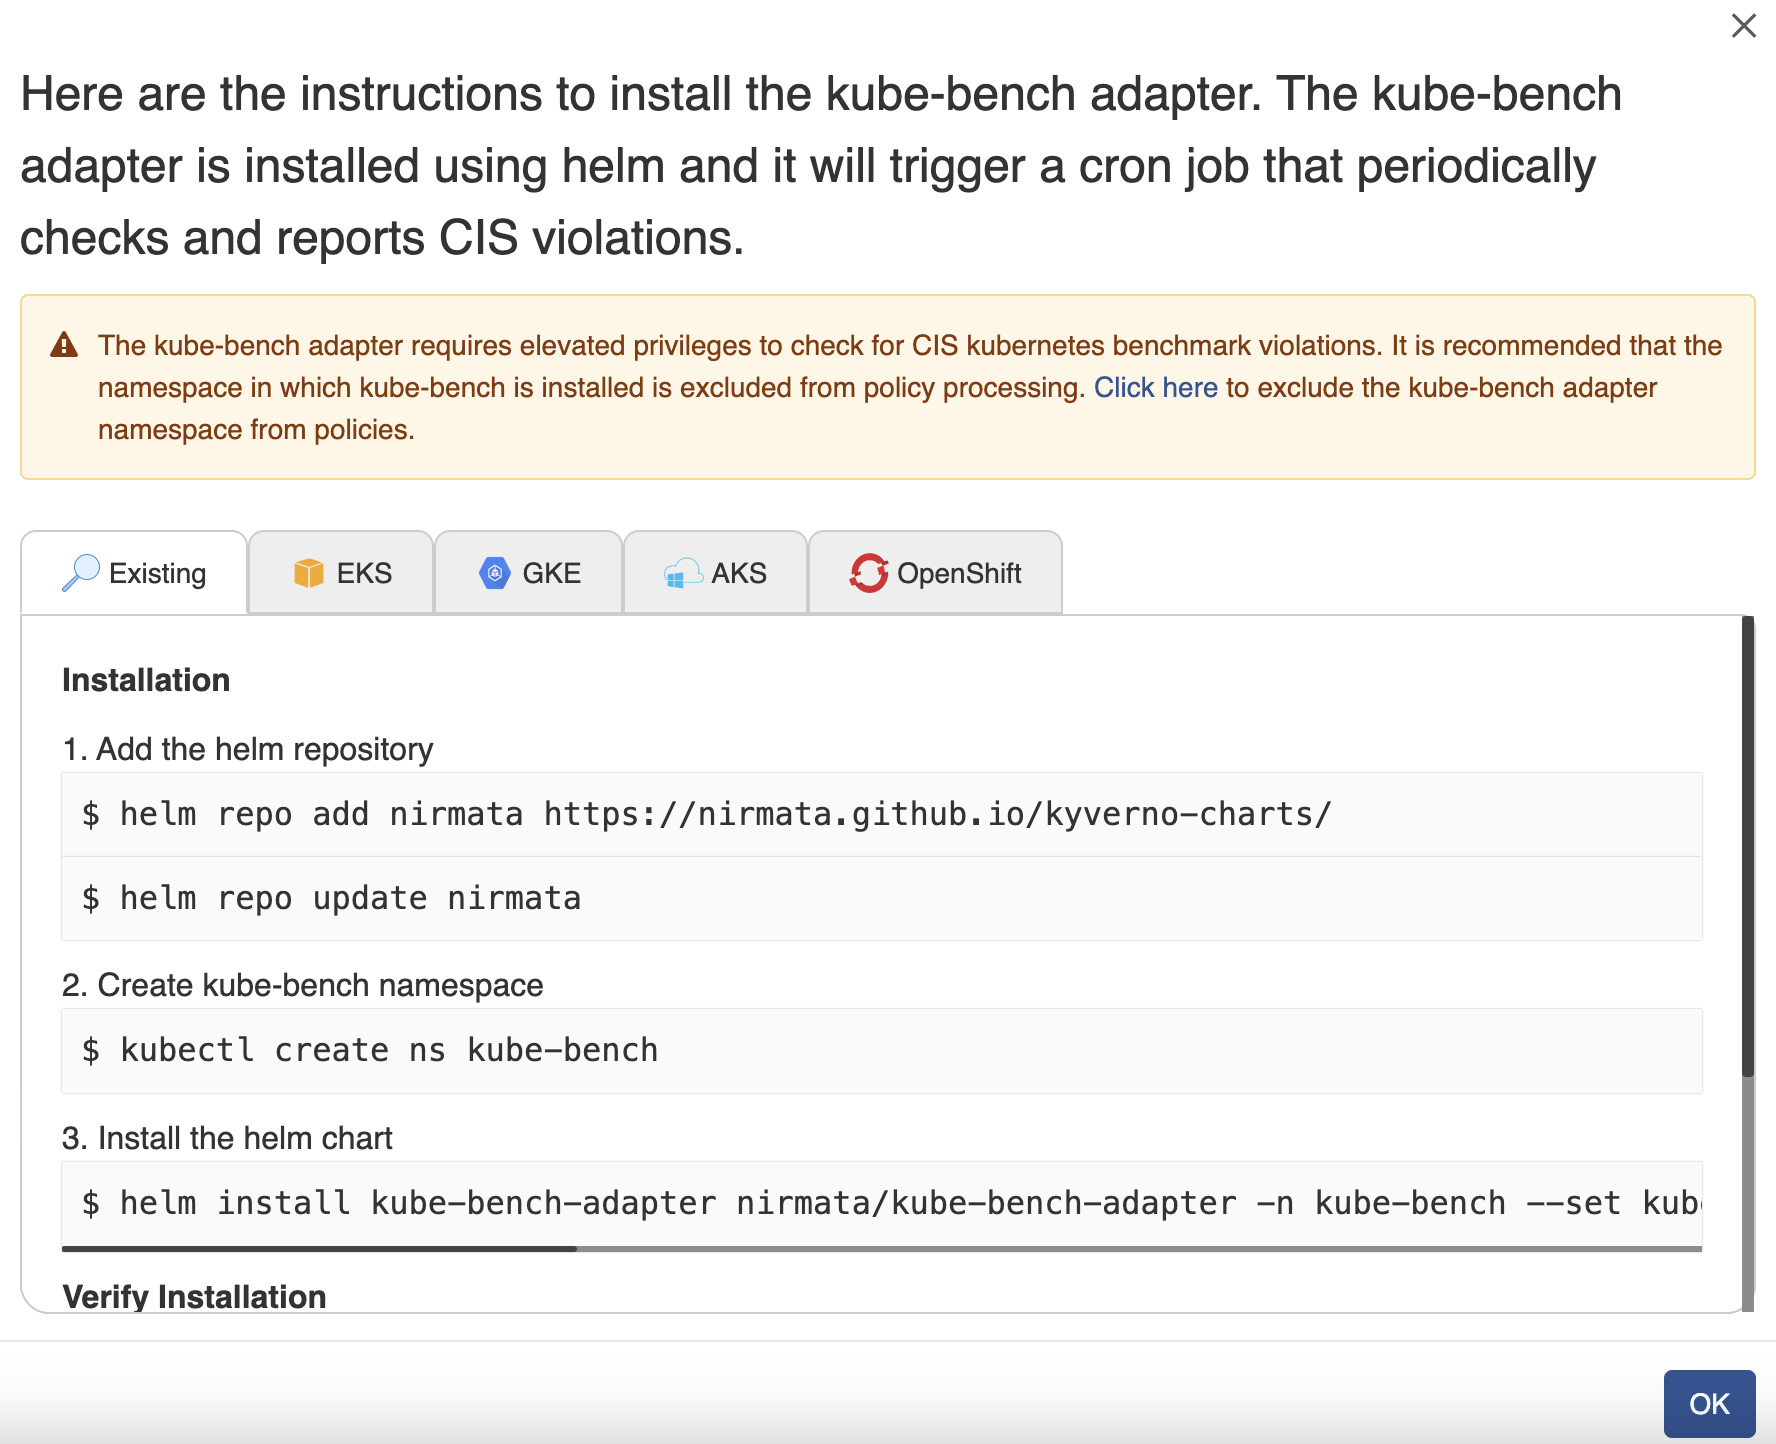
8. Click on the **Enable CIS Benchmarks** option. A window to install kube-bench adapter is displayed. In this window you will see the instructions to execute commands to install the helm chart and run the cron job to see policy violations immediately.
>NOTE: Installing kube-bench adapter prompts the user to check policy reports and report CIS Benchmark violations on a weekly schedule.
9. Click **OK**.
---
## Namespace Compliance
A Compliance Report per Namespace shows the compliance status of resources within a specific namespace in a cluster. Each compliance standard contains various controls or rules that policies must comply with.
To view the Compliance Report per Namespace:
1. Go to **Menu**>**Policy Reports**. Policy Reports can be viewed by Categories, Clusters, or Namespaces.
2. Click on the **Namespace** category to view policy reports generated for different namespaces across multiple clusters. Use the `Cluster` tab to filter namespaces by selecting your cluster from the dropdown.
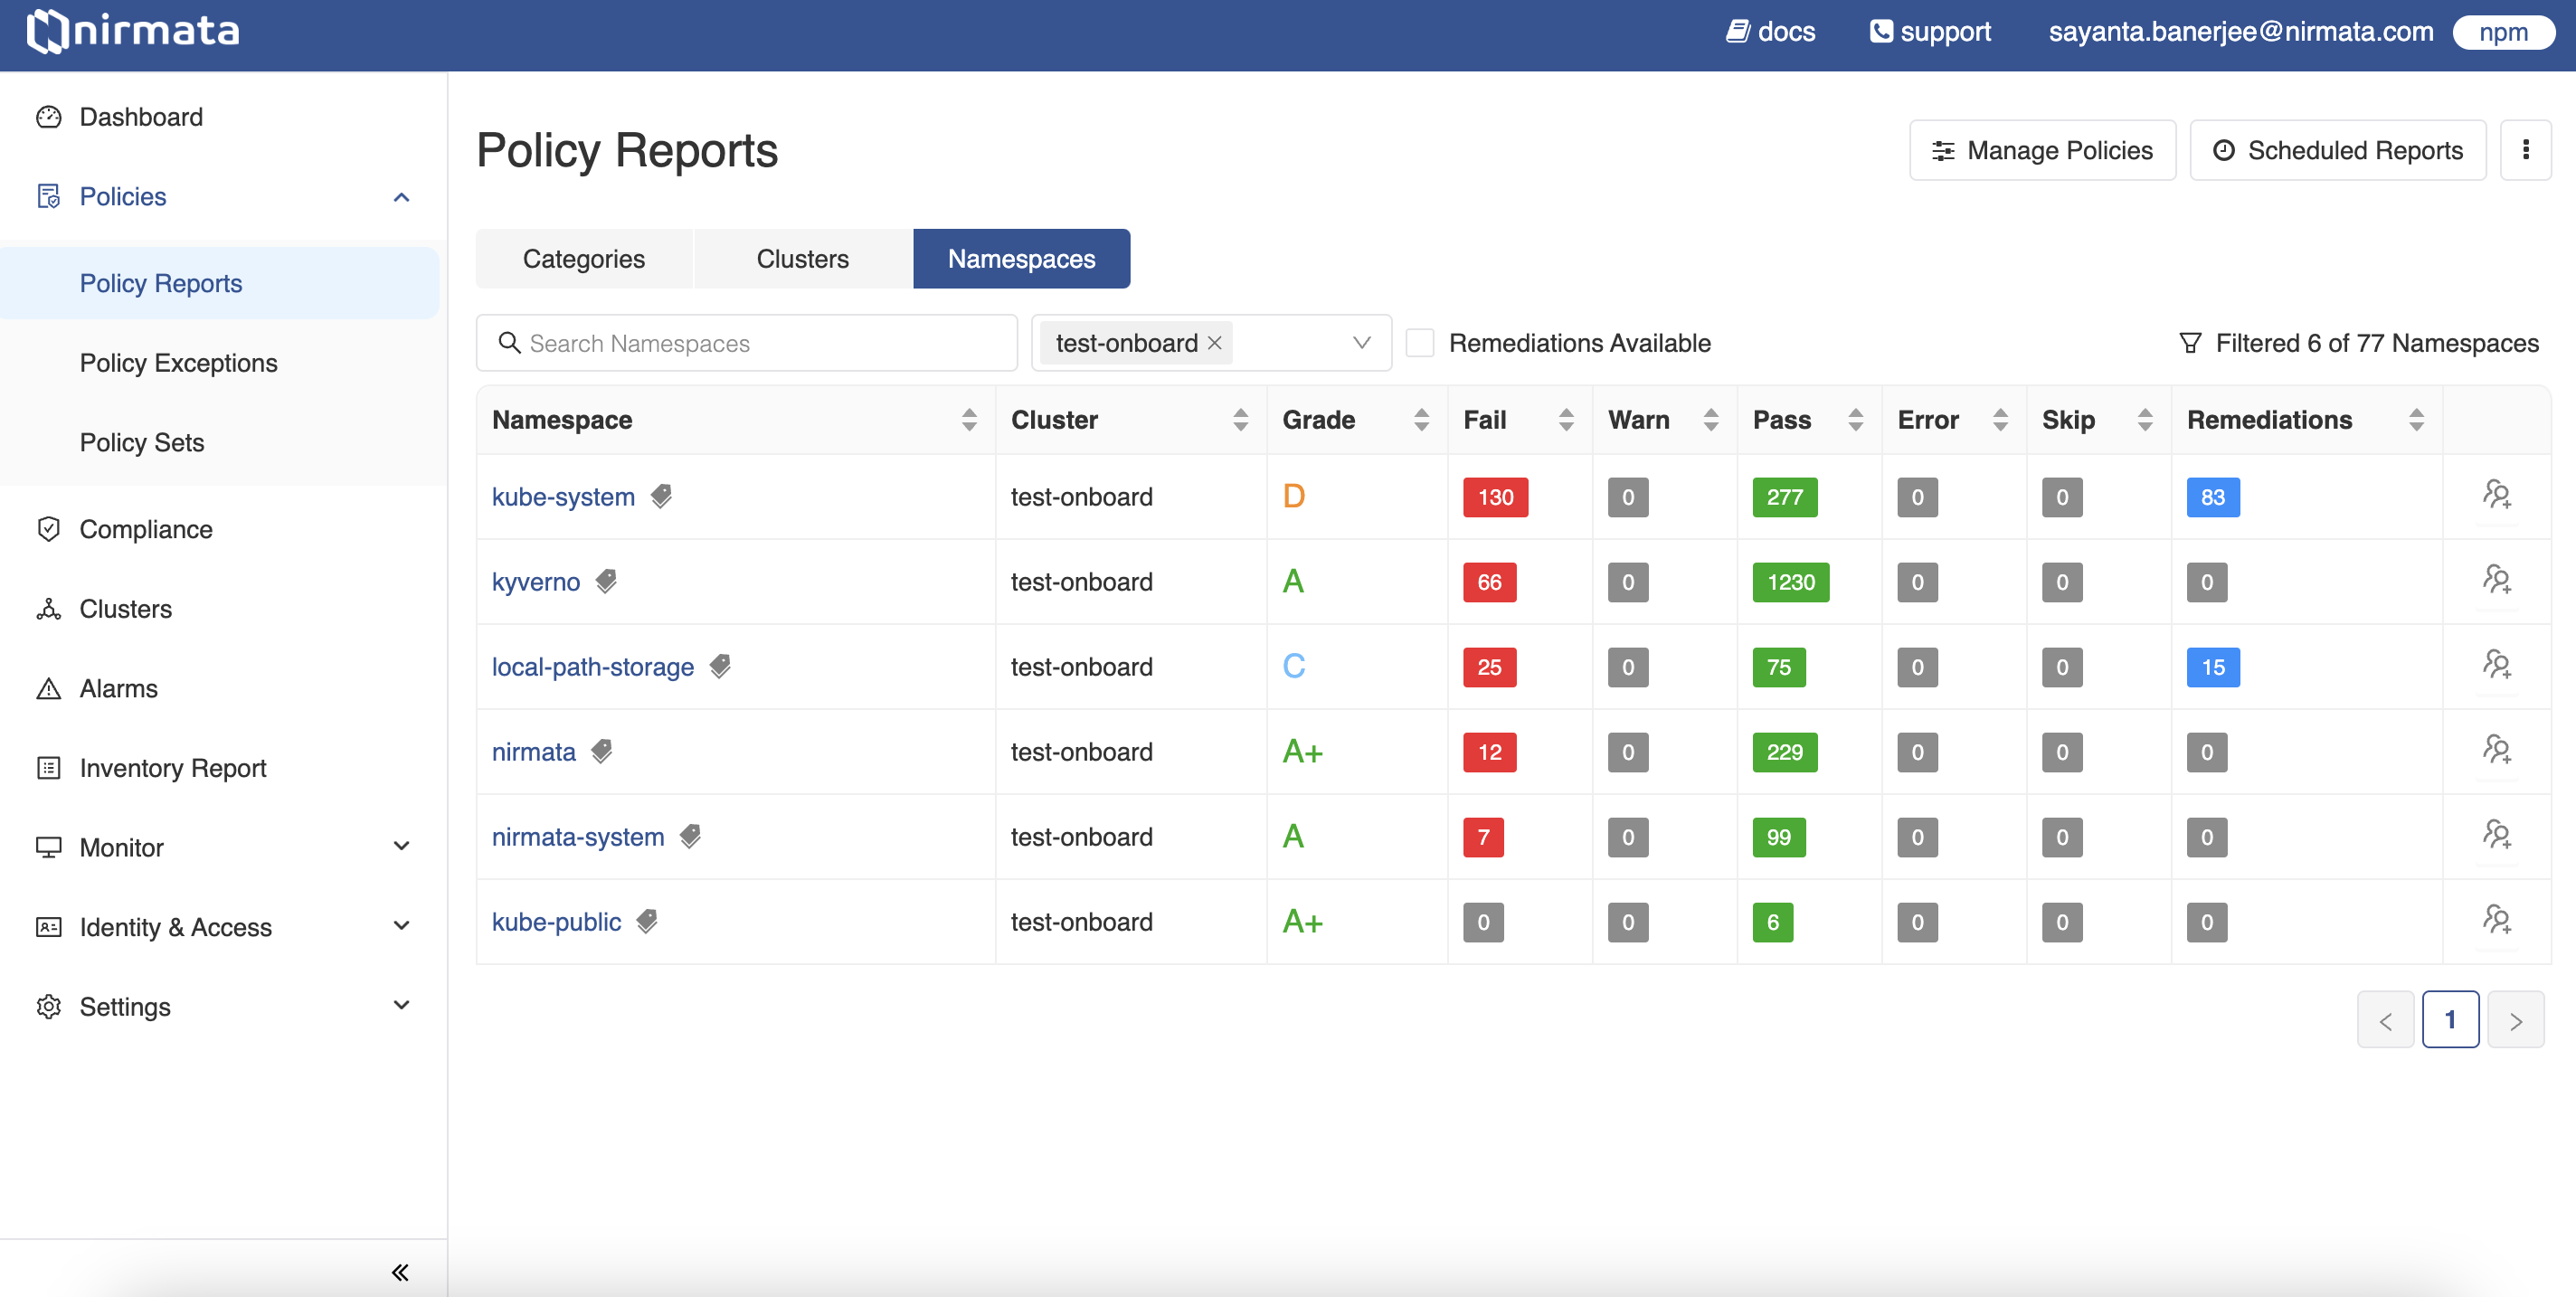
3. Click on any namespace associated with your cluster to view detailed policy reports for that namespace. The `Findings` tab opens by default, showing information about *Severity, Findings, Impact (Resources), and Status (%Pass or Fail)*.
4. Click on the `Compliance` tab to view the compliance report with standards for that namespace.
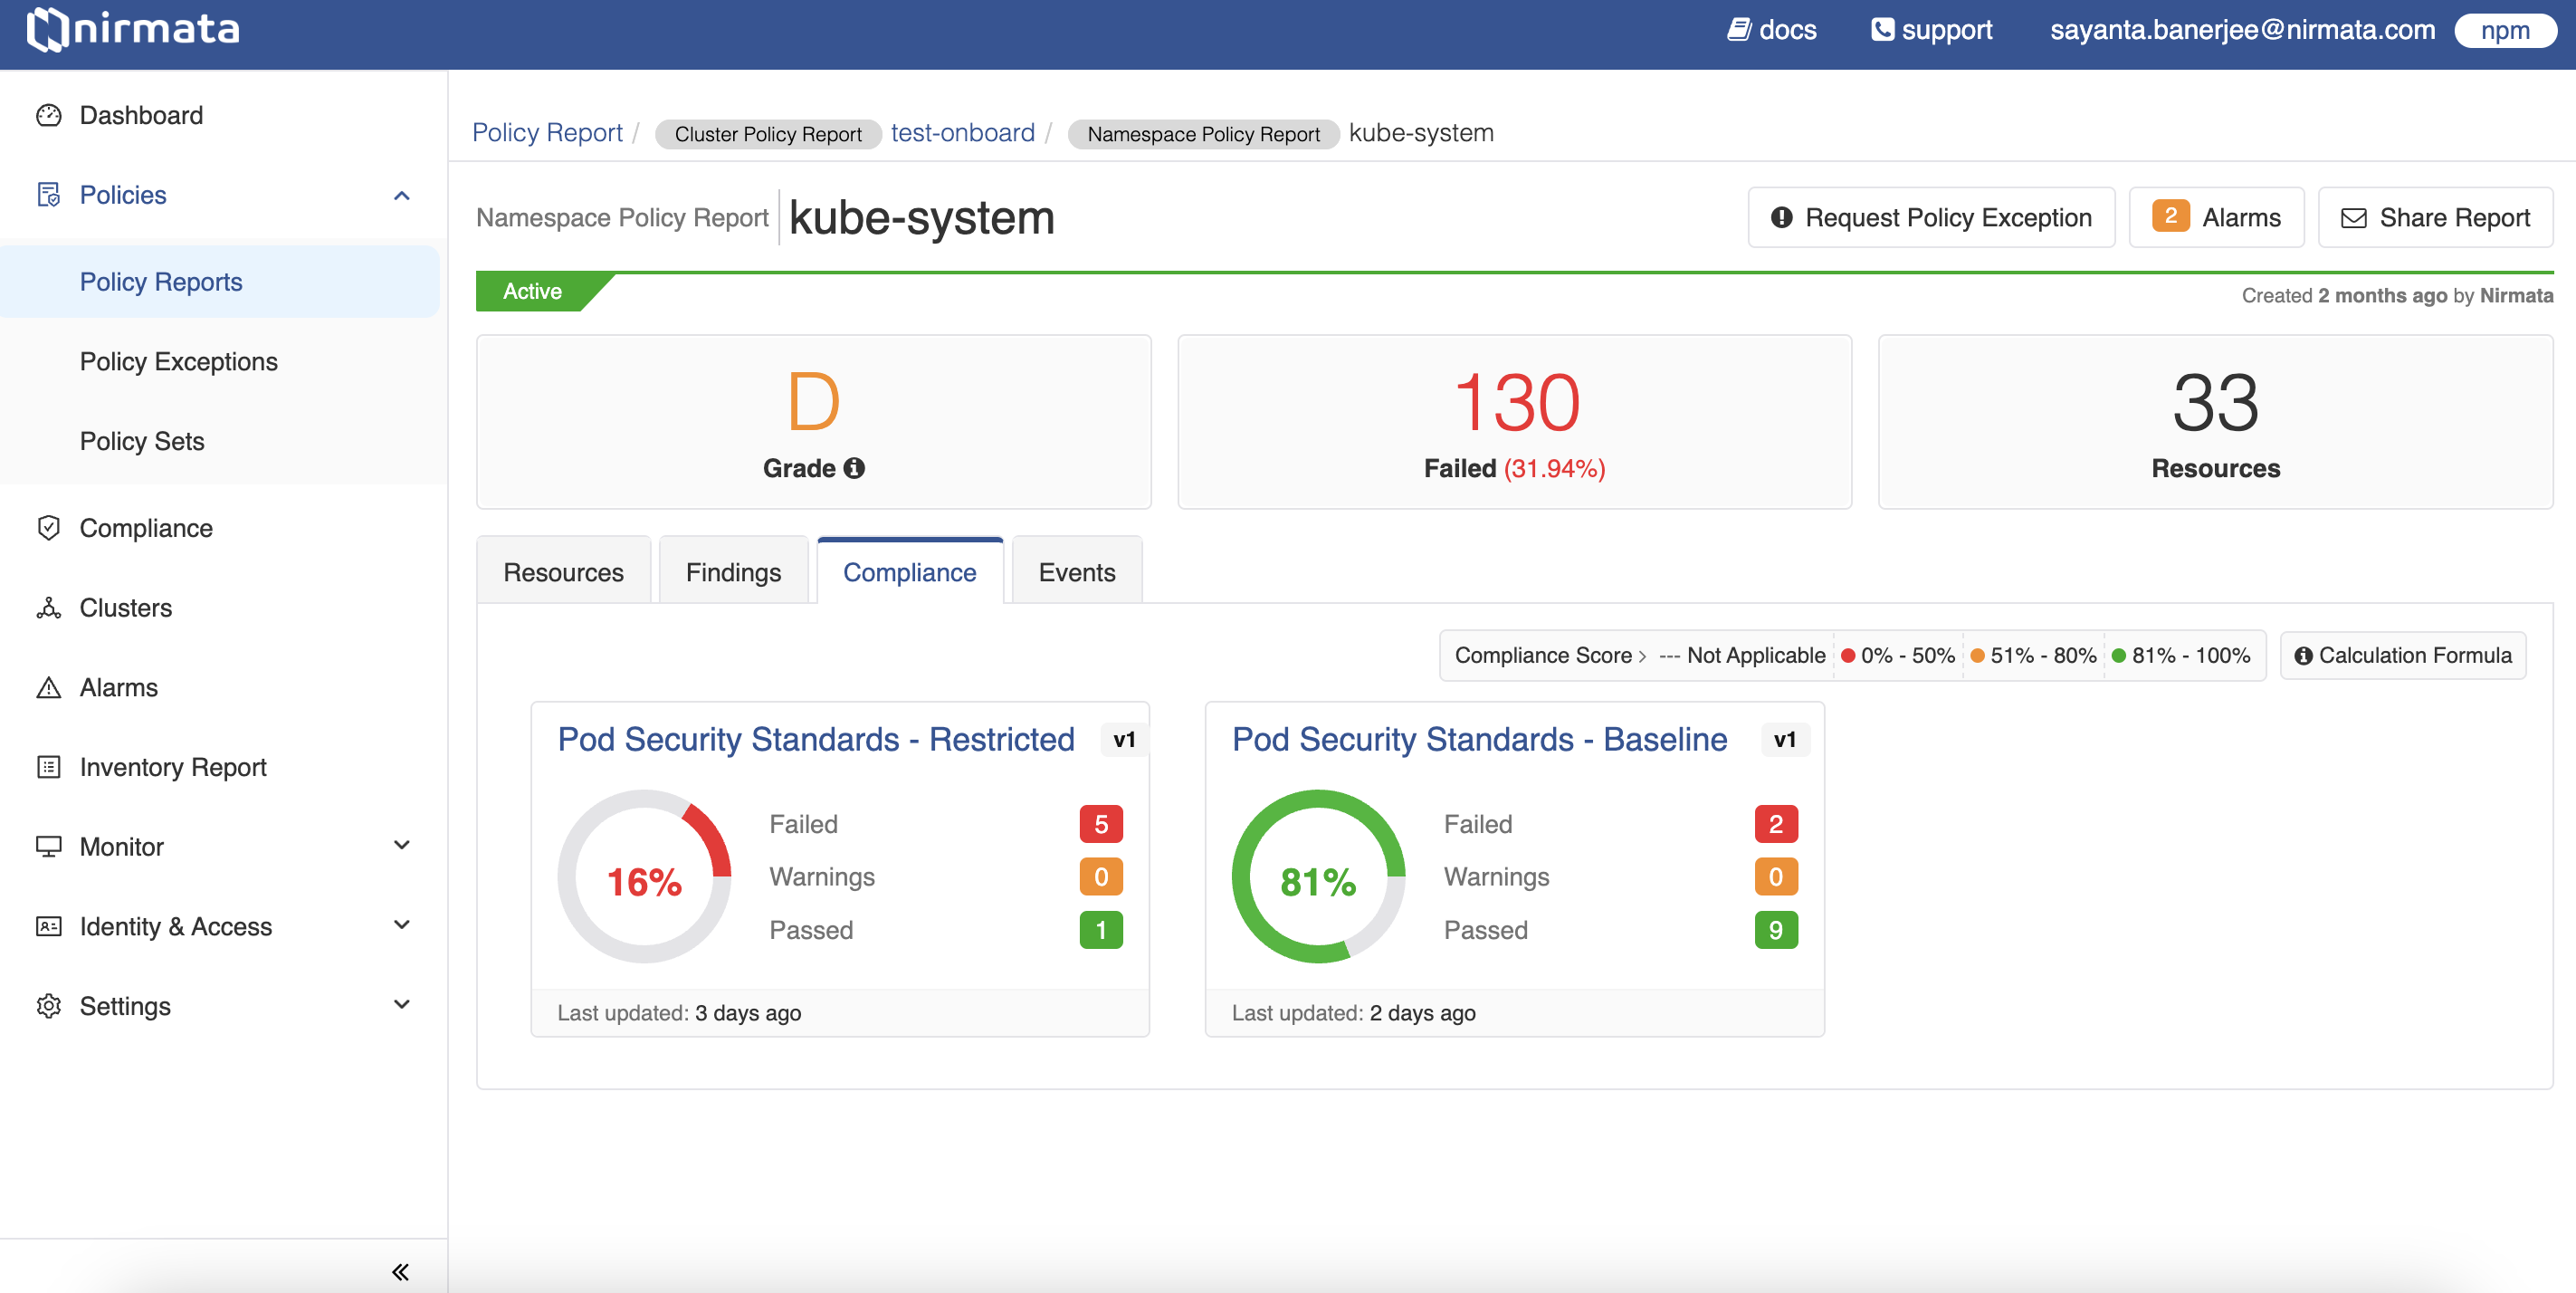
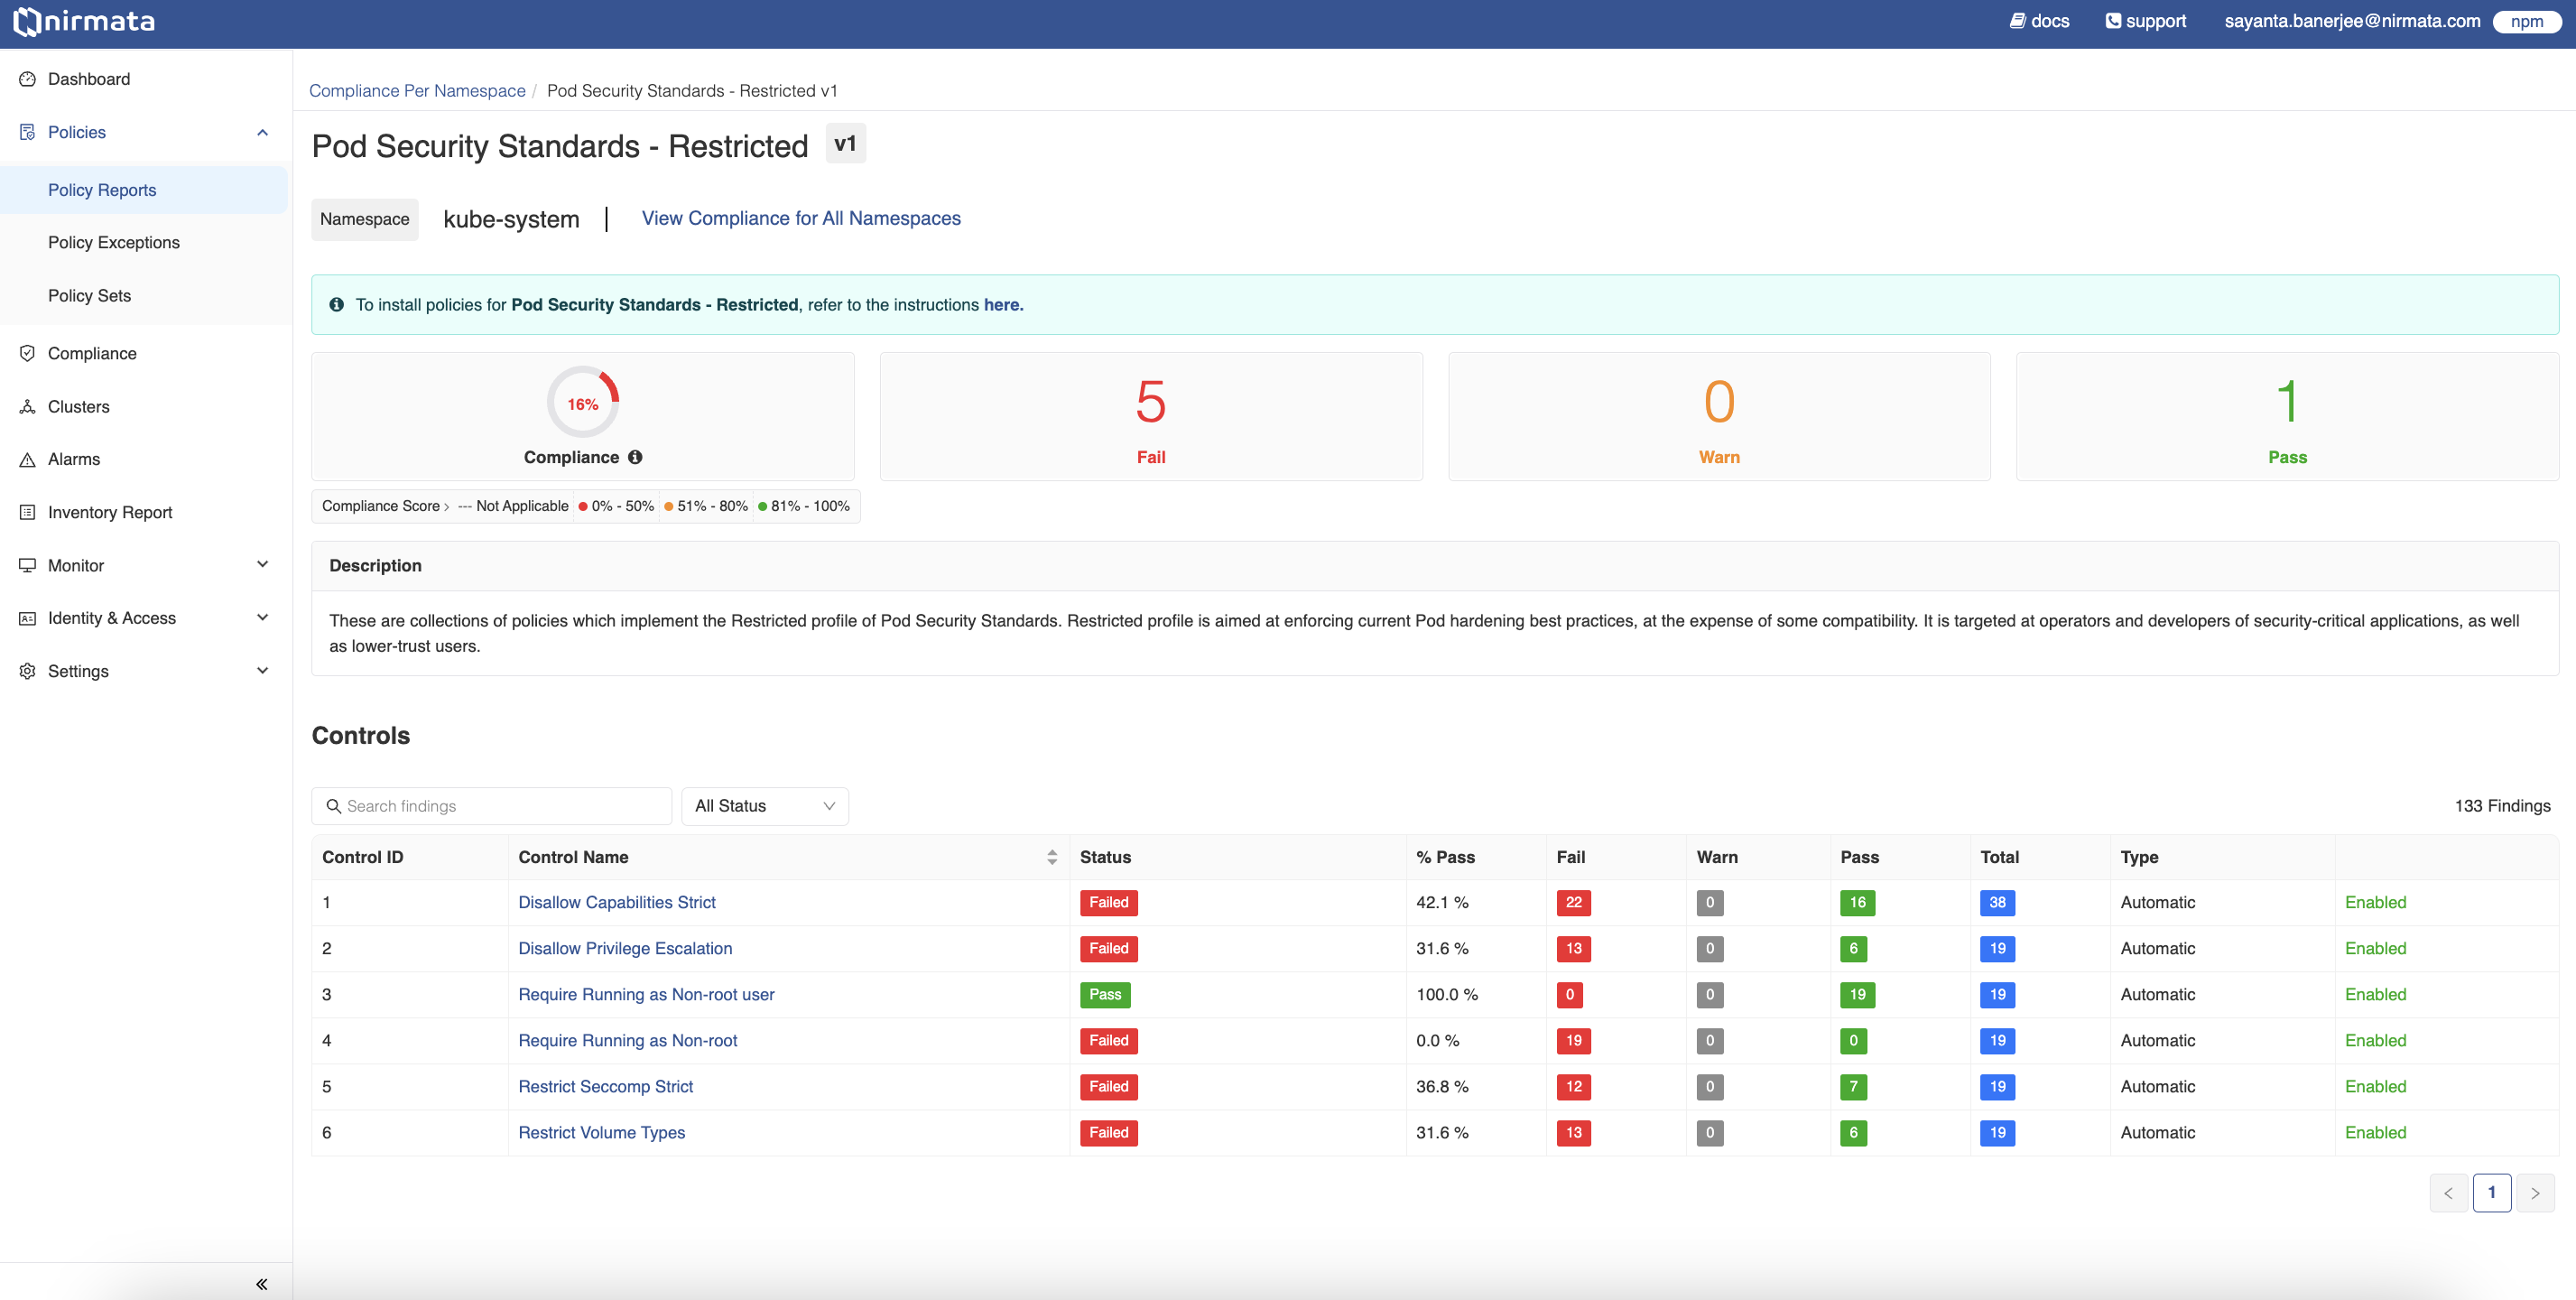
5. To view more details about a standard, click on its compliance card. For example, click on **Pod Security Standards - Restricted** to view the standard report for that namespace.
6. The page displays the `Controls` report for the selected compliance standard, including information about Control names, status, pass percentage, number of fail/warn/pass results, Control types, and whether the controls are enabled.
---
## Repository Compliance
A Compliance Report per Repository is a compliance report for resources that is generated for a particular git repository containing policy resources. A compliance standard contains various controls or rules that policies need to comply with.
To view the Compliance Report per Repository:
1. Go to **Menu**>**Policy Reports**. The Policy Reports can be viewed based on Categories, Clusters, Namespaces, or Repositories.
2. Click on the **Repository** category to view the policy reports generated for the different available repositories. Click on the `File Type` tab to filter the repositories by selecting the desired file type from the dropdown.
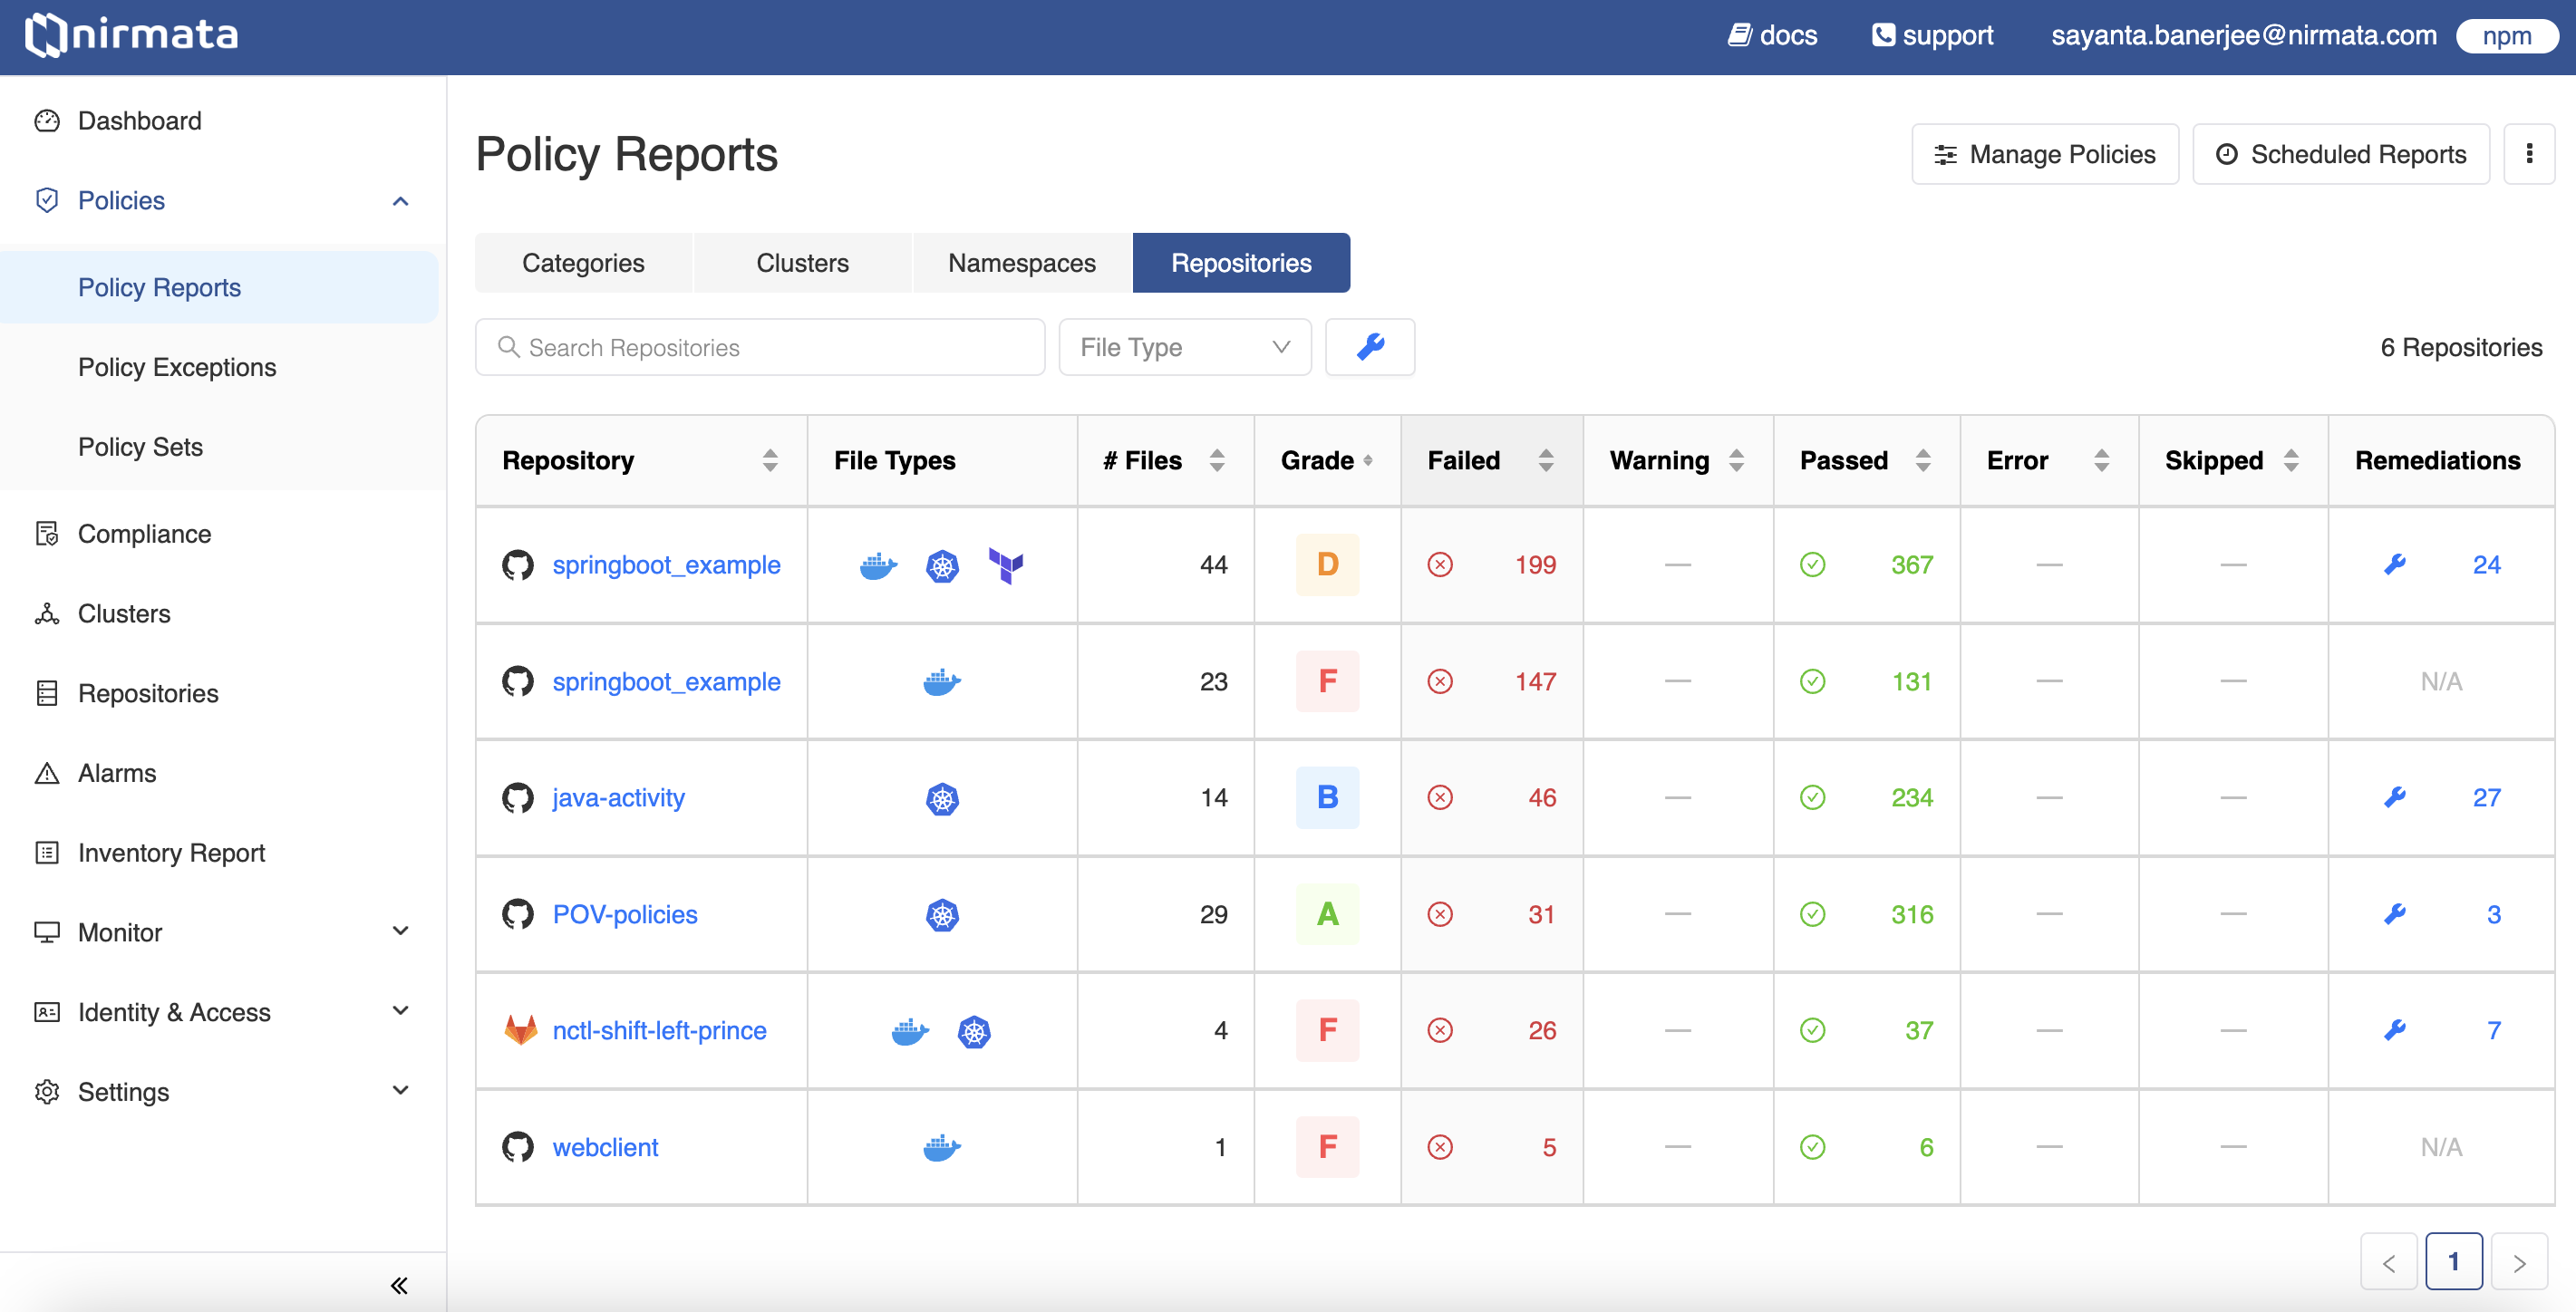
3. Next, click on any repository to view the detailed policy reports for that particular repository. The `Findings` tab opens by default with information related to *Findings (by severity), Impact (File Types and #Files), and Status (% Passed, Failed, and Remediations)*. Filter the findings by severity status and file types by clicking on the `Severity` and `File Type` tabs respectively, and selecting options from the dropdown.
4. After that, click on the `Compliance` tab to view the compliance report generated with the standards for that repository.
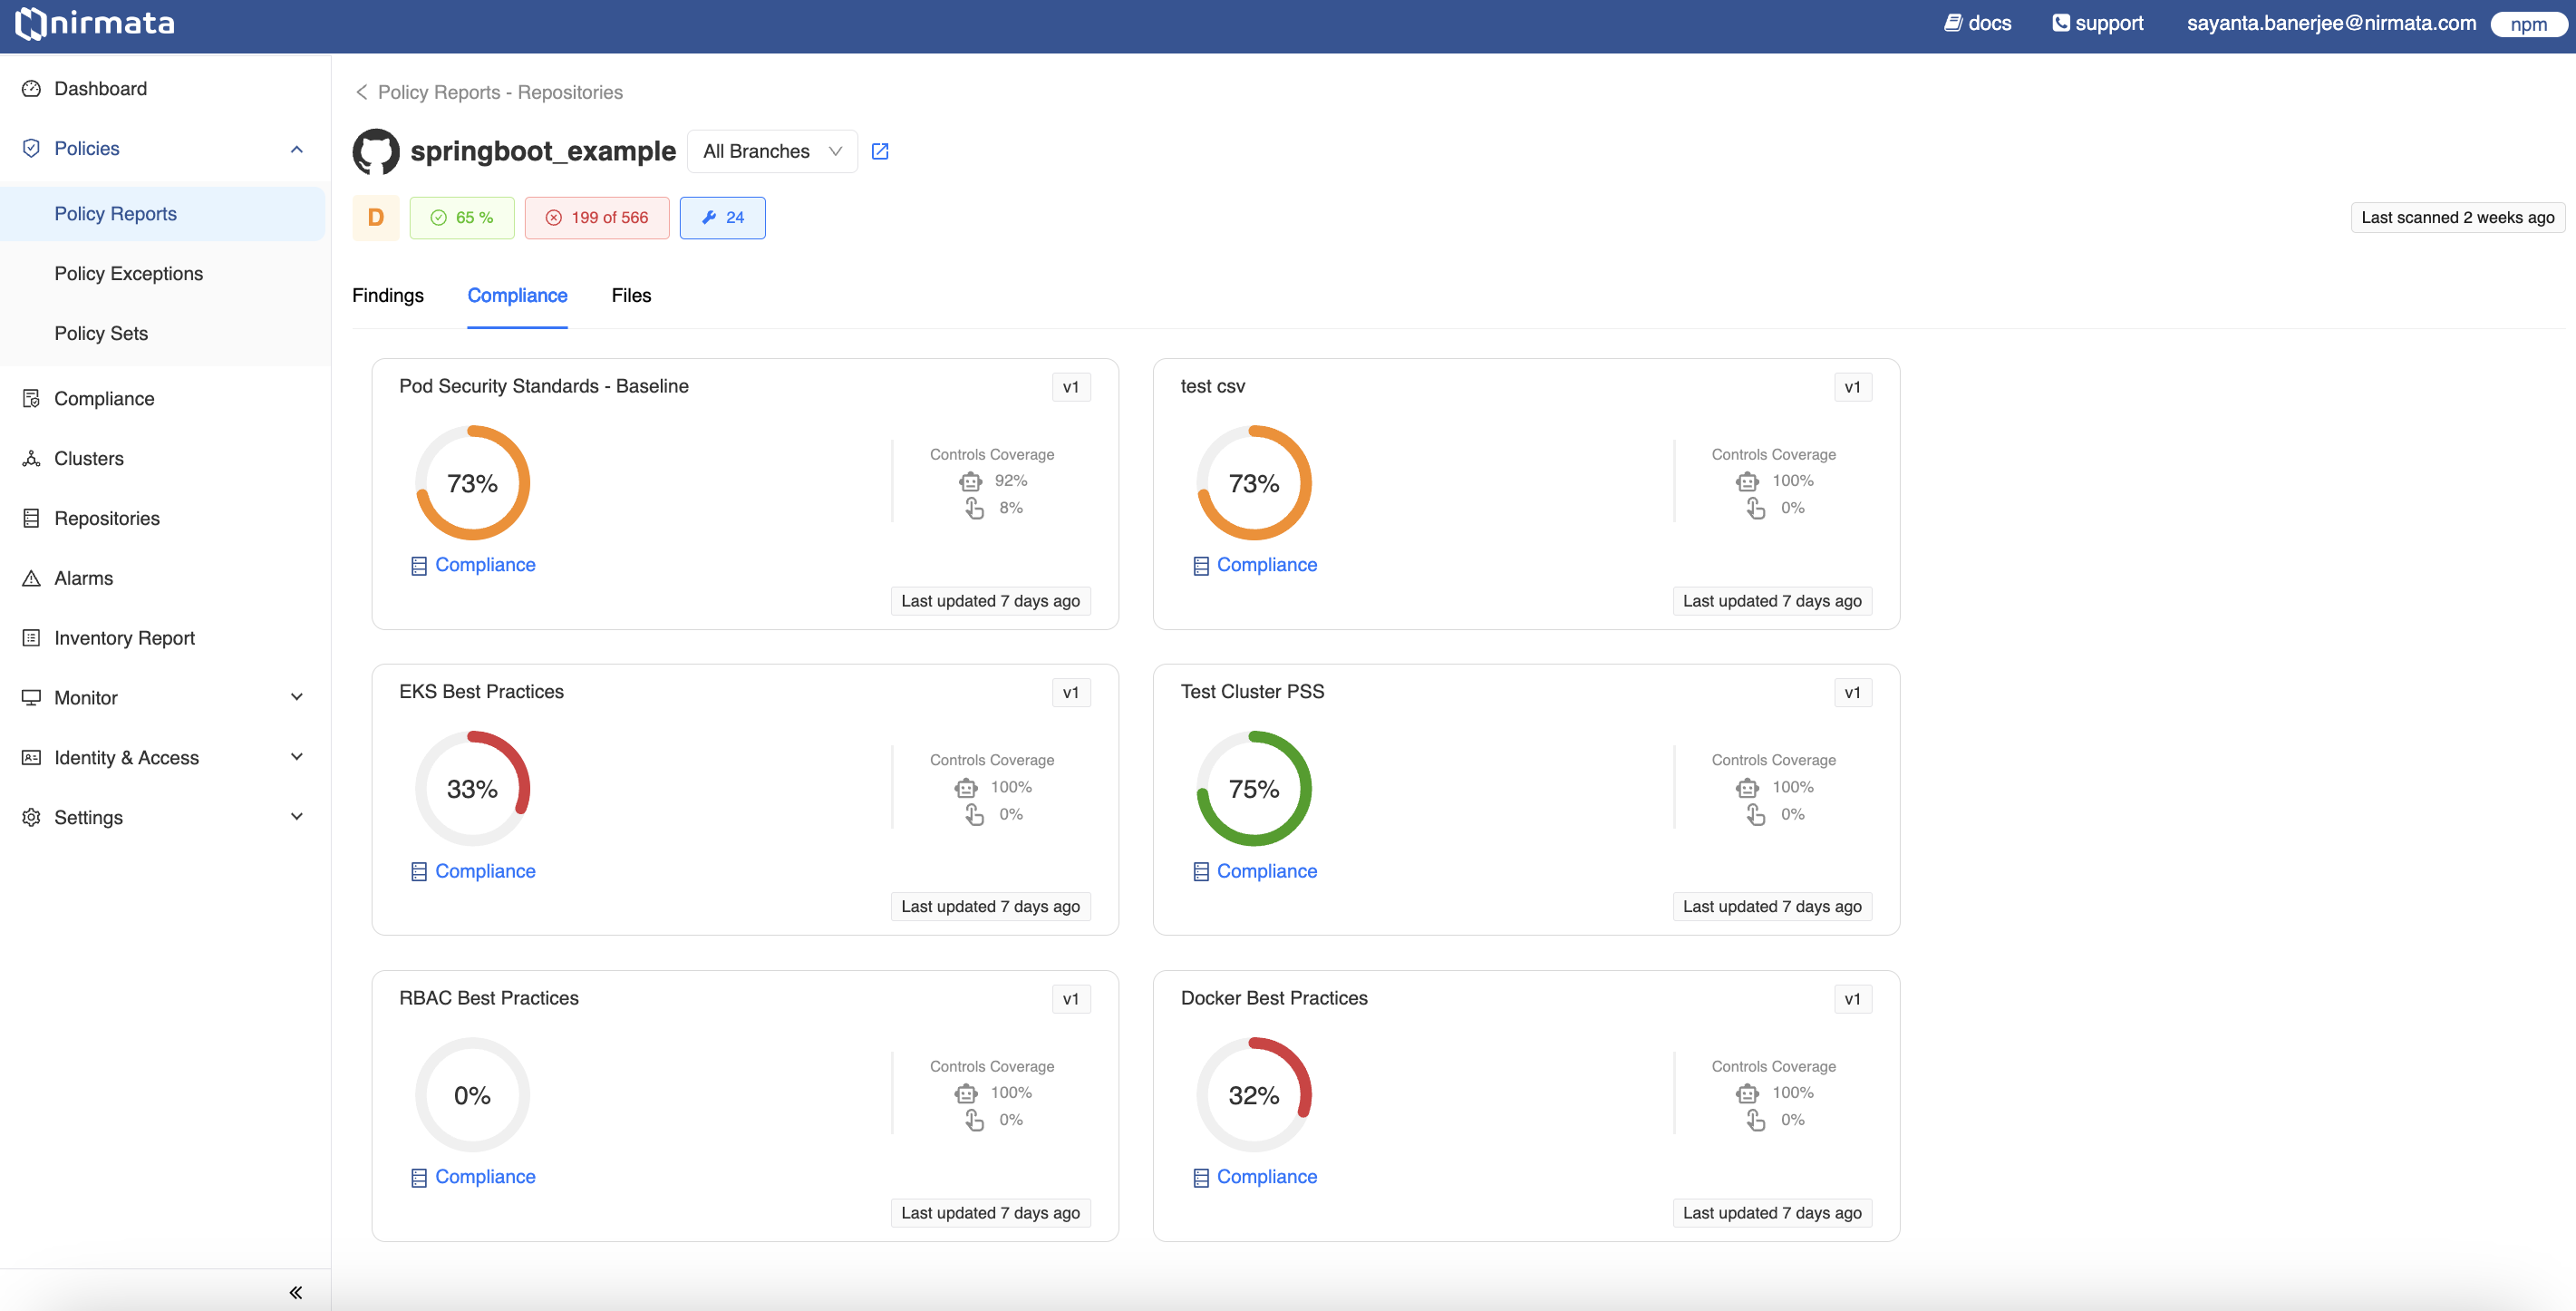
5. View more details about the standard by clicking on the compliance card. For example, click on **Pod Security Standards - Baseline** to view the standard report for that namespace.
6. The page displays the `Controls` report for the given compliance standard with information about Control names, their status, pass percentage, number of fail/warn/pass results, Control types, and whether the controls are enabled.
