---
title: "Identity and Access"
diataxis: how-to
applies_to:
product: "nirmata-control-hub"
audience: ["platform-engineer"]
last_updated: 2026-04-16
url: https://docs.nirmata.io/docs/control-hub/identity-access/
---
> **Applies to:** Nirmata Control Hub 4.0 and later
---
Identity & Access Management lets you manage users, set user privileges, and configure access methods such as SAML, OIDC, and MFA.
Identity and Access Management allows you to configure:
1. Users
2. OpenID Connect (OIDC) based authentication
---
## API Tokens
A Nirmata API Token is an access key that is required to login to Nirmata Control Hub via NCTL, or to make raw API requests to Nirmata Control Hub. The API token is available in the Nirmata Control Hub profile.
### Generating API Tokens
To generate an API token in Nirmata Control Hub:
1. Go to **Settings**>**Profile**. The page displays all the information related to the Nirmata Control Hub profile along with the API key.
2. Click on the `Generate API Key` button located on the top right corner of the screen. A dialog box appears with a prompt to enter the password.
>Note: If an API Key was already generated and the generated token is within the expiry time, the API Key will be automatically fetched within the dialog box.
3. Next, enter the password set for the Nirmata Control Hub profile under the `Password` section and leave the `API Key` section empty.
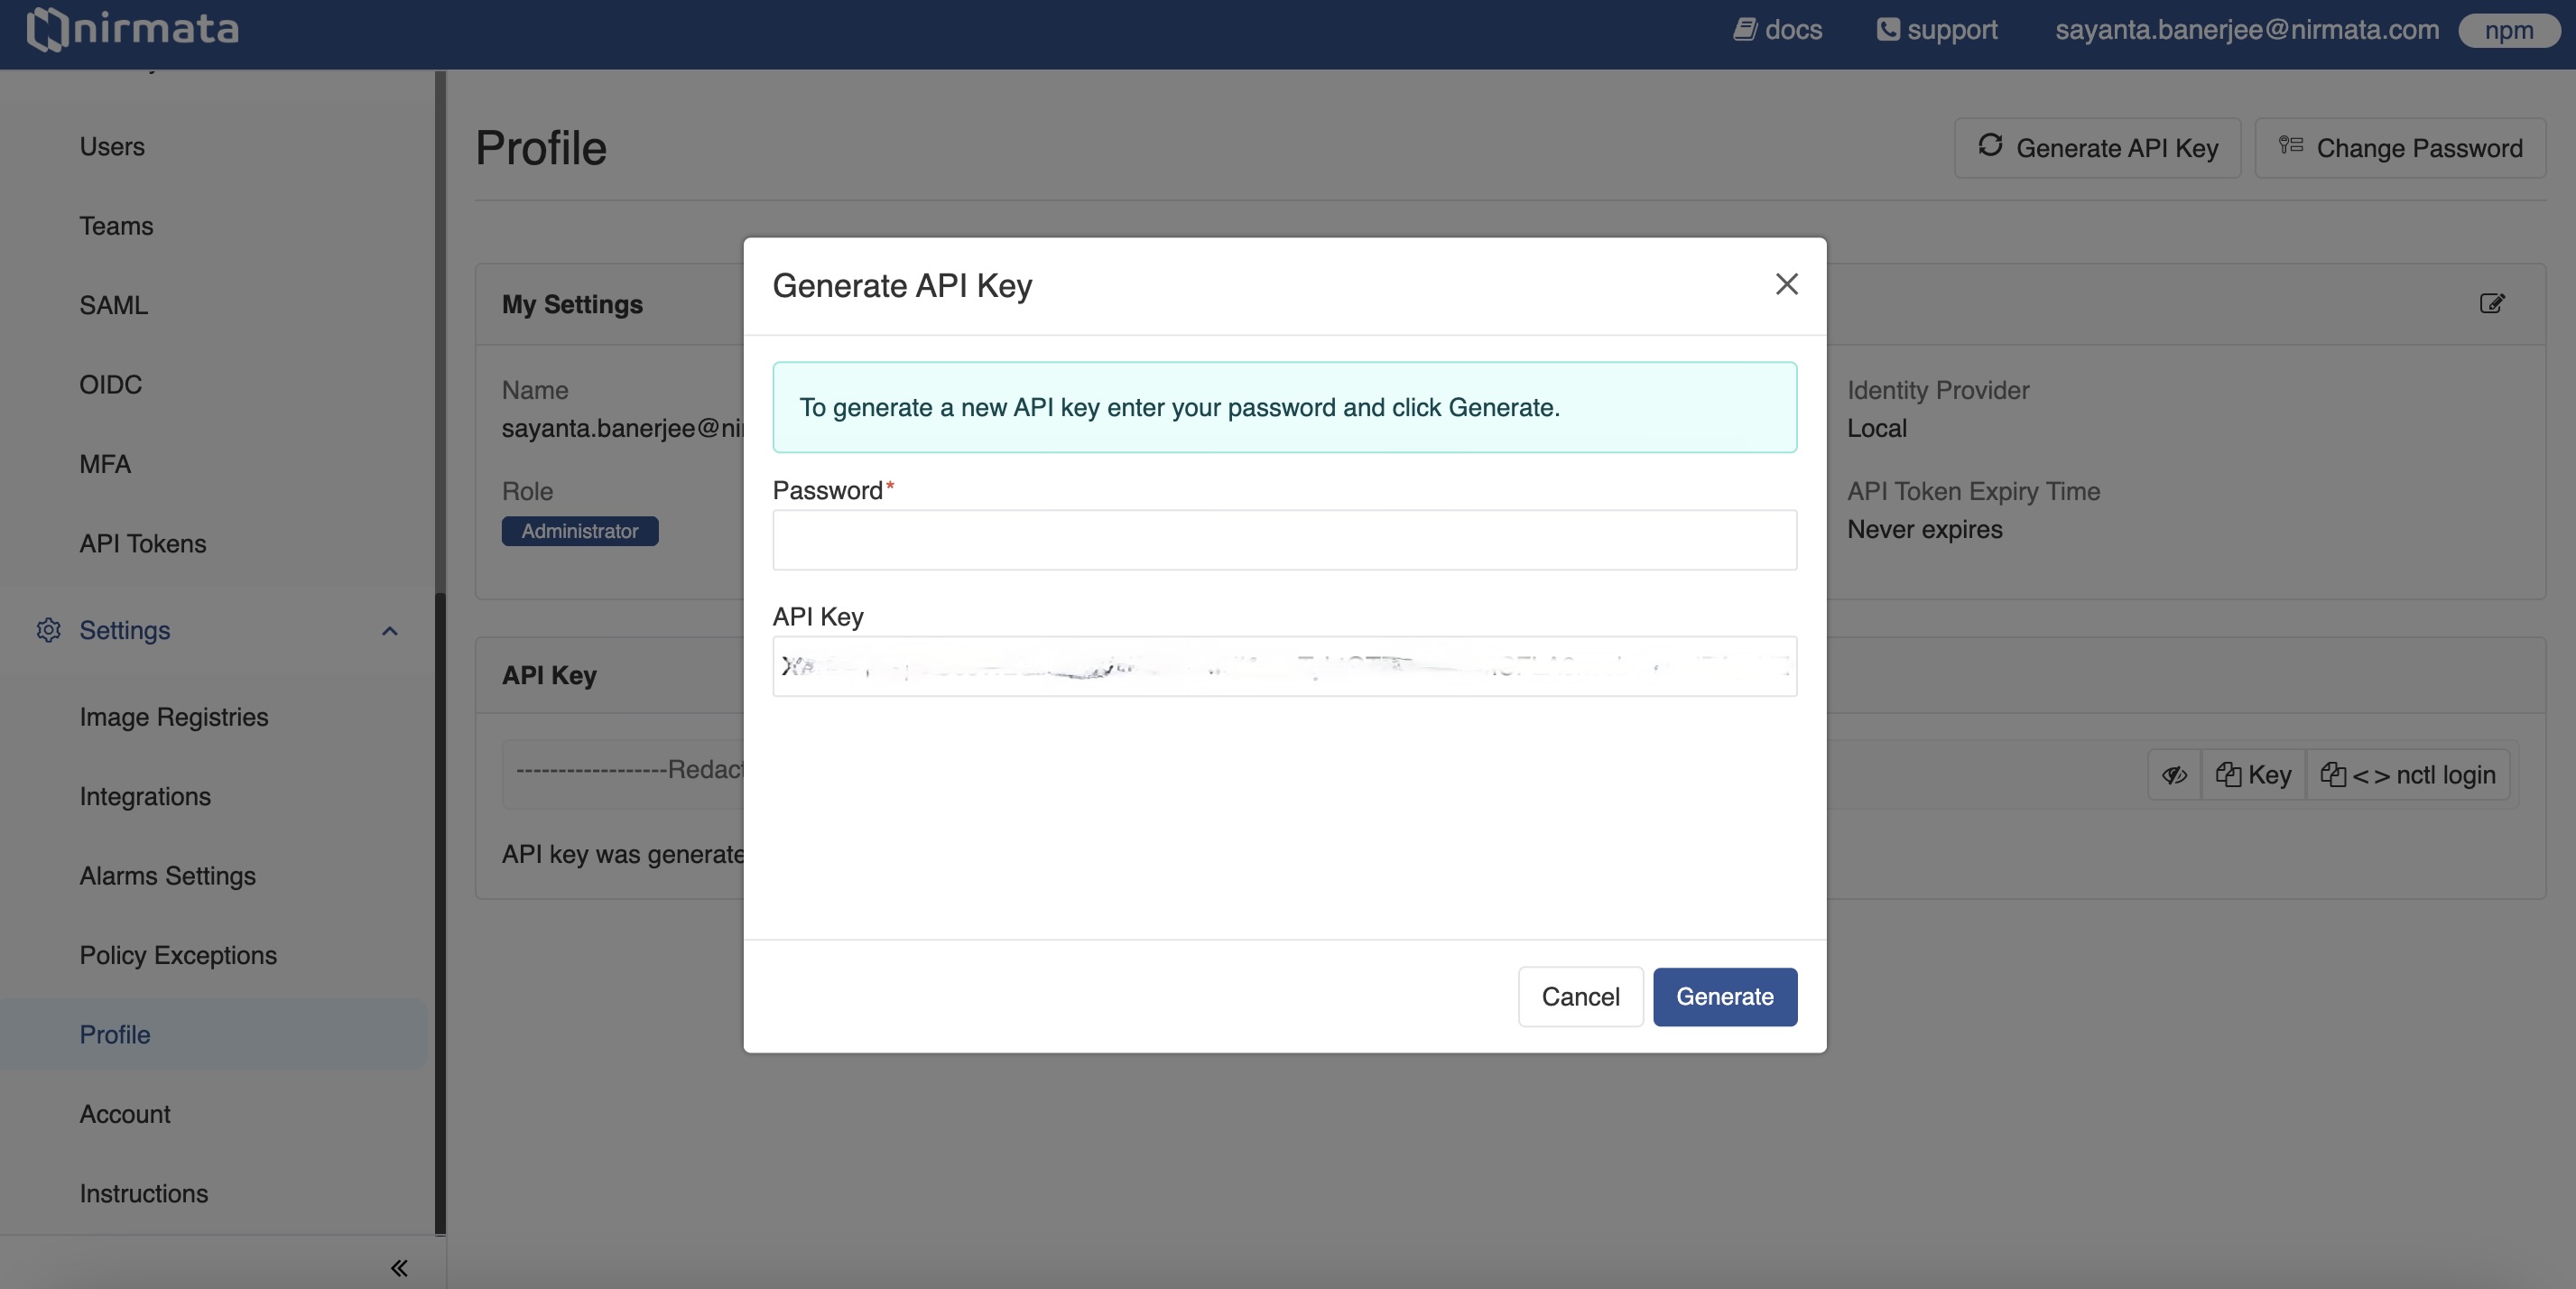
4. Finally, click **Generate** to generate a new API Key.
### Managing API Token Settings
A Nirmata Admin User can manage and review API Token settings as per requirements.
To manage API Token settings:
1. Go to **Identity & Access** -> **API Tokens**. The Settings page for API Tokens opens.
2. Manage the generation and usage of API Tokens for users by clicking the radio button beside the available options:
a. Selecting `None` will prevent all users from generating and using API Tokens.
b. Selecting `All users` will allow all users to generate and use API Tokens. Click the radio button beside `Token lifetime` to set a specific expiry time for API Tokens, or select `Never expires` to set tokens that don't expire.
c. Selecting `Selected users based on their` allows you to choose specific users based on their role and ID provider:
i. Select `Role` or `ID Provider` from the dropdown menu.
ii. Choose the specific role or ID provider from the next dropdown.
iii. Click the radio button beside `Token lifetime` to set a specific expiry time, or select `Never expires` to set tokens that don't expire for users of the selected role or ID provider.
iv. Click the `+` button to add additional roles or ID providers.
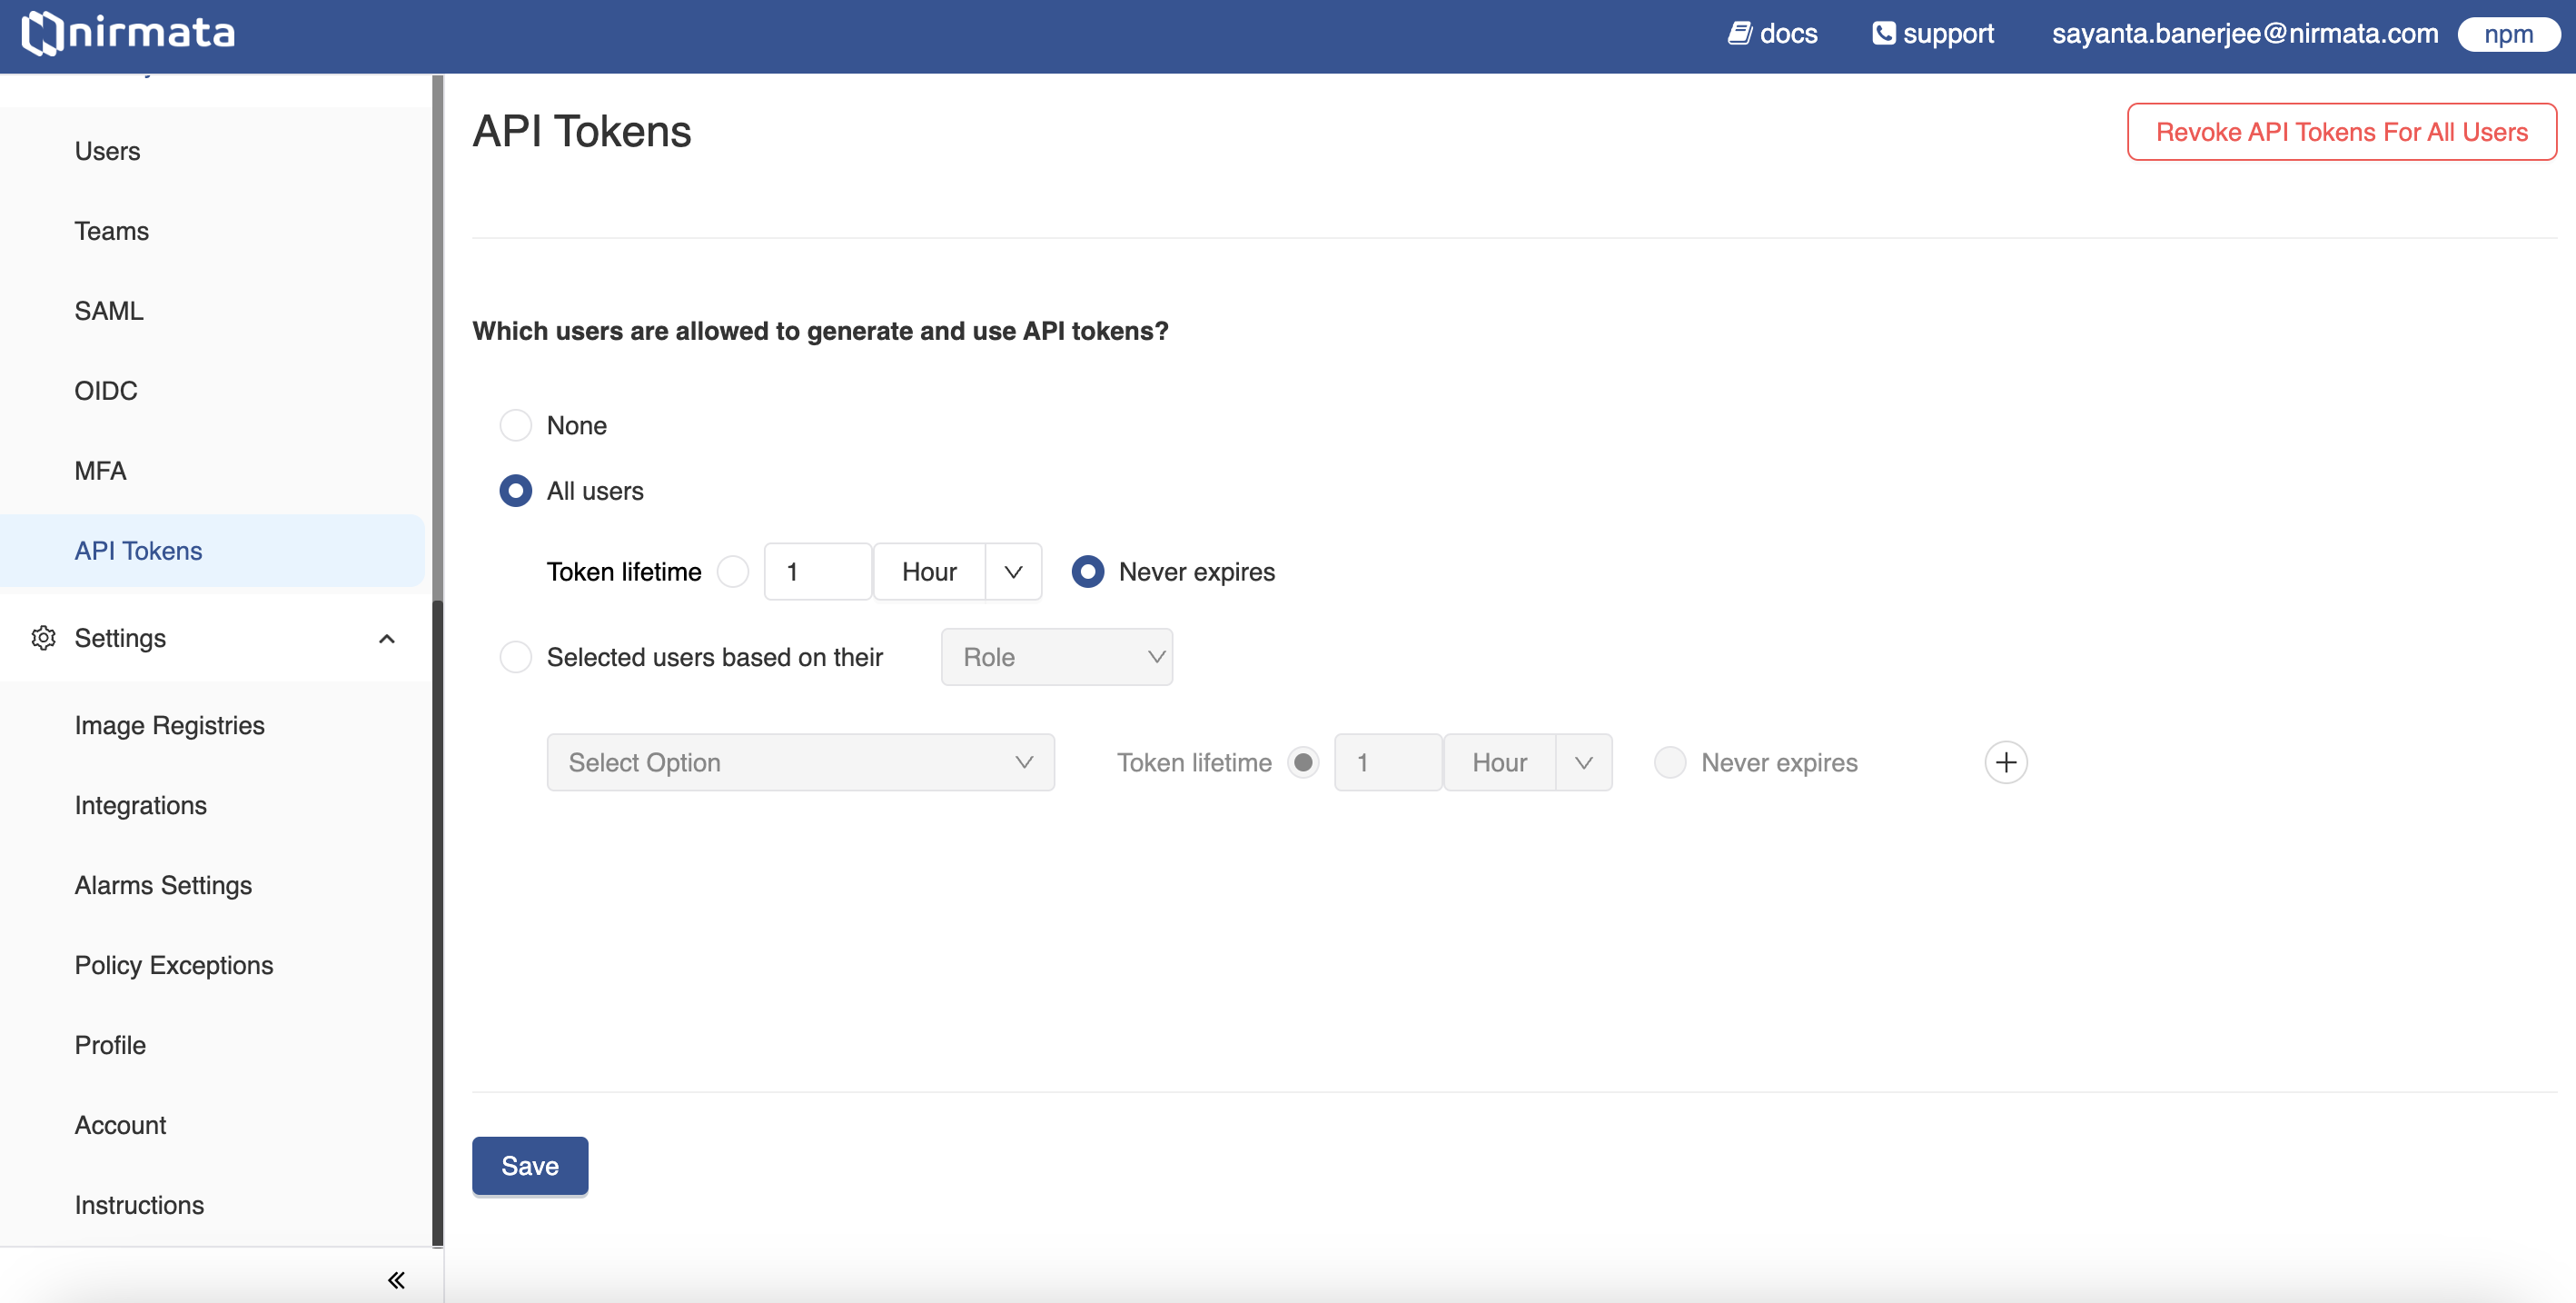
3. Click **Save**.
---
## Users and Roles
An account can have multiple users, and each user has a role that
defines what they can see and do. When a new account is created, the
first user has an *admin* role which allows that user to create and
manage additional users for the account.
## User roles and description
The following user roles are available:
Role | Description
-----|--------
**admin** | *admin* users have full access to the account and can manage other users and their access.
**platform** | *platform* users can access all resources including Compliance, Inventory Report, and Policies, but cannot manage users.
**security** | *security* users can view the Policy Report and manage Policy Exceptions. They have the privilege to review Policy Exception requests and have access to Compliance, Clusters, and Repositories, but cannot manage users.
**devops** | *devops* users have the least privileged access. A devops user can view the Policy Report and create Policy Exceptions. They do not have access to Compliance, Inventory Report, and cannot manage users.
## Configuring user roles and permissions
Identity & Access Management (IAM) lets you add users, set user privileges, group users in teams, and configure access methods such as Security Assertion Markup Language (SAML), OpenID Connect (OIDC), and Multi-Factor Authentication (MFA).
IAM offers configuration of:
1. Users and Roles
2. Teams
3. OpenID Connect based authentication
4. Multi-factor authentication
5. Granular IAM
6. Security Assertion Markup Language (SAML) based authentication
---
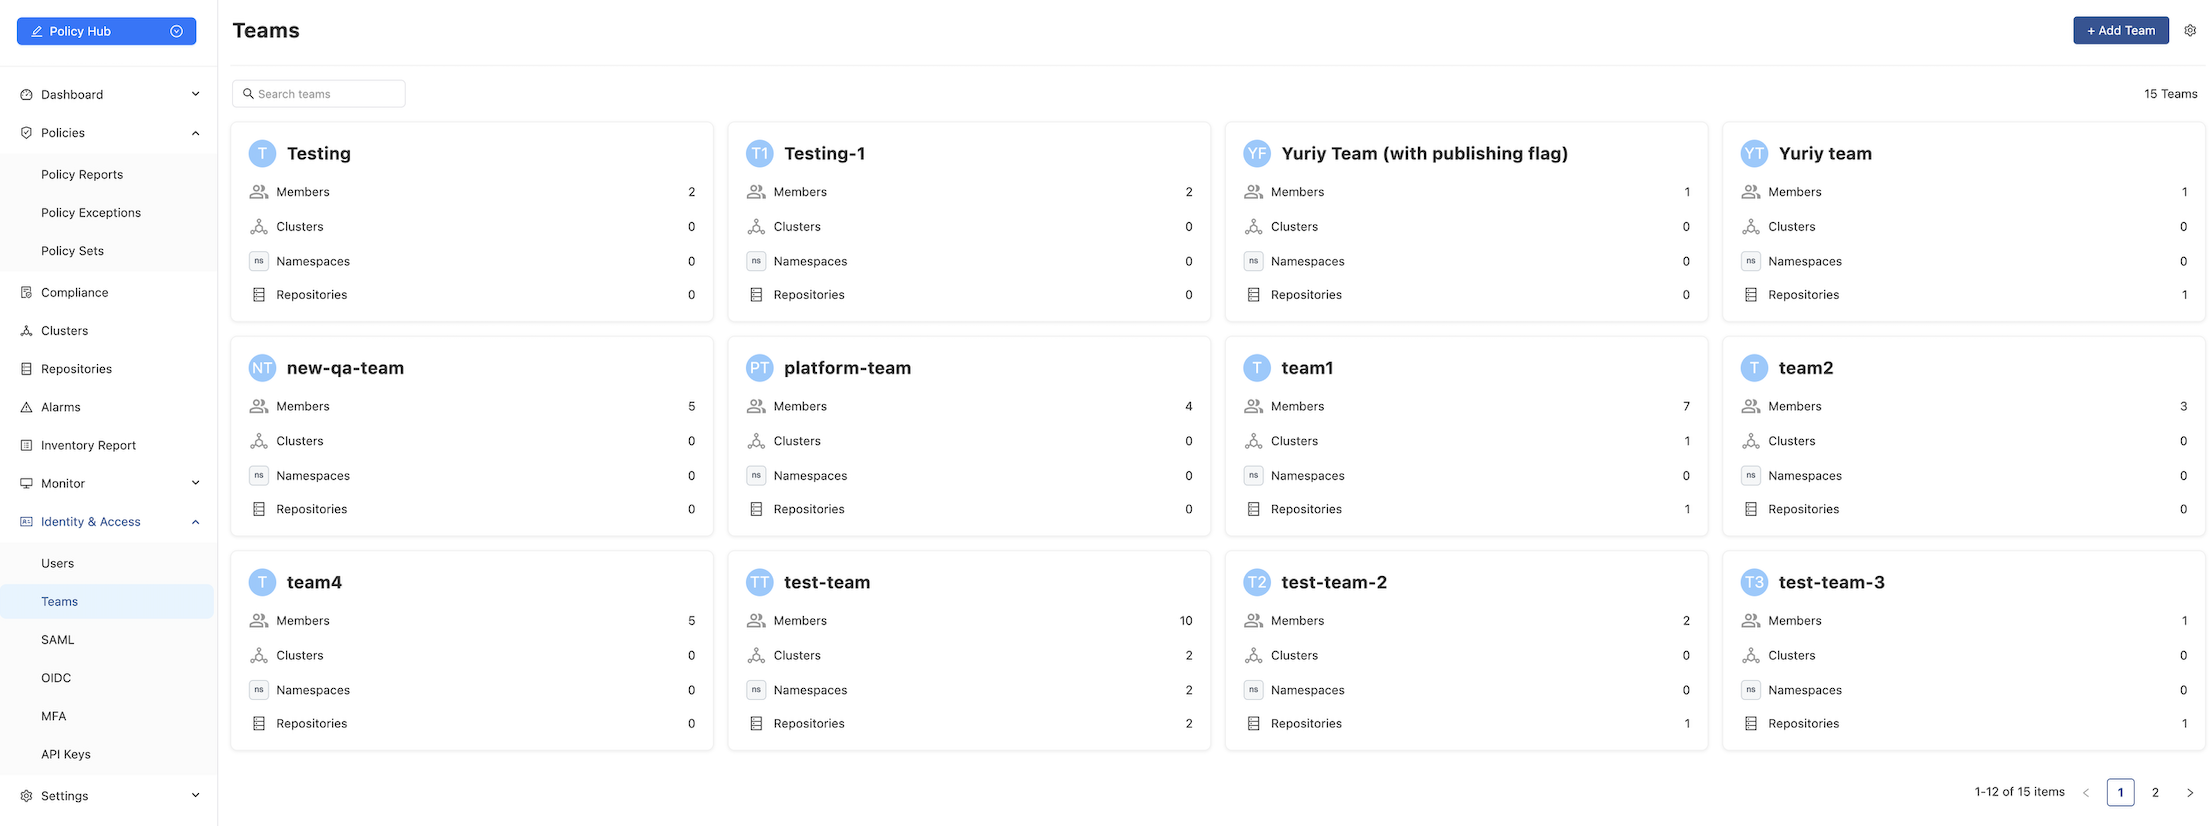
## Teams
In Nirmata, users can be organized into *teams*. A team is a logical entity that allows you to manage permissions for a group of users who require shared access to organizational resources. Each team can include multiple users, each with specific roles and permissions.
---
## Adding a Team
To create a new team:
1. Navigate to **Identity & Access > Teams**.
2. Click the **Add Team** button. The *Add a New Team* page will appear.
3. In the **Name** field, enter the team’s name.
4. In the **Description** field, provide a brief description of the team.
5. To add users:
- In the **Users** section, click the **Add Users** button.
- In the search field, enter the user’s name and select the checkbox next to it.
6. To assign namespace access:
- Click the **Add Access Control** button.
- In the search field, enter the desired namespaces and select the corresponding checkboxes.
7. Click **Create** to finalize the team.
---
## Editing or Deleting a Team
To edit a team:
1. Navigate to **Identity & Access > Teams**.
2. Click on the card for the team you wish to modify.
3. Edit the **Description** field as needed.
To add members:
4. Click the **+ Add Members** button.
- In the search field, enter the member’s name, select the checkbox, and click **Save**.
- Alternatively, select members from the list and click **Save**.
To delete a team:
5. Click the **three dots** icon in the upper-right corner of the screen and select **Delete Team**.
Confirm the action in the popup window.
---
## Email Notifications
To enable email notifications for a team:
1. Click the team name.
2. Click the **gear icon**, then select **Enable Email Notification**.
### Scheduling Email Notifications
To configure the scheduling email notification for sharing policy reports with teams via email:
1. From the main **Teams** page, click the **gear icon** in the top-right corner.
2. Enable the **Email Notifications** toggle.
3. Choose the frequency: *Hourly*, *Daily*, *Weekly*, or *Monthly*.
4. Set the preferred time for the email to be sent.
5. Click **Save**.
---
## Other Configuration
The Teams configuration page allows you to enable additional settings:
1. **Enable Auto Namespace Access**
This setting allows teams to automatically gain access to newly created namespaces.
- From the main **Teams** page, click the **gear icon**.
- Select the **Enable Auto Namespace Access** option.
2. **Enable Repository Publishing for All NPM Teams**
This setting allows DevOps users in all teams to scan repositories and publish them to NPM. A unique `repo-publish-team-key` is generated for each team.
- From the main **Teams** page, click the **gear icon**.
- Select the **Enable Repository Publishing for All NPM Teams** option.
---
## OpenID Connect (OIDC)
Nirmata allows administrators to configure end-user authentication and identity verification based on authentication performed by an Authorization Server. This feature provides an interoperable and REST-like authentication system.
### Setting up a user with OpenID Connect
To setup OIDC:
1. Go to menu option > **Identity & Access** > **OIDC**.
2. Click **Setup OIDC for single sign-on (SSO)**. The Update OIDC Settings window opens.
3. Update the OIDC Settings by entering the following details:
- *Name*
- *Client ID*
- *Secret*
- *Discovery URL*
- *Scopes*
- *Group Attribute Name*
- *JWS Algorithm*
4. Click **Add**.
---
## Security Assertion Markup Language (SAML)
By default, Nirmata uses a self-signed certificate for SAML signatures, as trust between entities is established externally. If your organization requires CA-signed certificates, you can configure them in SAML.
**NOTE:** You can optionally provide a custom certificate to be used for SAML signatures.